¶ 1. Overview
Within T6 Enterprise, in addition to the conventional login with username and password, we offer a flexible and secure approach to user authentication through multiple authentication providers. Our platform supports a variety of options to meet users' specific needs, including Active Directory, Azure Active Directory, Azure Active Federation Services, Auth0, Identity Server, and TryAuth. With these integrations, we simplify identity management and provide a unified and convenient login experience for users. Regardless of the choice, we ensure efficient implementation to protect data and facilitate user access.
¶ 1.1. Prerequisites
Our system prerequisites to proceed with the addition and configuration of authentication providers are being logged into T6 as an administrator user or having the Manage Authentication Providers feature enabled.
¶ 1.2. Available Providers
- Active Directory (AD): Microsoft's directory service that provides centralized authentication and authorization for users and computers in a Windows network;
- Azure Active Directory (AAD): Microsoft's cloud-based identity and access management solution;
- Active Directory Federation Services (ADFS): Allows the creation of an authentication federation between different organizations or domains. It supports protocols such as SAML (Security Assertion Markup Language) and OAuth 2.0, enabling users to authenticate to applications outside the corporate domain;
- Auth0: A cloud-based authentication and authorization platform that facilitates the implementation of secure login in applications;
- Try Auth: An authentication and authorization platform that supports various forms of authentication, including social networks, multi-factor authentication, and SSO (Single Sign-on).
The configuration of ADFS URLs will vary depending on how the provider is configured, whether it is set as default or not. If ADFS is not configured as default, the identifier code must be sent; otherwise, when it returns, it will not be able to identify which identifier will be used.
¶ 2. Configuration
We will add the providers so that they can be used for login.
-
Go to the main menu of the platform and select Authenticator under the Settings menu;
-
A panel will open on the side with a list of already registered providers, or an empty list for adding new providers. To add, click on
 ;
; -
The fields for entering information will be displayed.
-
In Type, click on
 to expand and display the available options:
- Form: For authentication using T6 platform username and password;
- OpenID Connect: Authentication protocol (OIDC) that allows users to authenticate with a login and password. It provides user profile information;
- SAML: Authentication federation protocol or standard based on XML (Extensible Markup Language) that allows an identity provider (IdP) to authenticate users;
- AD: Microsoft's directory service that manages users, groups, and network resources in Windows environments.
-
In SubType, click on
to expand and display the options:- Auth0;
- Azure Active Directory (AAD);
- TryAuth.
SubType will be available if you select the OpenID Connect type; otherwise, it will be disabled.
When selecting the OpenID Connect type along with the Azure AD subtype, the Authorization URL and Logout URL fields will be automatically filled in, as we will already have this information.
-
There are also fields for entering Title, Name, and Description, which will be displayed for all provider additions and must be filled out by the user;
- Title: The text displayed on the login screen along with the icon of the selected provider type;
- Name: An identifier for the list of added providers;
- Description: A field to briefly describe the provider in question, aimed at organizing the list of configured providers.
-
There is an option Default with a switch button
 , which when enabled, sets the provider for automatic authentication as an SSO, except for the Form option.
 -
Depending on the selected type, other fields for completion will be displayed:
- Selecting the OpenID Connect type:
- TenantID: A unique identifier for your organization's directory in the identity provider;
- Domain: Generally, the registered domain of your organization in the identity provider;
- ClientID: A unique public identifier for the application you registered with the identity provider;
- Client Secret: A private key that the application uses to authenticate with the identity provider;
- Authority URL: The authorization URL is the identity provider's endpoint used for authentication. It includes the TenantID (it is automatically filled when selecting the Azure Active Directory (AAD) or Auth0 SubType);
- Logout URL: The logout URL is used to redirect the user to log out from the identity provider.
- Selecting the SAML type:
- Certificate: Used to verify the signature of SAML responses sent by the identity provider. It ensures that the SAML responses have not been altered and are from a trusted identity provider (The certificate name used must exactly match the certificate registration in T6 Enterprise);
- Login URL: The endpoint where SAML authentication requests are sent. It is the address of the identity provider where users will be redirected to log in;
- Logout URL: The endpoint where SAML logout requests are sent. It allows users to log out from the identity provider.
- Selecting the AD (Active Directory) type:
- Server: The address of the server where the AD is hosted. It can be a fully qualified domain name or an IP address;
- User: The username of an account with permissions to query the AD. This account will be used to connect to the AD and perform authentication and query operations;
- Password: The password associated with the aforementioned user account;
- Group: The name of the group in AD that contains the user you want to authenticate or authorize.
To enable login through AD, the provider must be configured as default.
When selecting the AD (Active Directory) type, you must fill in the Application Parameter: Active Directory Sysphera Group, located in the Integration category. The parameter must be entered exactly with the same name configured in the Group field of the authentication provider. Remember that the value is case sensitive, it distinguishes between uppercase and lowercase letters.
- Selecting the Form type, no additional fields will be displayed.
The fields displayed when selecting the provider type should be filled out according to the configuration required by the authentication provider.
- To complete the addition of a provider, after filling in the requested data, click on
 .
.
¶ 2.1. Viewing, Editing, and Deleting
After adding one or more authentication providers, in our panel we will have a list of registered providers, displaying the name, type, and description. Next to the information, we will have:
 : Buttons for sorting the display of providers on the login screen (these will only be displayed if we have 2 or more registered providers);
 : Button that allows editing the entered data;
 : Button to delete a previously registered provider.
¶ 3. Usage
After registering the desired providers, on the environment’s login screen, the configured providers will be displayed below the username and password input fields:
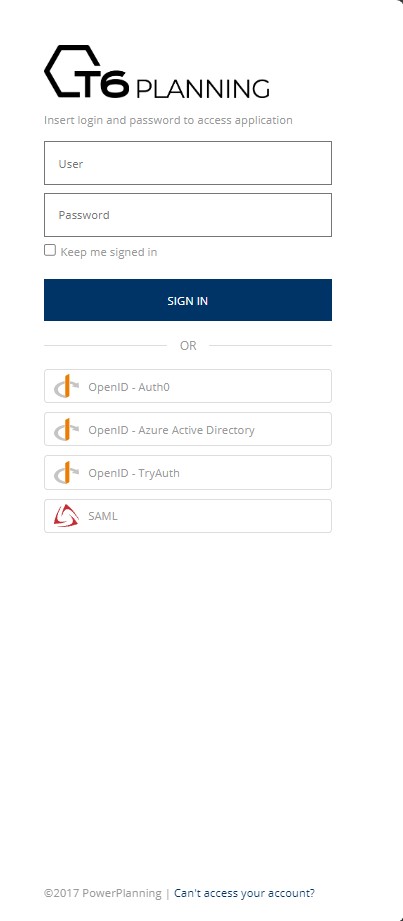
When we click on one of the displayed providers, we will be redirected to the login screen of the respective provider.
The AD (Active Directory) provider is not displayed on the login screen since selecting it as the default provider will automatically log in when accessing the T6 URL.