¶ 1. Overview
Scheduling in T6 allows you to configure automatic workflow executions at scheduled times. This tool is essential to ensure that recurring processes are carried out in an organized manner without the need for manual intervention.
Users can define the execution frequency of workflow triggers and enable notifications to monitor task execution.
¶ 1.1. Prerequisites
The user must be in a Global Group, with the Administrator feature: Manage Schedules enabled;
¶ 2. Usage
To create a schedule in T6, we need a workflow trigger created so that it can be linked to the schedule.
1. In the T6 main menu, in the Settings section, select the Scheduling option;
- A panel will open on the side where we will configure our schedule. If there are already created schedules, they will be displayed on this screen as a list.
2. To create our schedule, click the button  ;
;
- We will enter the Edit/Create Schedule screen.
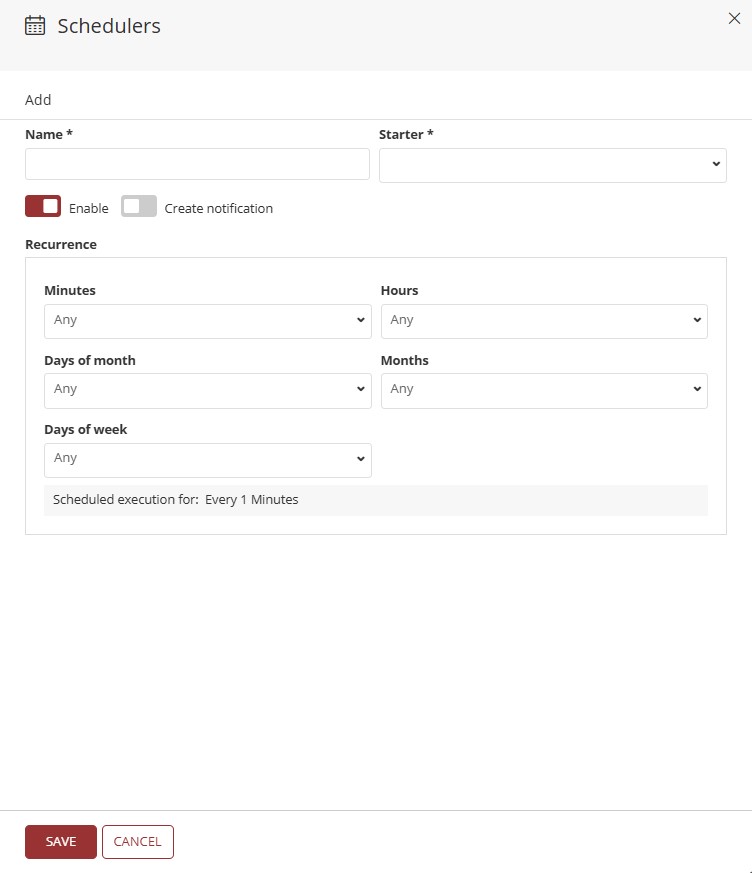
3. In Name, define the name for the schedule;
4. In Starter, click the dropdown and select the workflow trigger to which the schedule will be linked;
- There are two switch buttons, Enabled and Create Notification;
-
Enable: When marked as active, the schedule will be programmed to execute according to the defined recurrence. If disabled, the schedule will be created but will not execute until the flag is enabled;
-
Create Notification: When marked as active, whenever a schedule is executed, it will generate a notification for the user who created the schedule;
-


5. There is a Recurrence field where we define the execution frequency;
If all recurrence fields are set to Any, the execution will occur every day, every minute.
- In recurrence, we have the fields Minutes, Hours, Days of the Month, Months, and Days of the Week, all with a dropdown that allows multi-selection of values;
-
In Minutes, expanding the dropdown reveals the following options: Any, the numbers representing each minute (0 to 59), and options like Every 2 minutes, Every 3 minutes, Every 4 minutes, Every 5 minutes, Every 10 minutes, Every 15 minutes, Every 20 minutes, and Every 30 minutes;
-
In Hours, expanding the dropdown reveals options like Any, the numbers representing each hour (0 to 23), and choices such as Every 1 hour, Every 2 hours, Every 3 hours, Every 4 hours, Every 5 hours, Every 6 hours, Every 8 hours, and Every 12 hours;
-
In Days of the Month, expanding the dropdown reveals options like Any, the numbers representing each day of the month (0 to 31), and choices such as Every 1 month, Every 2 months, Every 3 months, Every 4 months, Every 5 months, Every 6 months, Every 8 months, and Every 10 months;
-
In Months, expanding the dropdown reveals options like Any, January, February, March, April, May, June, July, August, September, October, November, and December;
-
In Days of the Week, expanding the dropdown reveals options like Any, Sunday, Monday, Tuesday, Wednesday, Thursday, Friday, and Saturday;
-
All dropdowns in the Recurrence field allow multi-selection of values. However, it is advisable to schedule executions at times that will not impact the environment, as each scheduler runs only one instance at a time, which may cause system slowdowns.
Below, a line informs us how the schedule is configured: Scheduled execution for: ...;
For example:
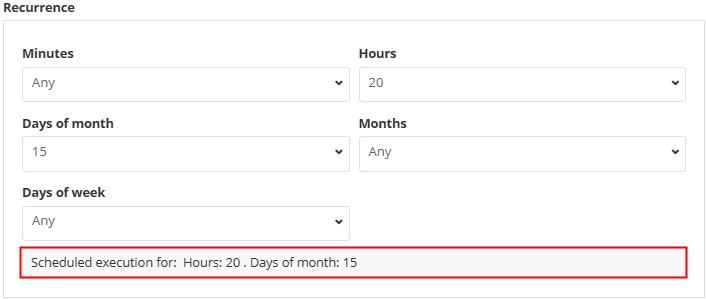
In the example above, a schedule is set to execute on the 15th day of every month at 8 PM.
6. After completing, click Save;
- You will be redirected back to the list of created schedules.
In the schedule list, Name, Starter, and Recurrence are displayed. Next to each schedule name, there is an icon representing the status of each registered schedule;
- Success:
 Displayed according to the last execution performed;
 - Error:
 Displayed according to the last execution performed;
 - Running/Executing:
 Displayed whenever the schedule process is executing;
 - Waiting:
 Displayed when the schedule has the Enable flag inactive;
Also, next to each schedule, there are options for Execution History, Edit, and Remove;
- Clicking
 redirects to the Execution History screen, detailing schedule executions, showing Start date and time, Duration in seconds, and Result, displaying success or an error stack if any;
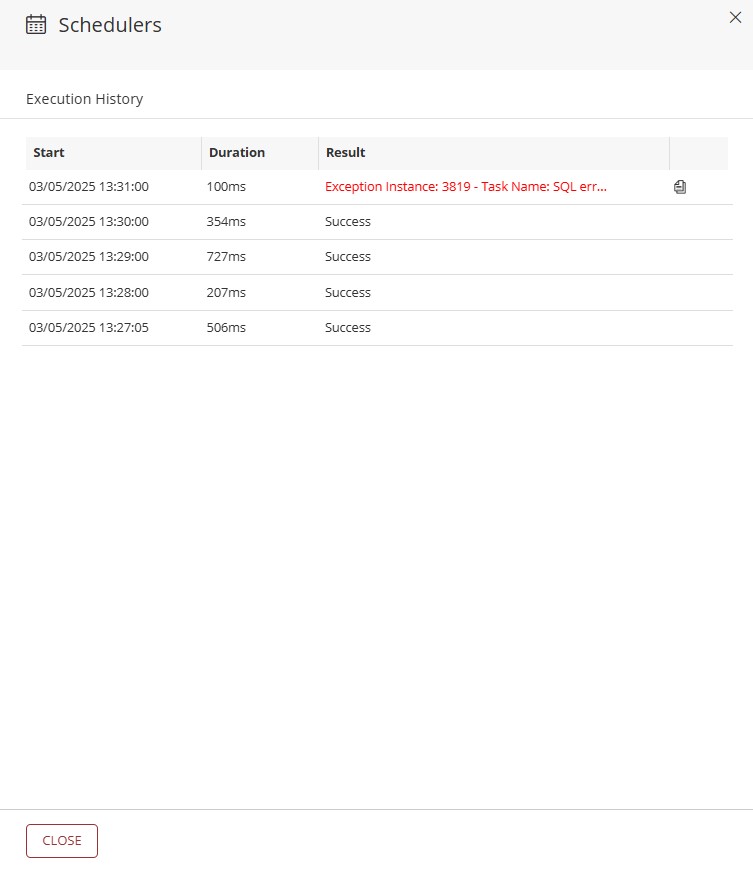
If an error stack is displayed, for better visualization, you can copy it by clicking
.
-
Clicking
 redirects to the Edit screen, allowing you to change the schedule's name, trigger, and recurrence;
 -
Clicking
 will delete the schedule.
¶ 3. Q&A
Frequently Asked Questions
1. What are Schedules in T6?
Schedules in T6 allow you to configure automatic executions of workflows at scheduled times, ensuring that recurring processes are performed in an organized manner.
2. What are the prerequisites for creating a schedule?
To be able to create a Schedule in T6, the user must be in a Global Group with the Administrator feature: Manage Schedules enabled.
3. How can I create a new schedule?
To create a new Schedule, follow the steps below:
- In the T6 Main Menu, access Settings;
- Select the Schedule option;
- Click the button to add a new schedule;
- Fill in the Name, Trigger fields and define the Recurrence;
- Check the Enabled and Create Notification options as desired;
- Click Save to complete the schedule creation.
4. What happens with the Schedule if I leave all recurrence fields with the Any option?
If all recurrence fields in the Schedule are set to Any, the execution will be performed every day every minute.
5. How can I enable notifications for a schedule?
When creating or editing a schedule, check the Create Notification option to receive notifications whenever the schedule is being executed.
6. What does the error icon next to a schedule mean?
The error icon next to a Schedule indicates that there was a problem in the last execution of the schedule, we can check the error details in the execution history and copy the error stack for analysis.
7. How can I view the execution history of a schedule?
To view the execution history of a Schedule, click the history icon next to the schedule to access the screen that details the executions, including date, duration, and result.
8. Is it possible to edit an existing schedule?
Yes, to edit an existing schedule you can click the edit icon next to the schedule to change the name, trigger, and recurrence.
9. What should I do if a schedule is not being executed?
If a schedule is not being executed, check if the Enabled flag is checked. If it is not, the schedule will not be executed until it is activated.
10. How can I delete a schedule?
To delete a Schedule, click the delete icon next to the schedule you want to delete to remove it.