¶ 1. Abstract
The Client Gateway is designed to be installed in the client's environment and allows for remote data loading tasks. It acts as an intermediary between the server and the client, fetching data based on the server-provided configuration and returning the requested data. This manual provides detailed information on how to install the Client Gateway on Windows and Linux operating systems, along with the necessary prerequisites such as software, hardware, and firewall settings. Additionally, the manual explains how to configure the Client Gateway, detailing the parameters that need to be filled in. The manual also covers monitoring the Client Gateway, explaining how to use health check parameters to verify the connection with the server.
¶ 2. Client Gateway
¶ 2.1 Overview
The Client Gateway is an executable created by T6 Planning to be installed in the client's environment. It enables remote data loading tasks.
When running, it listens for any SQL task requested by the server. It is responsible for retrieving data according to the server-provided configuration and returning the retrieved data.
¶ 3. Installation
¶ 3.1 Overview
The installation of the Client Gateway is straightforward, simply unzip the files and run the ClientGateway.exe. However, before launching the Client Gateway, you need to configure the parameters, which will be explained in the next section.
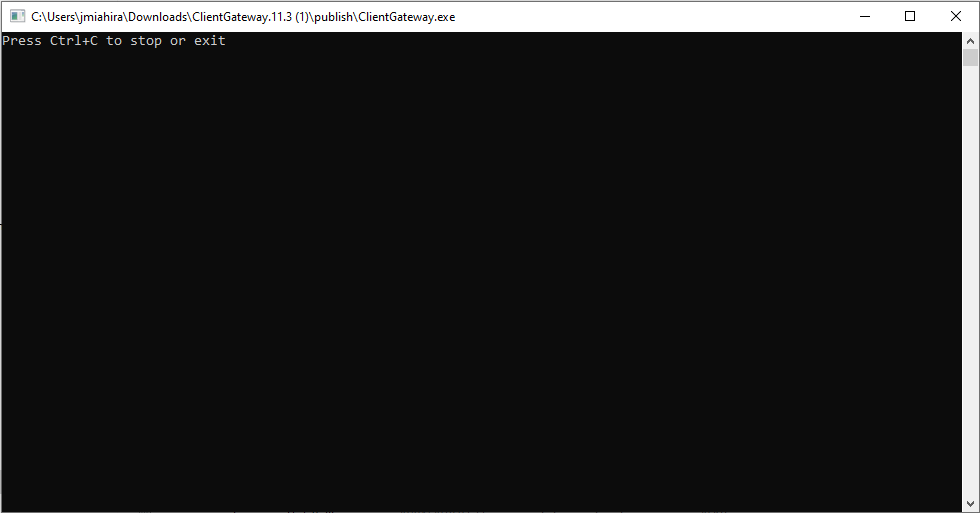
The Client Gateway is an application that runs in the background. To terminate the application, switch to the window where it is running and use the CTRL+C command. Below is an image of the terminal that opens when starting the Client Gateway.
The Client Gateway is available for both the Windows and Linux operating systems. Install it according to your operating system. There is no need to install other packages as prerequisites.
¶ 3.2 Prerequisites for Installation
¶ 3.2.1 Software
Before starting the installation, you need to download the Client Gateway file corresponding to your Linux or Windows operating system. However, your operating system must support one of the TLS 1.2 or 1.3 ciphers used by T6 Planning:
Client Gateway:
- Windows: https://powerplanningartifacts.blob.core.windows.net/public/ClientGateway.zip
- Linux: https://powerplanningartifacts.blob.core.windows.net/public/ClientGateway.tar.gz
TLS 1.2:
- TLS_ECDHE_RSA_WITH_AES_128_GCM_SHA256 (0Xc02f) ECDH x25519 (eq. 3072 bits RSA) FS;
- TLS_ECDHE_RSA_WITH_AES_256_GCM_SHA384 (0Xc030) ECDH x25519 (eq. 3072 bits RSA) FS;
- TLS_ECDHE_RSA_WITH_CHACHA20_POLY1305_SHA256 (0Xcca8) ECDH x25519 (eq. 3072 bits RSA) FS.
TLS 1.2:
- TLS_AES_256_GCM_SHA384 (0x1302) ECDH x25519 (eq. 3072 bits RSA) FS;
- TLS_CHACHA20_POLY1305_SHA256 (0x1303) ECDH x25519 (eq. 3072 bits RSA) FS;
- TLS_AES_128_GCM_SHA256 (0x1303) ECDH x25519 (eq. 3072 bits RSA) FS.
Firewall port 443 also needs to be open.
¶ 3.2.2 Hardware
Recommended:
- 4 GB of disk space for logs;
- A 4-core CPU;
- 8GB of memory.
¶ 3.3 Configuration
There is a configuration file that needs to be filled out for the Client Gateway to function. Below, we will show where this configuration file is located and provide details for each parameter that needs to be filled in.
In the unzipped folder containing the Client Gateway files, look for the appsettings.json file. Open it in a text editor, preferably one that reads JSON files.
The image below shows all the parameters currently present in the Client Gateway, based on the version used in this manual.
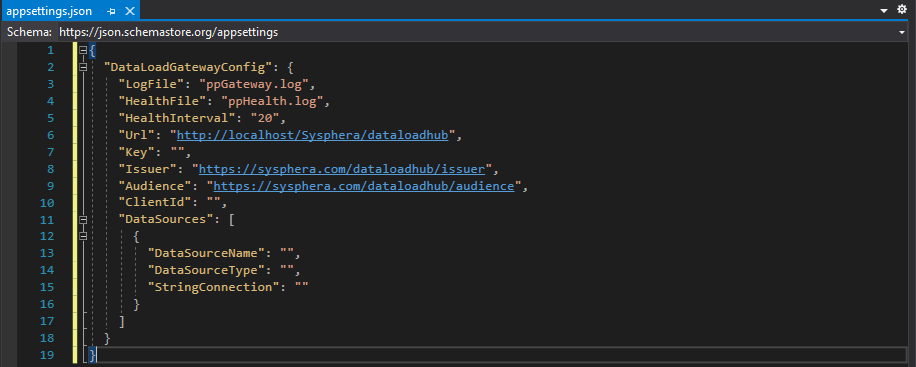
Describing each parameter in the image:
- LogFile: Specify a name for the log file. This file will record recurring information about the Client Gateway.
- HealthFile: Specify the name of the file used for health checks.
Both LogFile and HealthFile can accept full paths where the files should be saved. However, relative paths are also accepted, and in this case, the folder from which the Client Gateway was called will be considered to form the absolute path.
- HealthInterval: Interval between health check inspections. An optional parameter with a default value of 20 minutes.
- Url: Specify the URL of the T6 Planning UX application, ending with
/dataloadhub/. This parameter indicates the location on the server with which the Client Gateway will communicate.
Three parameters with values that do not need to be changed:
- Key: The value of this key will be provided by the implementation team.
- Issuer: https://Sysphera.com/dataloadhub/issuer
- Audience: https://Sysphera.com/dataloadhub/audience
The parameters that follow should be filled with the values used in the creation of "Remote Data Load" in T6 Planning.
- ClientId: This is the Identifier of the Remote Data Load;
- DataSources: Each datasource has three pieces of information that need to be filled according to the values used in the creation of the "Remote Data Load". They are:
- DataSourceName: ""
- DataSourceType: ""
- StringConnection: ""
You can have multiple datasources. Just add them to the file following the JSON formatting.
The image below shows an object of the Remote Data Load type created within T6 Planning, from which we will take the values to configure the parameters mentioned earlier.
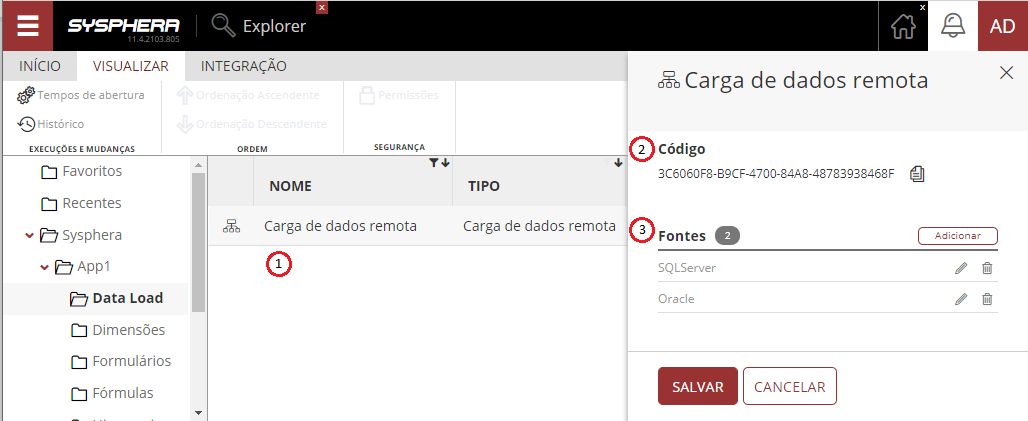
- Object created for Remote Data Load;
- Code generated when saving a Remote Data Load;
- List of available data sources for this data load.
Taking these values and assigning them to the parameters mentioned earlier:
ClienteId: “3C6060F8-B9CF-4700-84A8-48783938468F”
“DataSources”: \[
{
“DataSourceName”: “SQLServer”,
“DataSourceType”: “SQLSERVER”,
“StringConnection”: “Data Source=192.168.225.150;Initial Catalog=DEV\_T6 Planning;Trusted\_Connection=false;Persist Security Info=True;User ID=developer;Password=developer1234”
},
{
“DataSourceName”: “Oracle”,
“DataSourceType”: “ORACLE”,
“StringConnection”: “Data Source=OracleConnection;User ID=developer;Password=developer1234”
}
\]
¶ 4. Monitoring
¶ 4.1 Overview
Regarding monitoring, we bring back the two parameters mentioned in the configuration chapter: HealthFile and HealthInterval.
At predefined intervals (HealthInterval), the Client Gateway will append the current date and time to the file (HealthFile) in a new line, successively, while the connection with the server is established. An external health check tool can verify the last modification date of the file or check the date/time contained in the last line of the file. If you want to pinpoint past failures, you can check the differences between lines in the file.
¶ 5. Running as a Service
¶ 5.1 Overview
The Client Gateway can also be started as a service. Once the service is created, you can configure the type of startup, choosing between automatic or manual initialization.
SC.exe is an executable that comes with the Windows operating system. We will use this executable to register the Client Gateway in the Service Control Manager. SC.exe supports Event Viewer, meaning that service-related information can be logged and viewed in Windows Logs.
¶ 5.2 How to Run the Client Gateway as a Service (Windows)
Here are the steps to register the Client Gateway as a Windows service.
- Open a Windows terminal with administrator privileges;
- In the command prompt, type the syntax:
sc.exe create NewService binpath= c:\windows\system32\NewServ.exe,
where NewService is the name of the service you want to create, and as the value for binpath, assign the full path to the Client Gateway executable; - Press Enter, and the new service will be listed in the Windows service screen.
SC.exe has other parameters that can be used in service creation. In the step-by-step described above, these are the minimum mandatory parameters to register a service. You can learn more about the other parameters at the following link:
https://docs.microsoft.com/pt-BR/windows-server/administration/windows-commands/sc-create
The command to remove the created service is: sc delete _ServiceName_ where ServiceName is the name of the service you want to remove.
¶ 5.3 How to Run the Client Gateway as a Service (Linux)
Here are the steps to register the Client Gateway as a Linux service.
- Open a terminal prompt with administrator privileges;
- In the command prompt, navigate to the path:
/bin/release/netcoreapp3.1/linux-x64/publish/; - Execute the command:
vim appsettings.json; - Configure the Data Sources to be used;
- After configuring appsettings.json, execute the vim command:
(Sysphera-client-gateway.service)for editing theSysphera-client-gateway.serviceservice file that will be located in the directory:/etc/systemd/system; - The service file should be edited as follows:
[Unit]
Description=Start the SyspheraClientGateway
[Service]
Type=simple
User=root
ExecStart=/Sysphera/bin/release/netcoreapp3.1/linux-x64/publish/ClientGateway
Restart=always
RestartSec=1800
[Install]
WantedBy=multi-user.target
7. To complete, execute the command: systemctl enable Sysphera-client-gateway.service. This command will enable the service automatically in case the server restarts.