¶ 1. Overview
Data Link is the tool used by T6 to move data between applications.
For example: A company has two T6 applications, one for headquarters financial control and another for a branch. Using Data Link, it is possible to automatically copy registered expense information from the headquarters application to the branch application, ensuring both use the same up-to-date data for consolidated analysis.
¶ 2. Features
Using the Data Link tool, you can perform the following tasks:
- Create and manage data links to load information from specific contexts of other T6 applications;
- Copy data between applications, both in the same database and in separate databases. Data copying enables integration of two or more applications within the same project.
¶ 2.1. Prerequisites
To create and use this feature, some user permissions must be enabled.
In Manager permissions, the user must have the following permissions enabled:
The user must also be associated with a Global Group with the following manager permission enabled:
The following Preview Feature must also be enabled:
To use this feature in T6, a source application and a destination application are required. Therefore, the user must be associated with both applications that will be used.
¶ 3. Creation and Usage
Below are the steps to create and use a data link in T6.
¶ 3.1. Creating a Data Link
To create a data link, follow these steps:
- In the T6 main menu, access Explorer;
- On the left side of the screen, select the folder where the data link will be created;
- In the ribbon, click New Item, expand Data Load, and select Data Link;
- Select the created data link and click Edit in the ribbon;
- After clicking Edit, a new screen opens to configure Data Link properties and mapping;
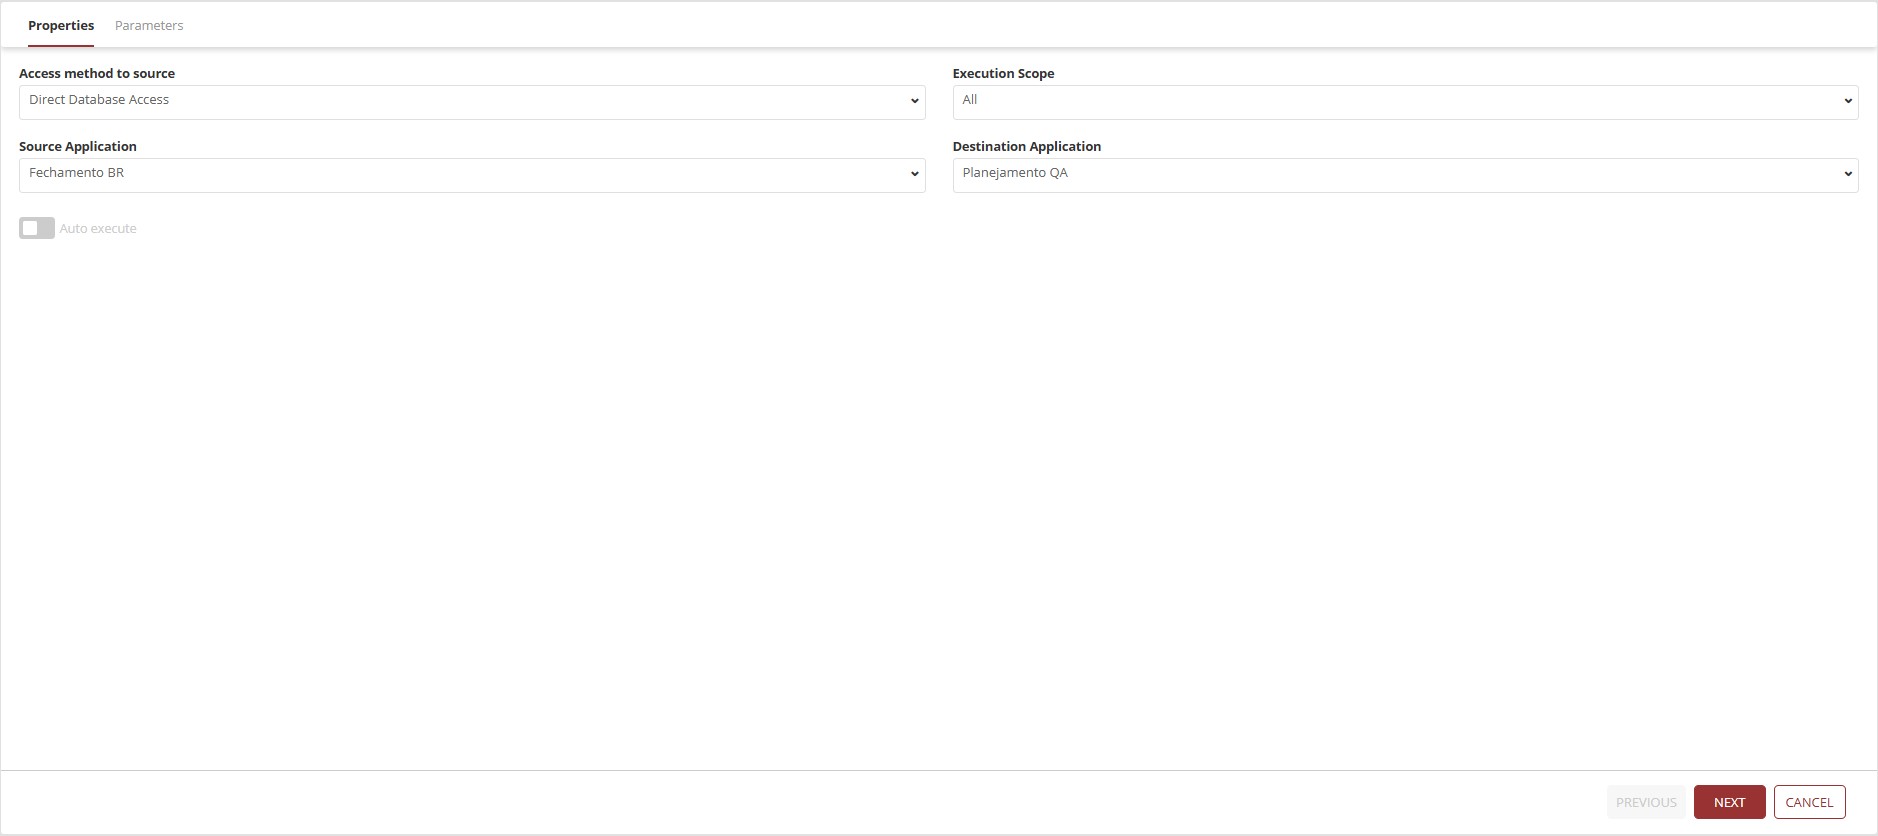
- In the properties step, configure Source Access Method, Execution Scope, Source Application, and Destination Application;
- In Source Access Method, changes are not allowed, since only Direct Database Access is used;
- Data copying with this access type is done through SQL queries directly in the database;
- In Execution Scope, click the dropdown and select one of: All, Planned, or Actual;
In an application, there are always 3 scenario options: Planned, Actual, and Closed. The Closed scenario is never copied.
- In Source Application, click the dropdown and select the application from which data will be copied;
- Still on the properties screen, there is a Run Automatically switch. When enabled, manual execution is not required. When data changes in the source, the product detects the need and executes the data link automatically;
EXAMPLE:
When data is saved in a form, the system identifies that the form is a source premise for a data link, recognizes the existing data link, and runs it automatically. The value reaches the destination in real time.
- Click Next to move to Configure Parameters;
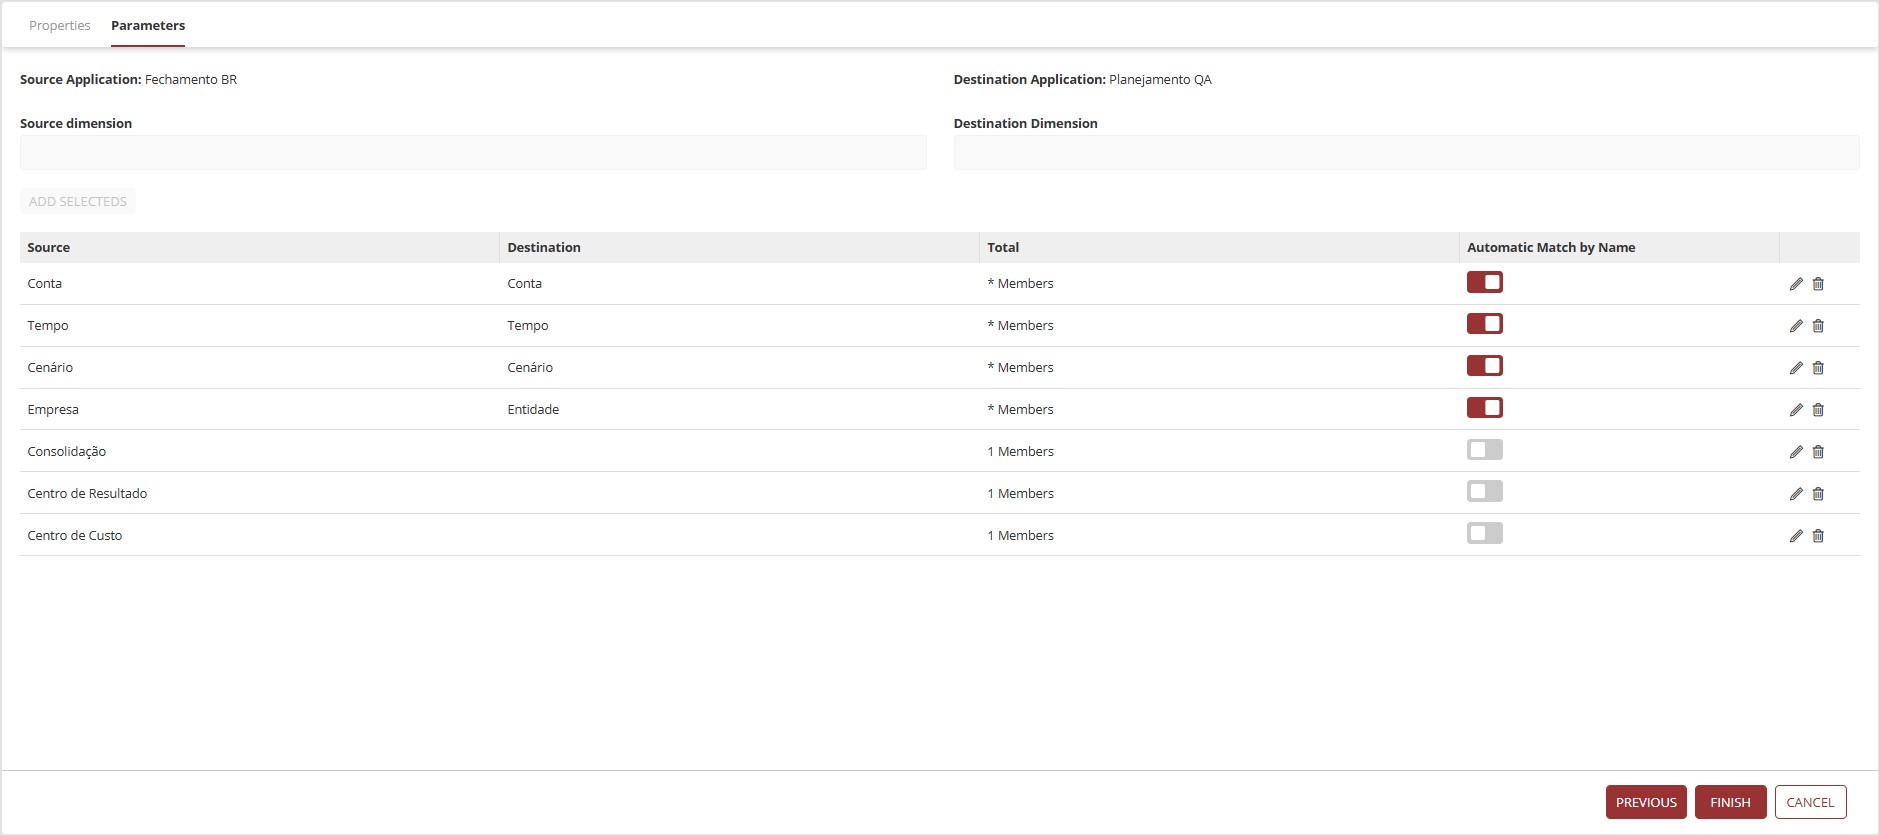
- In Configure Parameters, select one source dimension and one destination dimension from dropdowns, then click Add;
-
By default, all mapping is performed by name. Dimensions with different names are mapped individually;
-
In the dimensions list, you have Source, Destination, Total, and Automatically Associate by Name;
- Source: Source dimension selected earlier;
- Destination: Destination dimension selected earlier;
- Total: Number of members affected by the data link;
- Automatically Associate by Name: Switch next to each listed dimension. If enabled, it ignores manual member mapping (members are mapped at execution time by name; when running the data link, source and destination members are identified and linked during execution);
Automatically Associate by Name only copies members with exactly the same name. If the name differs, nothing is copied.
- To manually map members for each dimension, click
 ;
;
- A new screen opens to map members of the selected dimension;
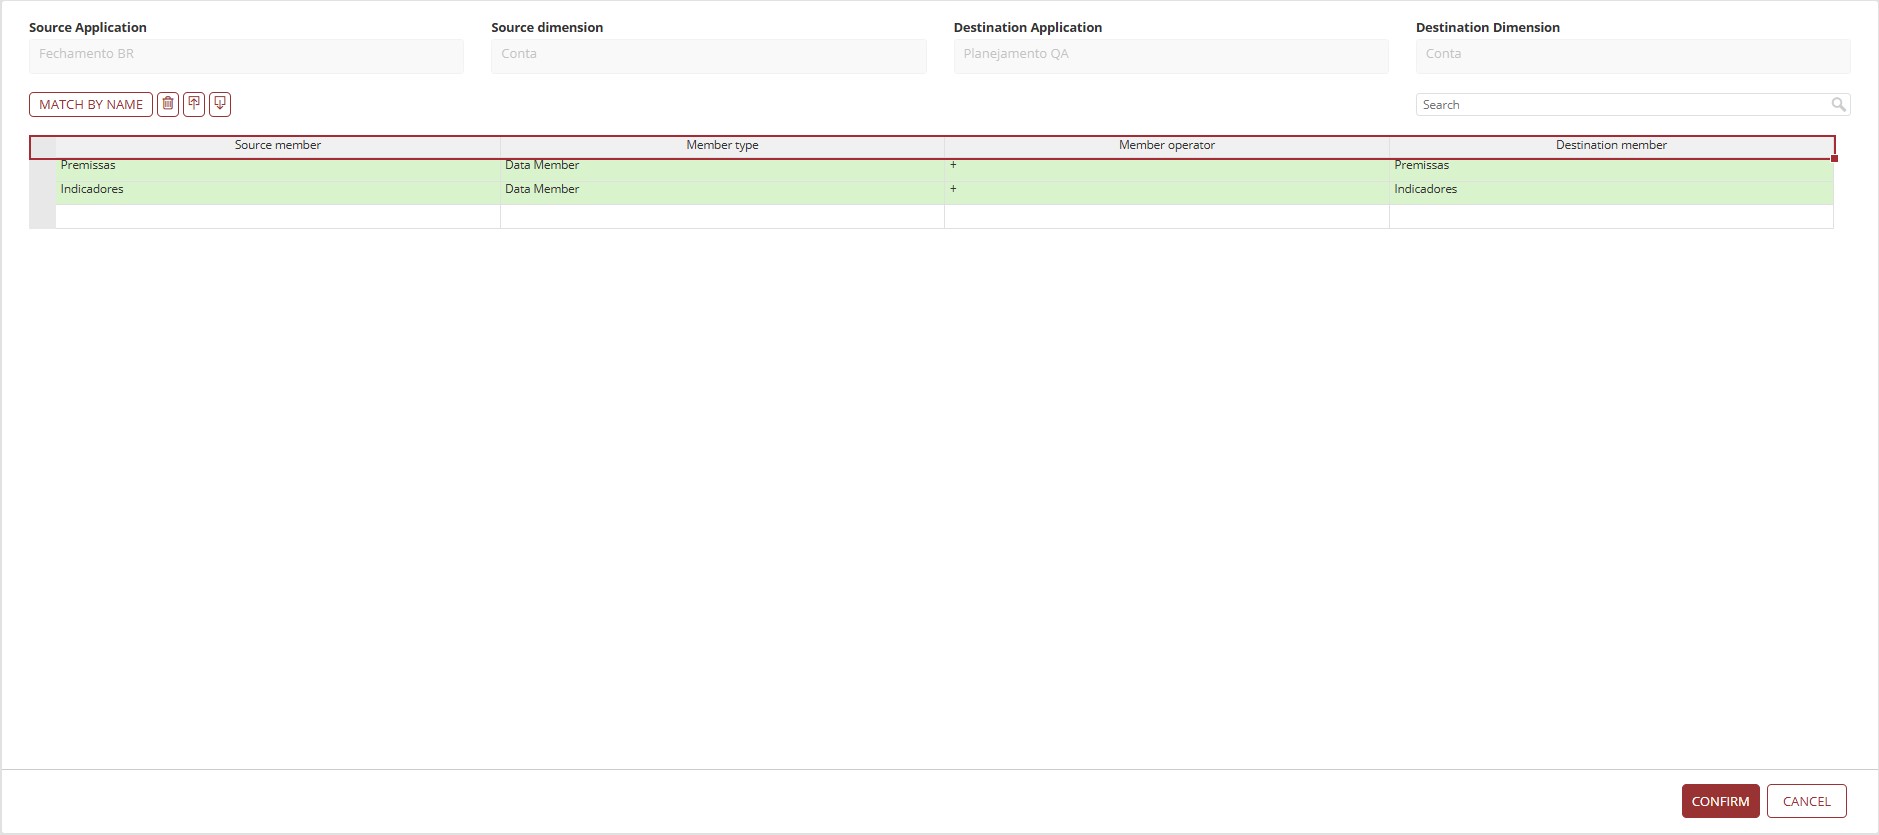
- After mapping the dimension members, click Confirm, which returns you to the previous screen;
- After all dimensions and members are mapped, you can save data link settings;
In specific cases, a dimension may exist in only one of the applications involved in Data Link. When the dimension exists only in the source application, an aggregate account that includes all members is usually used, indicating in the destination application that this detail will not be considered. On the other hand, if the dimension exists only in the destination application, a single representative member is usually selected, such as Not Applicable, to keep consistency in data transfer.
- Click Save;
- After saving, you are redirected to the T6 object list.
¶ 3.2. Executing the Data Link
To execute Data Link, the user must have the permissions listed in topic 2.1. Prerequisites of this manual.
- After configuration, select the previously configured data link object and open it with a double click, or select it and click Open;
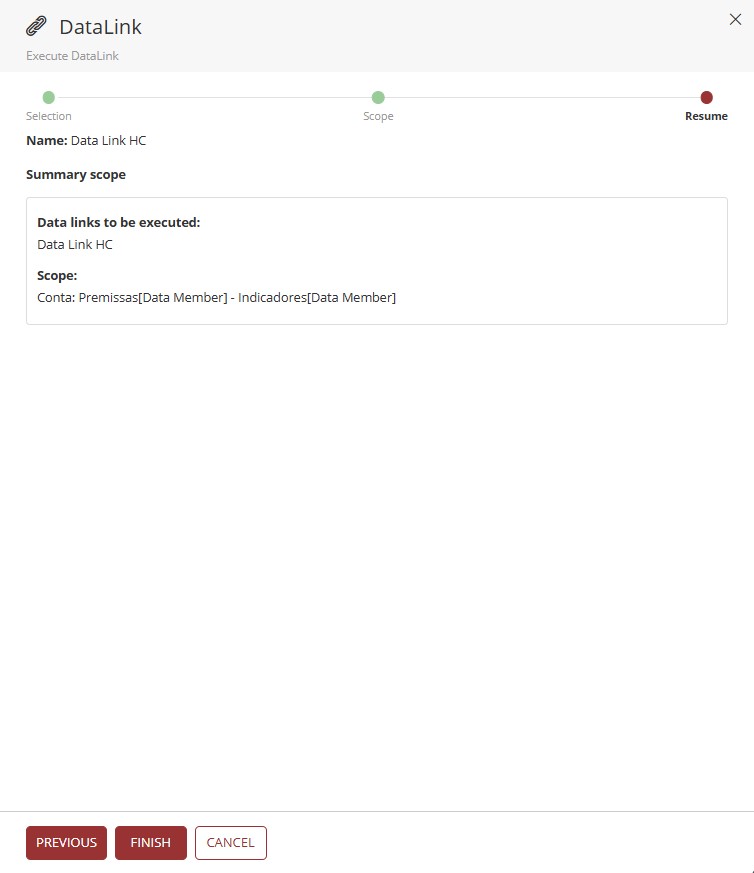
- A side panel opens with 3 steps: Selection, Scope, and Summary;
- In Selection, there is a list of available data links and a switch for individual selection. There is also a Select All button and a search bar to filter by data link name;
- Select the data links you want to run and click Next;
- You are directed to Scope, where you edit the data link scope and select, for each dimension, which members will be executed with the data link (if no members are filtered in this step, the data link runs for the entire scope);
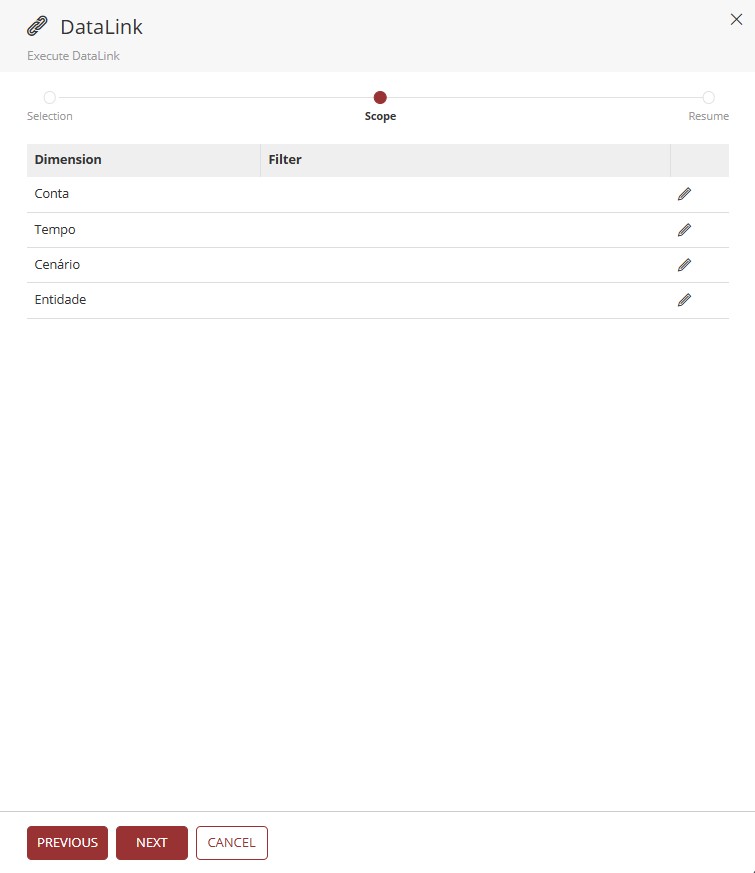
- Next to the dimension name, click to edit the dimension scope;
- A new screen opens where members and aggregation type are selected from dropdown menus;
- In Members, click
 and select the member;
 - In Aggregation, click and select the aggregation type;
Click to view aggregation types
| Aggregation | Description |
|---|---|
| Member | Selects only the reference member |
| Descendants | Selects all descendants of the reference member |
| Descendants (inc) | Selects all descendants of the reference member, including itself |
| Ancestors | Selects all ancestors of the reference member |
| Previous | Selects the immediately previous member in the member tree, at the same level as the reference member |
| Next | Selects the immediately next member in the member tree, at the same level as the reference member |
| Previous (Relative to Parent) | Selects the previous member at the same level and same position as the reference member's parent |
| Ancestors (inc) | Selects all ancestors of the reference member, including itself |
| Same-level members | Selects all members at the same level as the reference member |
| Same-level members (inc) | Selects all members at the same level as the reference member, including itself |
| Parent Member | Selects the parent of the reference member |
| Next (Relative to Parent) | Selects the next member at the same level and same position as the reference member's parent |
| Previous (Relative to Root) | Selects the previous member in the member tree, at the same level and same position relative to the root |
| Next (Relative to Root) | Selects the next member in the member tree, at the same level and same position relative to the root |
| Parent Member (inc) | Selects the parent of the reference member, including itself |
| Children Member | Selects the children of the reference member |
| Children Member (inc) | Selects the children of the reference member, including itself |
| Descendants Without Children | Selects all descendants without children (leaf members) of the reference member |
| Previous same Root (inc) | Selects previous members in the member tree, at the same level and same root as the reference member |
| Next same Root (inc) | Selects next members in the member tree, at the same level and same root as the reference member |
| Previous same number of root children (inc) | Selects previous members of the reference member, in the same root and same number of members |
| Data Member | Selects only the Data Member of the selected member |
| Descendant Data Members (inc) | Selects all descendant Data Members of the reference member, including its own Data Member |
| Exclude Member | Excludes the reference member |
| Exclude Data Member | Excludes the Data Member of the reference member |
| Next same number of root children (inc) | Selects next members of the reference member, in the same root and same number of members |
| Children [Words-DataMember] | Selects only child Data Members of the selected member |
- After selecting member and aggregation type, click Add Selected;
- The selected member and aggregation type are listed below;
- To remove an added member, click
 next to its name;
 - After finishing member and aggregation selection, click Apply;
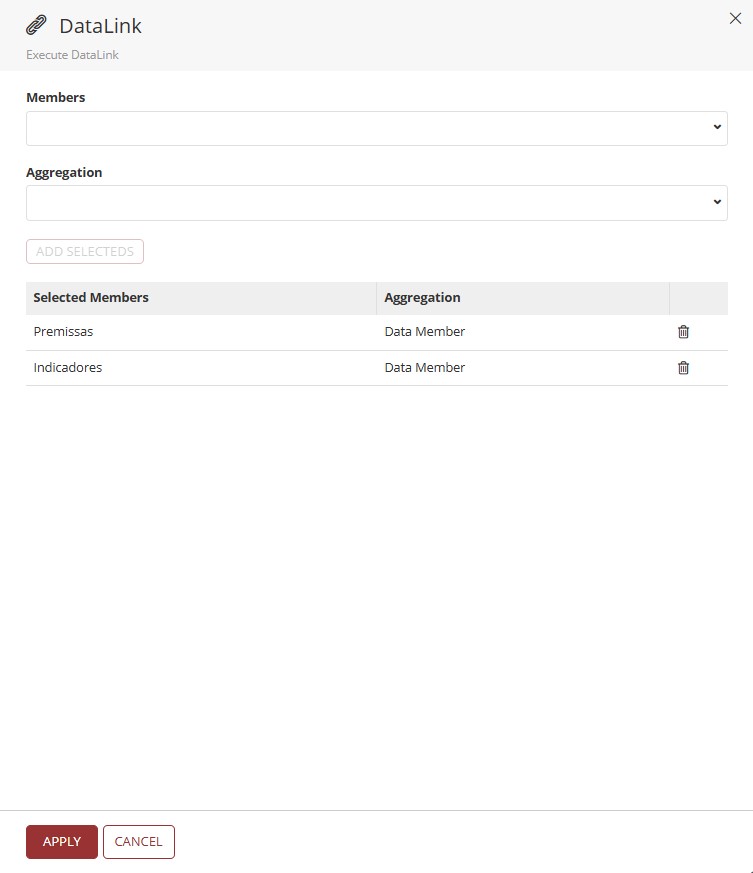
- You return to the Scope page;
- After selecting the members to be executed, click Next;
- You are directed to Summary, where the actions to be performed are reviewed;
- To finish executing the data link, click Finish;
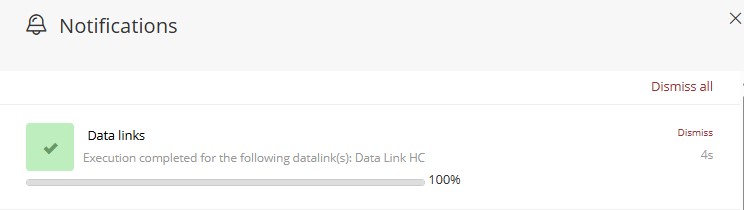
After execution, system notifications show whether execution succeeded or if errors occurred;
¶ 4. Q&A
Frequently Asked Questions
1. What is a Data Link in T6?
Data Link is a T6 tool for moving data between applications, allowing automatic copying of information from one application to another, such as copying expenses from headquarters to a branch.
2. What is the difference between automatic and manual execution in Data Link?
In T6 Data Links, with automatic execution enabled, the system detects source changes and runs the link automatically.
With manual execution, you must run the process manually whenever you want to sync data.
3. Which features are required to use Data Link?
To use Data Link, the user must have the following Manager features enabled: Run Data Load and Manage application structure/model, and must belong to a Global Group with Manage Explorer.
The Preview Feature Data Link New must also be enabled.
4. Can I create a Data Link between applications I cannot access?
No. To create a Data Link, you must be associated with both the source and destination applications.
5. Which execution scopes are available in Data Link?
Available execution scopes in Data Link are:
All;
Planned;
Actual.
The Closed scenario is never copied.
6. How does "Automatically Associate by Name" work in Data Link parameter configuration?
In Data Link parameter configuration, "Automatically Associate by Name" is a switch next to each listed dimension. When enabled, it ignores manual settings and maps members by name at execution time. It only copies members with exactly the same name.
7. What should I do when a dimension exists only in the source during Data Link setup?
During Data Link setup, when a dimension exists only in the source application, an aggregate account that includes all members of that dimension is typically used in the destination.
8. What happens when a dimension exists only in the destination during Data Link setup?
During Data Link setup, when a dimension exists only in the destination application, the most common approach is selecting a representative member such as Not Applicable to keep consistency.
9. How can I filter which data will be copied in Data Link?
During Data Link setup, in the Scope step, you can select specific members and aggregation types for each dimension.
10. Which aggregation types are available when defining scope in Data Link?
The aggregation types available when configuring scope in Data Link are:
| Aggregation | Aggregation | Aggregation | Aggregation |
|---|---|---|---|
| Member | Descendants | Descendants (inc) | Ancestors |
| Previous | Next | Previous (Relative to Parent) | Ancestors (inc) |
| Same-level members | Same-level members (inc) | Parent Member | Next (Relative to Parent) |
| Previous (Relative to Root) | Next (Relative to Root) | Parent Member (inc) | Children Member |
| Children Member (inc) | Descendants Without Children | Previous same Root (inc) | Next same Root (inc) |
| Previous same number of root children (inc) | Data Member | Descendant Data Members | Exclude Member |
| Exclude Data Member | Next same number of root children (inc) | Children Data Member |
11. How do I know if Data Link execution was successful?
After running Data Link, the system shows notifications indicating successful execution or possible errors.
12. Can I change the source access method in Data Link?
No, currently the available source access method in Data Link is Direct Database Access, which uses SQL queries.
13. Is it possible to run Data Link between different databases?
Yes, Data Link allows copying between applications in the same database or in separate databases.
14. Why is my Data Link not running automatically?
Open Data Link properties again and check whether the Run Automatically switch is enabled.