¶ 1. Overview.
The form formatting feature allows for the visual customization of cube forms and data forms. It enables customization of columns, rows, headers, dimensions, data, and also the configuration of fonts and fill colors. It is possible to format the entire form view, in the "all" section, or to format columns, rows, and cells individually.
Formatting Group: serves as a template for future use in application form formatting.
¶ 2. Features.
- Formatting by Columns, Rows, and Dimensions: Users can format the entire form or specific parts, such as headers and data, and select actions for each part.
In the case of formatting a dimension, when selecting the target and the action, you will be asked to select the type (all or members). By selecting all, the change will be applied to members and attributes, selecting everything related to the chosen dimension. If you select member, the change will be made only to the members (you can also select specific members) without altering the attributes.
-
Expressions: Uses Excel syntax for expressions, allowing advanced customization, such as displaying negative numbers in parentheses and changing the number of decimal places.
-
Levels: Level refers to hierarchy; when formatting through levels, "children" are created.
The sequence of levels will always start at 0, for example: Level 0, Level 1, Level 2..., with 0 being the starting level, or the root member.
-
Indentation: Indentation creates a blank space before the form information.
-
Attribute: Used as a data source, it can be used to obtain a member's attribute for use in specific situations.
¶ 2.1. Cube Form Formatting.
To format a cube form, we will select the desired form and click on ![]() , a new page, form editing, will open. We will click on the
, a new page, form editing, will open. We will click on the  tab, which will display rows containing: All, Columns, Rows, Formatting Group, and the dimensions present in the selected form.
By clicking on ![]() , you should insert the formatting through the Formatting Group line, which will apply the predefined formatting through the data form Application Form Formatting.
, you should insert the formatting through the Formatting Group line, which will apply the predefined formatting through the data form Application Form Formatting.
Here is the translated text, maintaining the syntax:
¶ 2.2. Formatting Applied to the Data Form:
We can create columns and pages of data forms from a data table. To start, we will go to Explorer and create a Data Table. With the table created, we will open it and start the configurations.
- On the first page, properties, confirm the folder and click next.
- In configure columns, click on
 to add a new column (the identifier column is created automatically and cannot be deleted or altered).
- A new page, columns, will open;
- In column, we will name the column to be created;
- In type, we will select the type of data that will be added to the column by clicking on
 . You will be able to select from Date; Value; Integer; Text; Percentage; File; Calculated; Dimension; Data Table; User; Real, and Formatting.
When selecting the table, in the Layout section, under Data Table Columns, the possible columns or pages that we can create within the form will be displayed. Select the columns you want to be displayed and click on ![]() to add to the form what will be displayed. You can choose to create columns or pages within the form.
to add to the form what will be displayed. You can choose to create columns or pages within the form.
To remove any column or page from within the form, select what you want to remove and click on ![]() .
.
To select which columns will be displayed in our form, we will choose the data form and click on
. A create/edit sheet page will open. Inside it, in the properties section, when clicking on the Formatting Group button, a new window will open. By clicking on
), it will be changed, displaying the predefined formatting in the form: Form Formatting, based on the selected group.
¶ 2.2.1. Description Column in Forms
Data forms associated with formatting data tables have a column called Description, which allows users to enter a description identifying the information related to that formatting.
This serves as a reference for those configuring the forms, providing a basis when revisiting the data.
If you are creating a new data form associated with a formatting data table, in the column layout, select the columns you wish to display, along with the Description column, and save the data form. When you open the form, the description column will be displayed alongside the other selected columns.
By default, we already have a data form associated with the system's Form Formatting Data Table, in which the description column is already added!
¶ 2.2.2. Data Form with File-Type Column
If you select a file-type column in your data form, it is important to note the following.
Before version 12.0, when opening a spreadsheet with file-type columns, all registered files were fully downloaded, which took a long time to open the spreadsheet.
After version 12.0, when opening a spreadsheet with file-type columns, only the metadata about the files is downloaded. By clicking on the cell where the file is located and then clicking the Download button ![]() , only the selected file will be fully downloaded, improving system performance and user experience.
, only the selected file will be fully downloaded, improving system performance and user experience.
¶ 3. Usage.
To use the formatting within T6 Enterprise, a form must be created. When the cube is published, Formatting System Data Forms are created, and the application itself will handle the creation of these forms.
When inserting or altering a dimension, the application itself updates the form.
Three main data forms are created, along with other adjacent data forms.
The three main forms are Form Formatting Group, Application Form Formatting, and Form Formatting:
¶ 3.1. Form Formatting Group.
A form used to create a group for formatting. You can create as many groups as needed.
- Global Formatting: You can create a formatting group to apply formatting to the form dynamically, applying formatting to all parts of the form defined through the formatting group.
- Formatting via the ribbon: When applying formatting to the form through the ribbon, the system generates a new formatting group and its ID.
To create a formatting group, in Explorer, select the desired application and open the Form Formatting Group form. Inside it, we will have ID and Group. In the group, you will name the formatting group to be used to save formatting and serve as a template for future use in application form formatting, through data form editing, and also through form formatting. The ID is generated automatically when naming the group.
¶ 3.2. Application Form Formatting.
We use it to format the cube form. You can create as many rows as needed. Inside it, we have:
- Group: Enter the group name, previously defined through the form formatting group.
- Place: Select the place where the formatting will be applied, throughout the form, in the header, or in the values.
- Type: Select whether the formatting will be applied to the entire form, only a specific row, a specific column, or a dimension context.
- Scope: If you have selected the type option, apply only to a specific row or column.
- Dimension Scope: Select the dimension if you have selected a dimension in the type option.
- Account Scope, Time Scope, Scenario Scope, Entity Scope: If applied to a specific cell in the cube form, you can choose the specific context to be used.
- Formatting: Select to apply formatting.
- We have the following formatting options:
- Number: Selection of a mask to be applied to the characters (using Excel syntax).
- Alignment: Selection of alignment. Horizontal: left, right, centered, or justified. Vertical: top, bottom, centered, or justified.
- Font: Allows changing the font; style (bold, italic, and bold/italic); size; color; effects (underline, subscript, superscript, overline, and strikethrough).
- Border: Allows changing the border of the cells, including style (single or double); border color; total outline, top, bottom, left, right, or no outline.
- Background: Allows changing the fill color of the cells.
- Size: Allows changing the size of the cells, height and width (in pixels).
- Order: Allows toggling the header ordering through the data table, from smallest to largest, or reverse order, from largest to smallest.
- Level: Allows indenting the cells, creating a hierarchy based on the values entered within the data form.
- Indentation: Allows moving the header content to move it away from the cell border (from left to right).
- We have the following formatting options:
¶ 3.3. Form Formatting.
-
Form Formatting: It is used for formatting data forms. Inside it, we have:
- Group: Enter the group name, defined through the form formatting group.
- Place: Select the place where the formatting will be applied, throughout the form, in the header, or in the values.
- Column: Select a specific column to apply the formatting.
- Row: Select a specific row to apply the formatting.
To create a data form dynamically, we create a data table (creation method: create), in which we will add the columns.
¶ 4. Formatting via the Ribbon.
Formatting via the Ribbon is a facilitator for formatting a specific cell within forms, without needing to switch pages or close the form to view the formatting application. Through the Ribbon, we can apply all the types of formatting mentioned earlier, but some components are hidden.

¶ 4.1. Functionality of the Formatting Ribbon.
In FONT, we have:
-
 - Allows changing the font used and the size of the characters. (We use Open Sans as the default font. Currently, we offer the possibility of changing to the Arial font. As for font size, we can change it to 10, 11, and 12).
 -
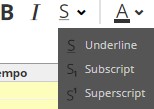 - Allows changing the style of data display to bold and/or italic; and enables the application of underline, subscript, and superscript effects.
 -
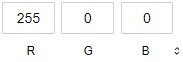
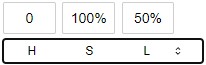
 - Allows changing the display color of the data. The selection can be made in 4 ways:
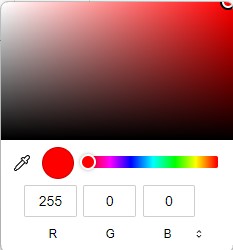
- By selecting a color by clicking on the square;
- By RGB code -
- By HSL code -
- By Hexadecimal code -
 .
.
The color selection box and selection methods are standard for all tools that allow color changes within formatting.
In BACKGROUND, we have:
 - Allows changing the background color of the selected cell.
In BORDER, we have:
- Allows changing the border of the cells, including the style (single or double) and the outline (total, top, bottom, left, right, or no outline).

 - Allows changing the border color of the selected cell.
In ALIGNMENT, we have:
Allows selecting the alignment. Horizontal: left, right, centered, or justified. Vertical: top, bottom, centered, or justified.

Here's the translated text, maintaining the syntax:
¶ 4.2. Viewing Hidden Functions.
To view the hidden formatting options, we have two options. One is to view all available formatting options by clicking View in the Advanced section:

The following formatting panel will be displayed:

Another option to view the hidden options is to click on the icon:  , which will open the panel related to the selected section, displaying more formatting options.
Remember, formatting through the Ribbon is only for specific individual cells; it is not possible to format an entire column or row at once.
If you want to undo a specific formatting, open the formatting panel and click ![]() in the desired formatting field.
in the desired formatting field.
If you want to undo all applied formatting, open the formatting panel and click  .
.