¶ 1. Abstract
The manual covers configurations and suggestions to optimize the performance and security of T6 Planning applications on the IIS server. Focusing on the HTTPS protocol, emphasizing HTTP compression to improve bandwidth efficiency. It details the implementation of SSL/TLS for secure communication, including step-by-step instructions for importing certificates in IIS 8.0 and creating self-signed certificates. The manual also addresses encryption algorithms and SSL/TLS protocols, recommending the disabling of SSL 3.0 due to vulnerabilities and migration to more secure protocols like TLS 1.0, TLS 1.1, or TLS 1.2. In summary, the manual provides specific guidelines for configuring IIS, prioritizing the security and efficiency of T6 Planning applications, especially in the context of HTTPS protocol and encryption settings.
¶ 2. IIS Tips and Configurations
¶ 2.1 Overview
This manual aims to provide configuration suggestions in IIS to offer instructions for HTTPS protocol settings to enhance the performance and security of T6 Planning applications.
¶ 3. HTTP Compression
¶ 3.1 Overview
HTTP compression reduces the size of transmitted data before reaching the client computer. This improves the utilization of available bandwidth and consequently enhances the performance of the T6 Planning application. It can be configured for both static and dynamic modes.
Static compression is installed by default from IIS version 7.0 on Windows Server. Dynamic compression will be described step by step in this chapter.
¶ 3.2 Enabling Dynamic Compression in IIS
In this section, we will cover the installation of dynamic compression in IIS on Windows Server, as described below.
Note: The images in this section are based on Windows Server 2012 R2.
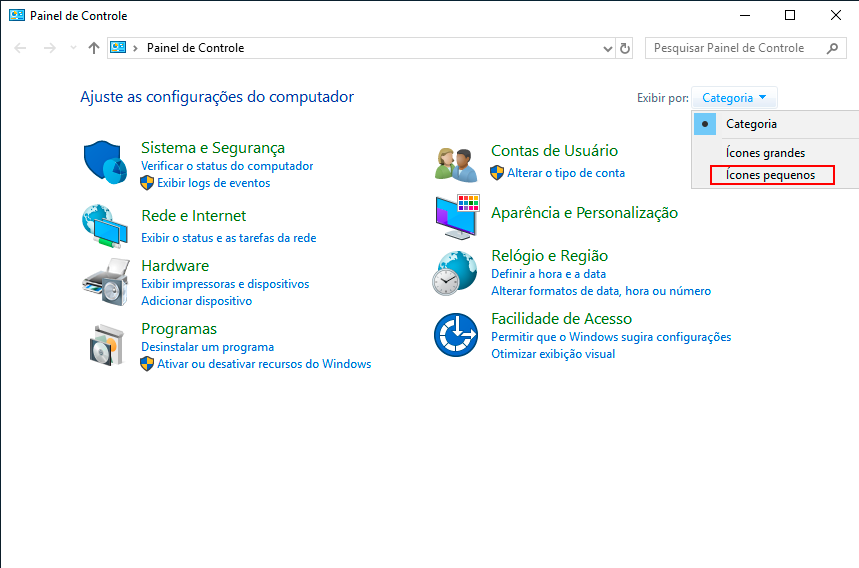
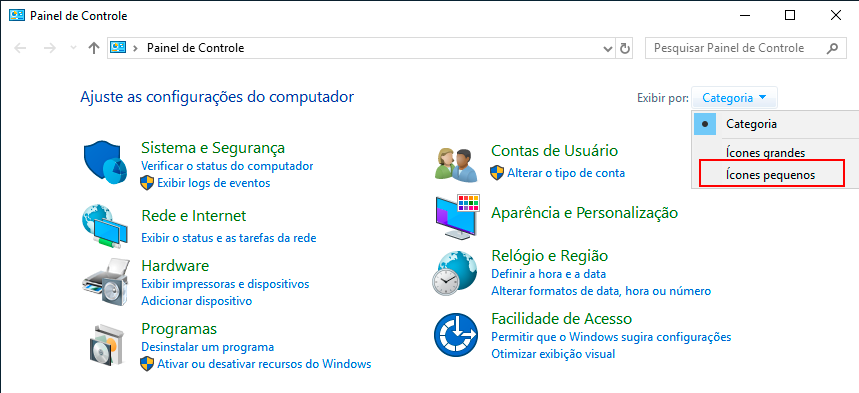
Open the Windows Control Panel and select the Small Icons option.
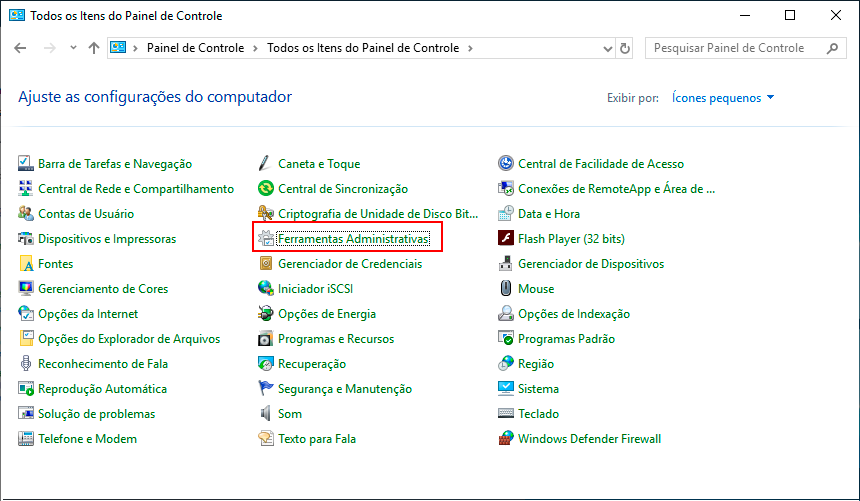
Next, click on Administrative Tools.
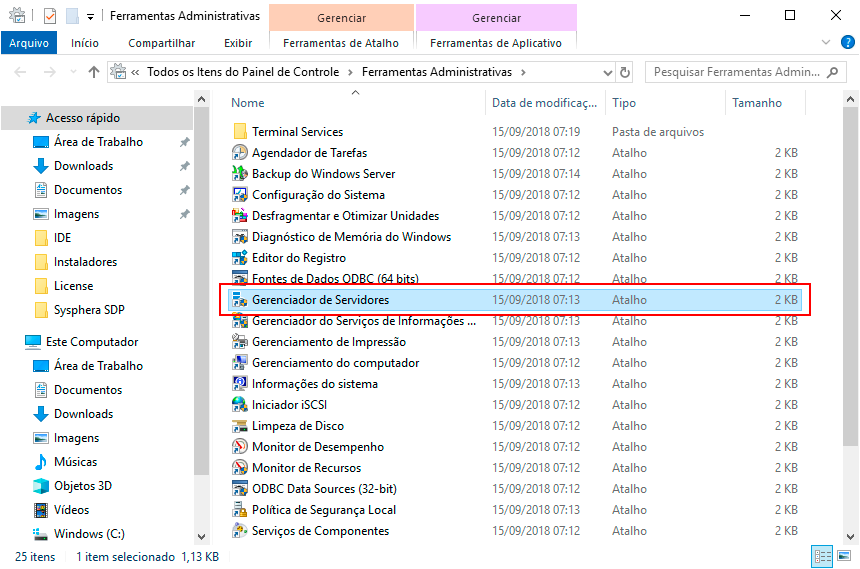
In the Administrative Tools screen, click on Server Manager.
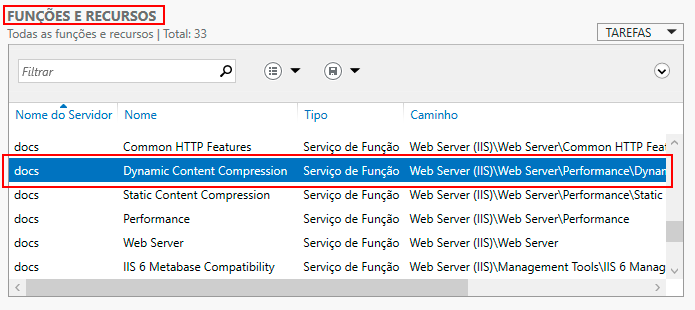
On the left side of the Server Manager screen, in the hierarchical Server Manager panel, click on IIS. In the right-hand field, scroll down to the Roles and Features option.
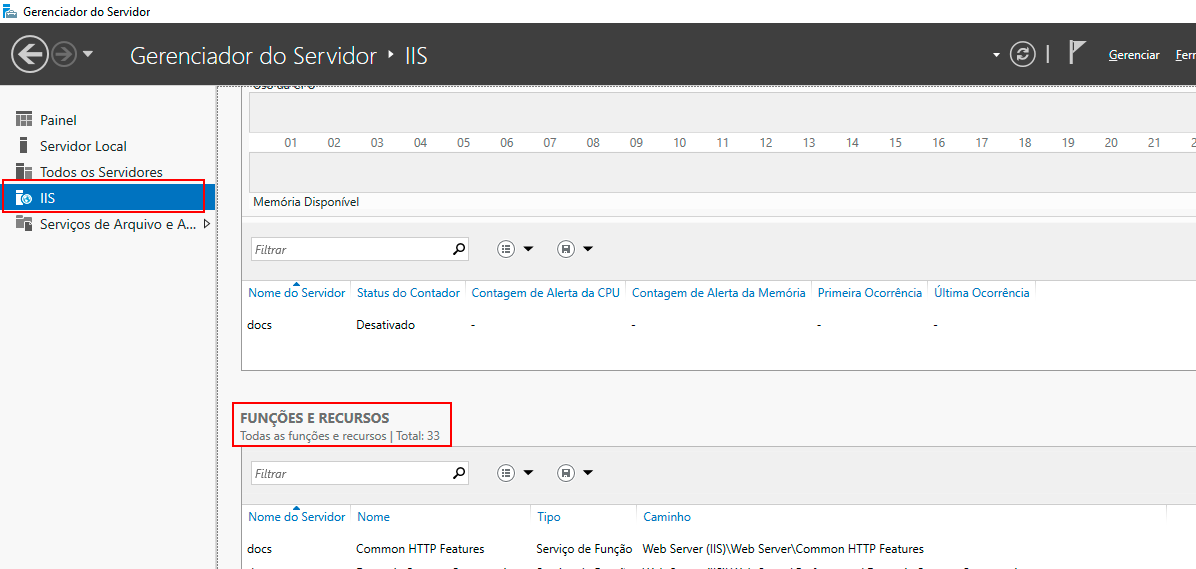
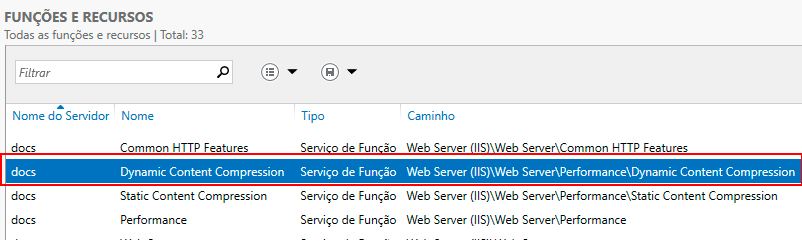
Below Roles and Features, you will see a list of installed services. Try to locate the "Dynamic Content Compression" function. If found, proceed to the next topic and enable compression.
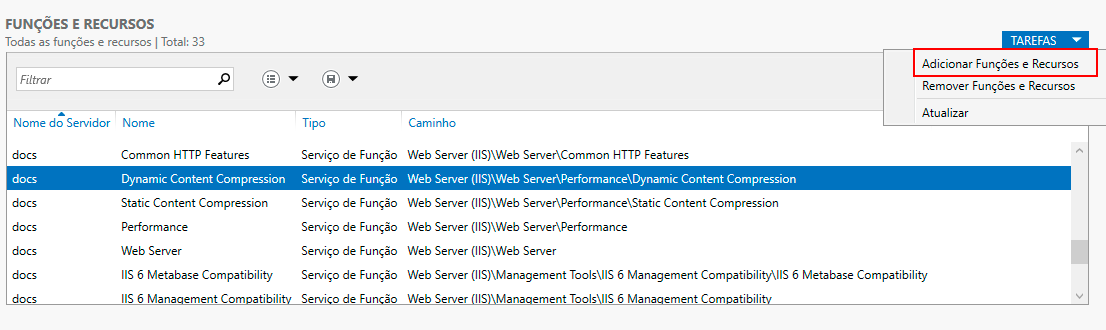
If the "Dynamic Content Compression" function is not found, in the upper right corner of the screen, go to -> Tasks -> Add Roles and Features.
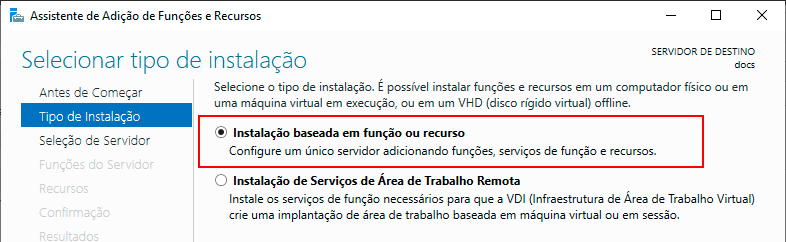
The Add Role and Feature Services window will appear. Click Next.

In the Installation Type step, select the Role-Based or Feature-Based Installation option and click Next.
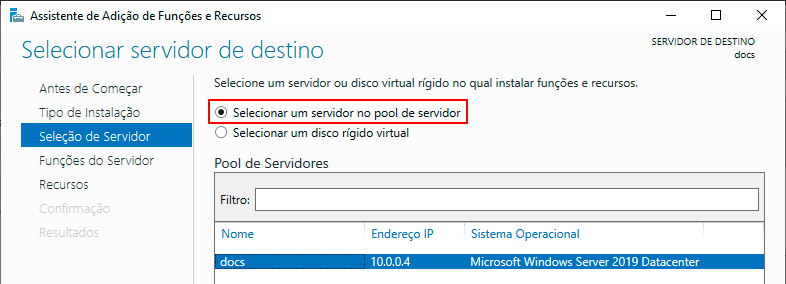
In the Server Selection step, check the Select a server from the server pool option, and click Next.
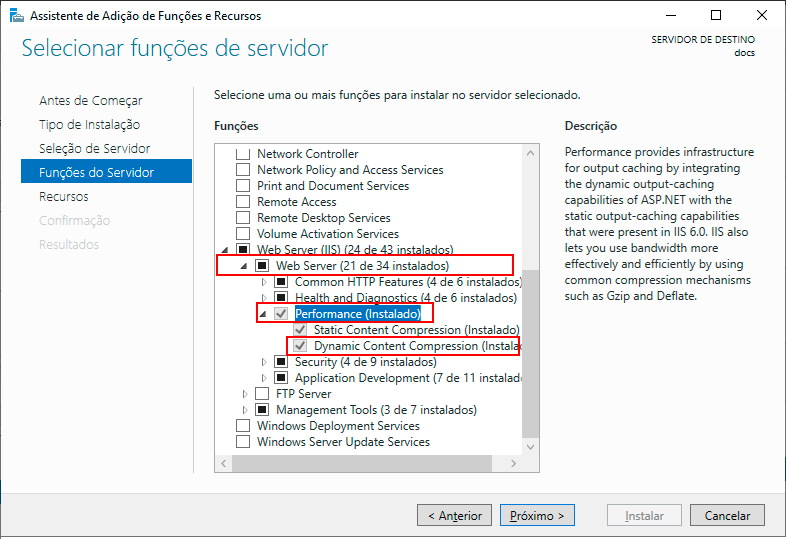
In the Server Roles step, follow the options: Web Server (IIS)” -> Web Server -> Performance, and check the "Dynamic Content Compression" box. Then click Next.
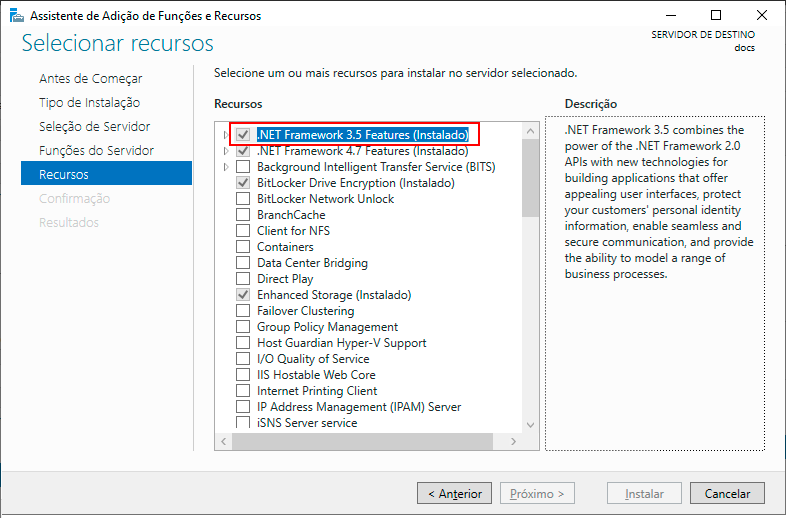
The Features step will display the features for addition; as we are adding a role, ignore this screen and click Next.
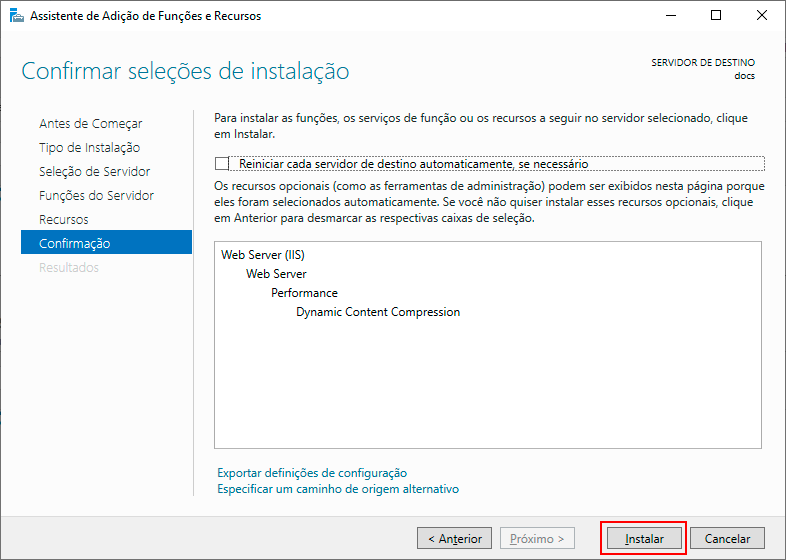
On the Confirm Installation Selection screen, click the Install option.
On the Installation Progress screen, wait for the entire installation process to load, and after the successful installation message appears, click Close.

Return to the Roles and Features field and click -> Tasks -> Refresh.
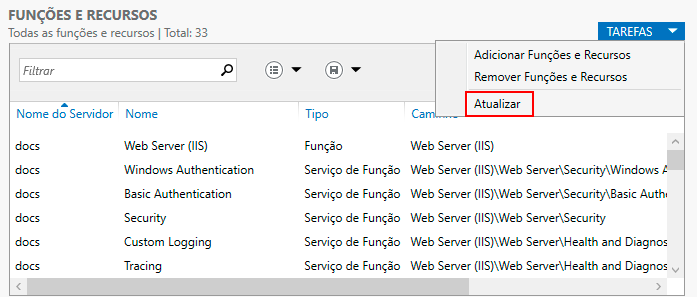
Note that the "Dynamic Content Compression" function will appear in the list.
¶ 3.3 Configuring Compression in IIS
To configure dynamic compression in IIS on Windows Server, access the Windows Control Panel and select the Small Icons option.
Next, click on Administrative Tools.
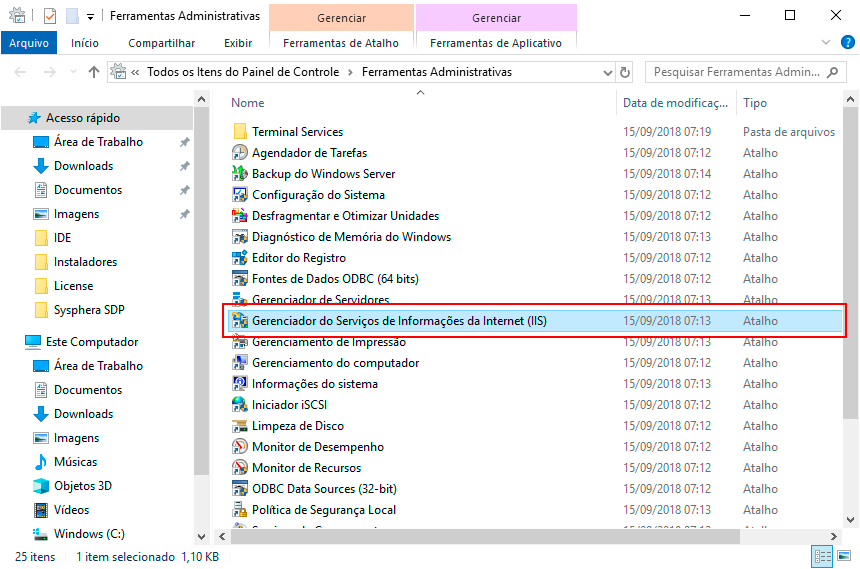
In the Administrative Tools screen, click on Internet Information Services (IIS) Manager.
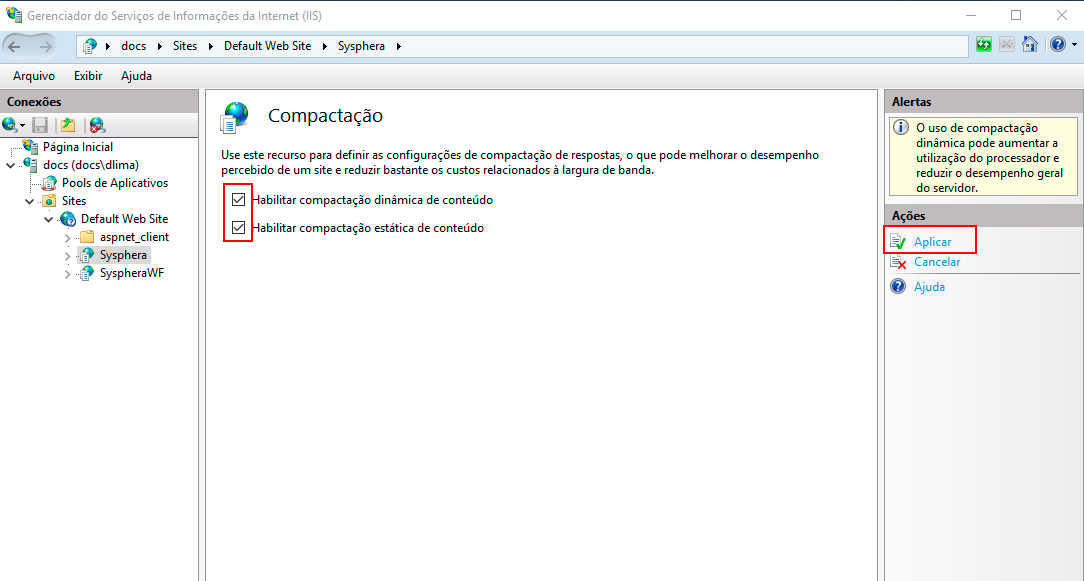
In the IIS Manager screen, click on the Sites folder and then choose the WebSite related to T6 Planning. In the options that appear on the side, double-click on the "Compression" icon.
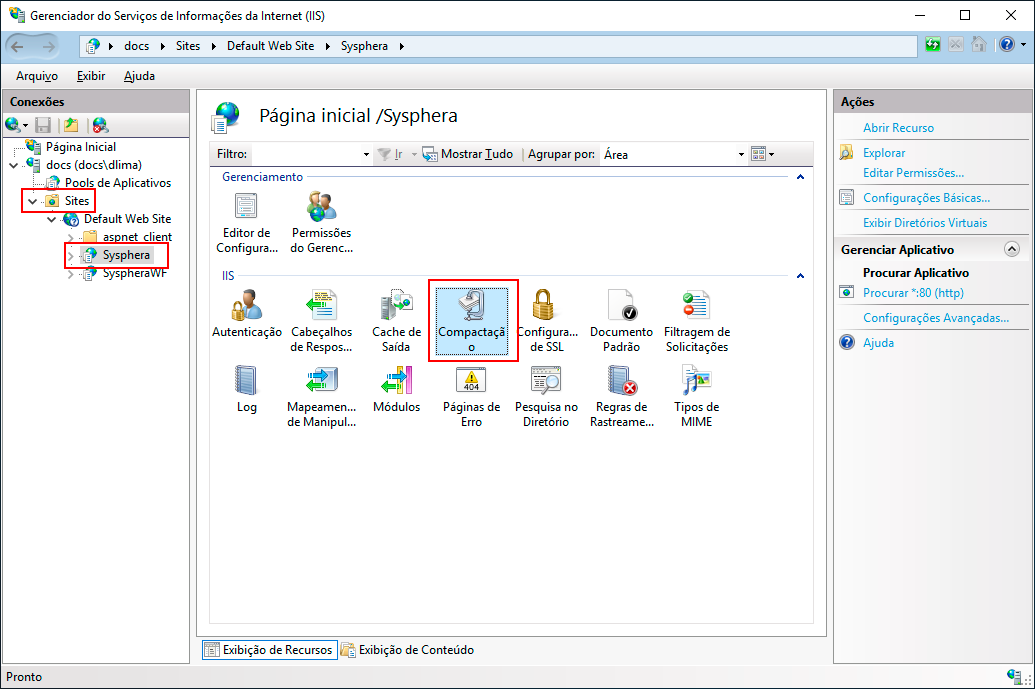
The Compression properties will be displayed. Check the options for Enable Dynamic Content Compression and Enable Static Content Compression. Then in the Actions panel, click Apply.
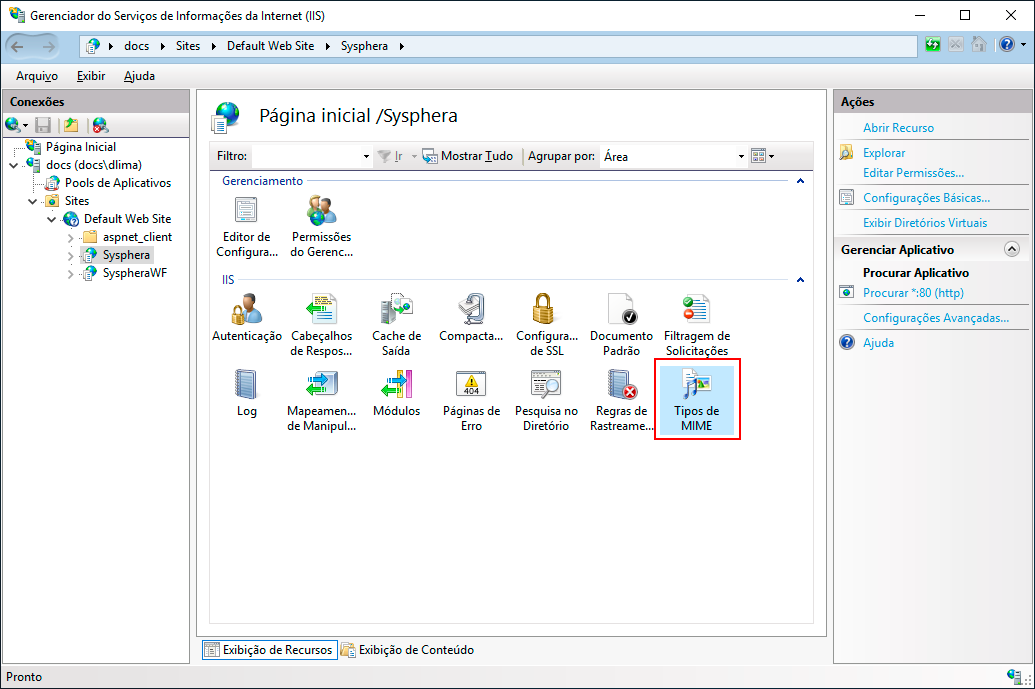
Returning to the resource display screen, double-click on the MIME Types icon.
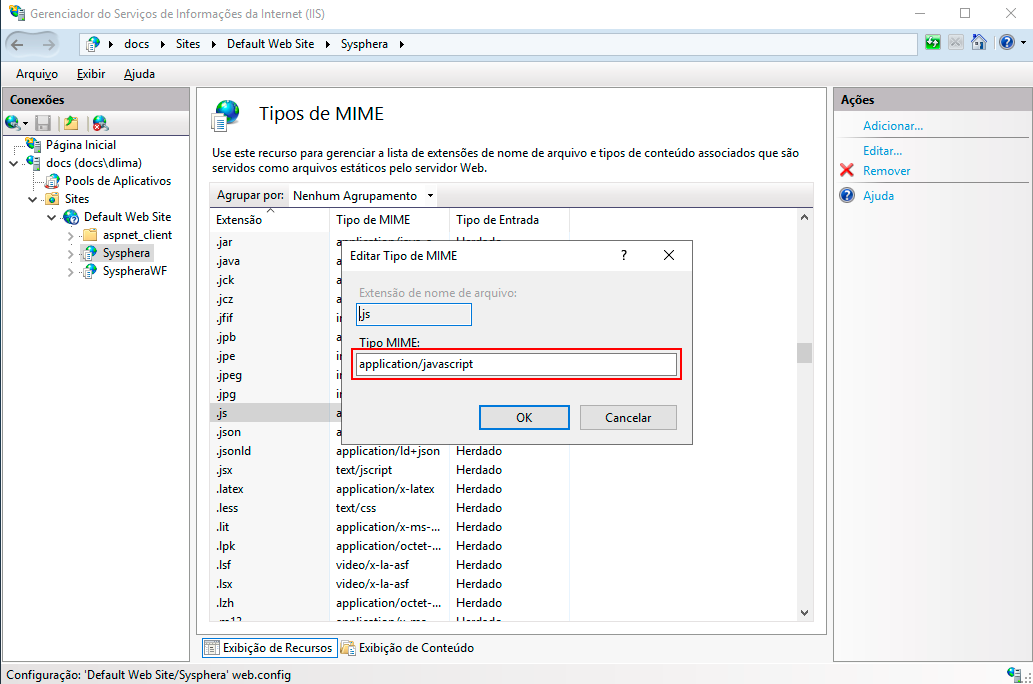
In the list of extensions, locate the ".js" extension. If the MIME type for this extension is set to "application/x-javascript," double-click on it to edit. In the dialog box that opens, enter "text/javascript" in the MIME Type field and click OK.
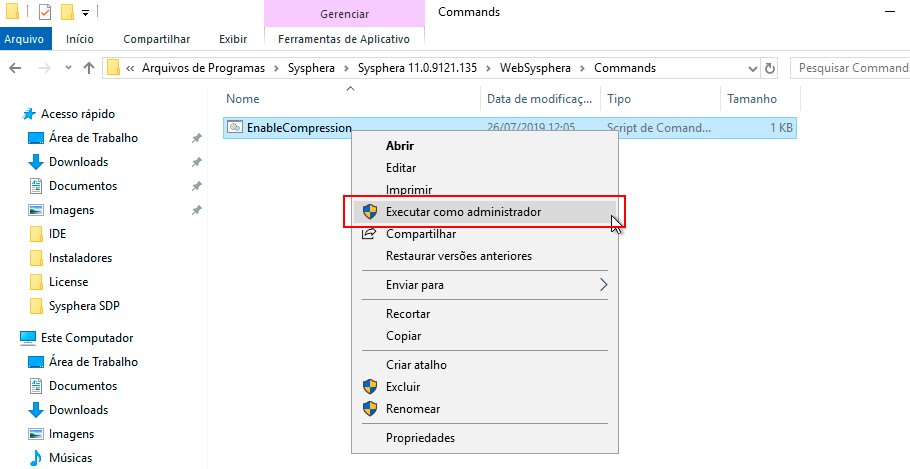
Next, it is necessary to run the "EnableCompression.cmd" file as an administrator, located in the WebT6 Planning -> Commands folder within the T6 Planning folder as shown in the image below:
¶ 4. HTTPS Protocol
¶ 4.1 Overview
The HTTPS protocol is an extension that adds a security layer to HTTP to make browsing more secure. It uses the Secure Sockets Layer (SSL) and its successor, Transport Layer Security (TLS), to create a secure communication channel between the client's computer and the server, encrypting the transmitted data so that only the client's computer can understand it.
Enabling HTTPS requires the use of an SSL/TLS certificate to ensure secure communication between the client's computer and the server. These certificates, when signed by trusted and publicly recognized certification authorities, ensure that the server being connected to is indeed the expected address, reducing the risk of fraud and interception of data transmitted over the network.
¶ 4.2 Importing an SSL/TLS Certificate in IIS 8.0
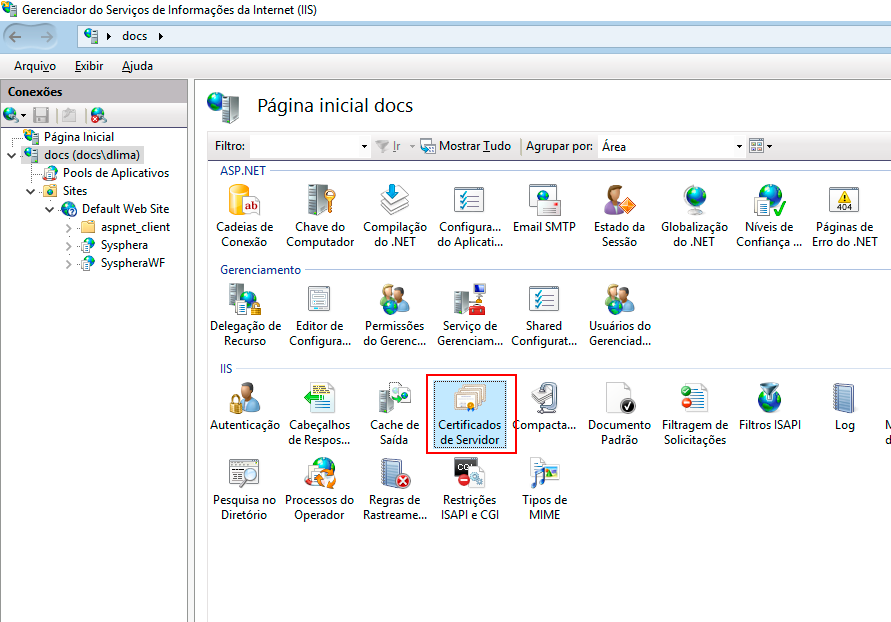
Open IIS 8 and click on the name of the IIS server.
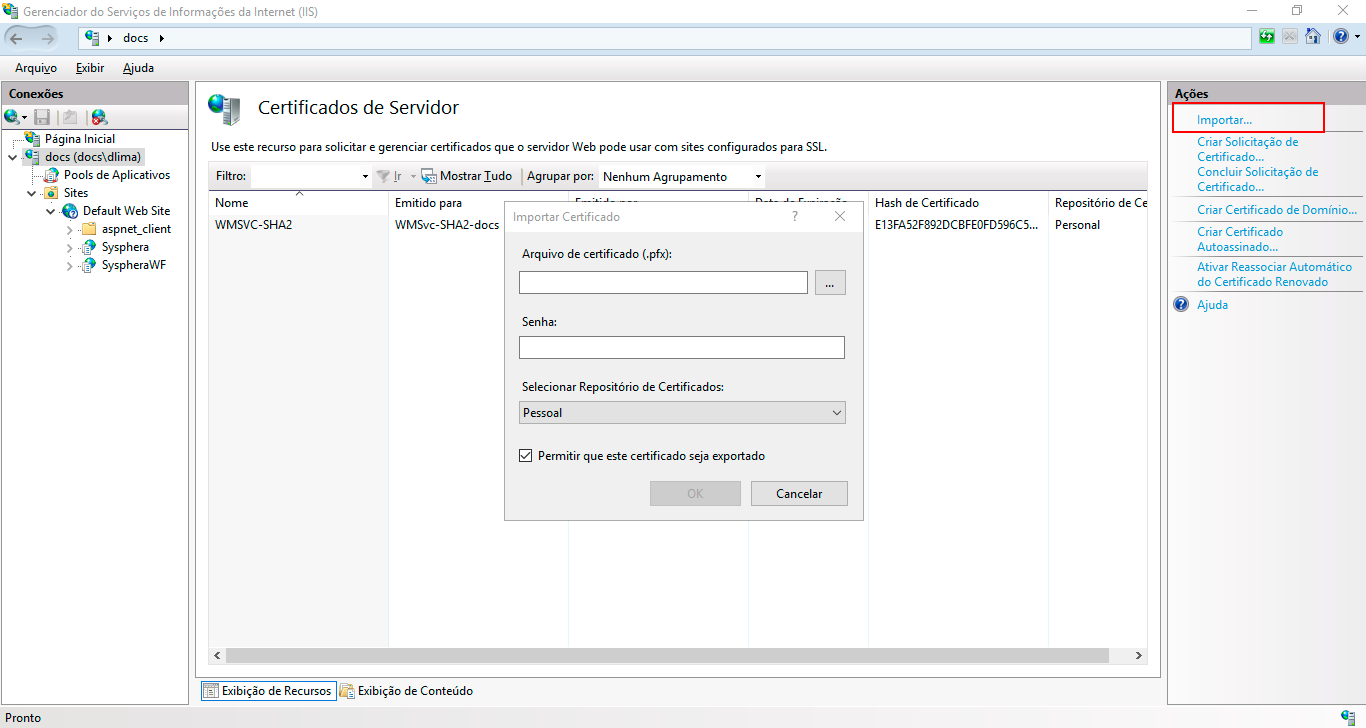
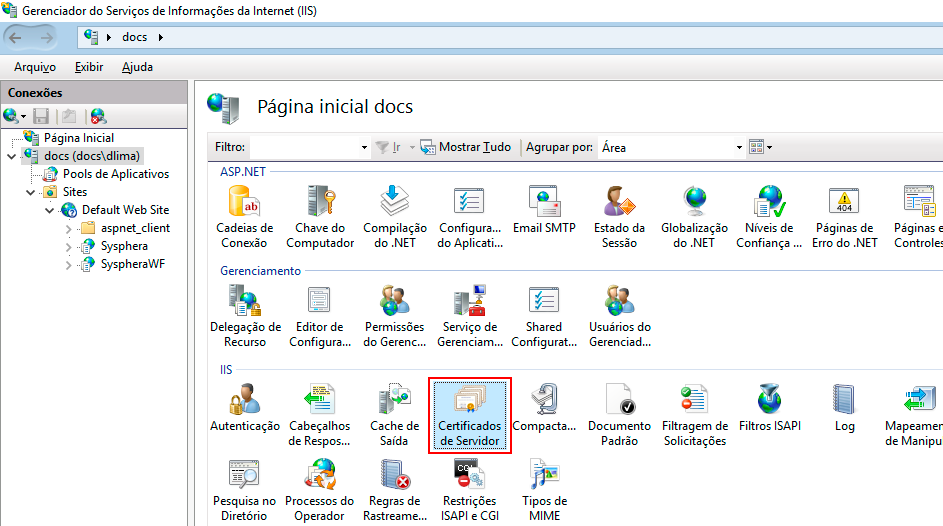
In the options that appear on the side, double-click on the Server Certificates icon.
In the Server Certificates screen, locate the Actions panel and click on Import. The Import Certificate dialog box will appear. Select the certificate to be imported, enter the certificate's import password, and click OK.
¶ 4.3 Enabling HTTPS Bindings in IIS 8.0
Returning to the IIS 8 screen, click on the Sites folder and then right-click on Default WebSite.
In the dropdown menu, click on Edit Bindings...

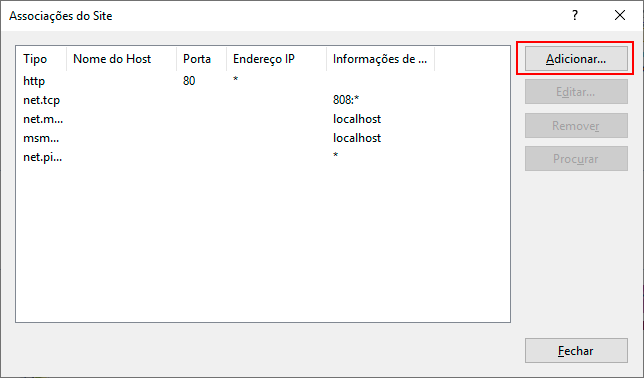
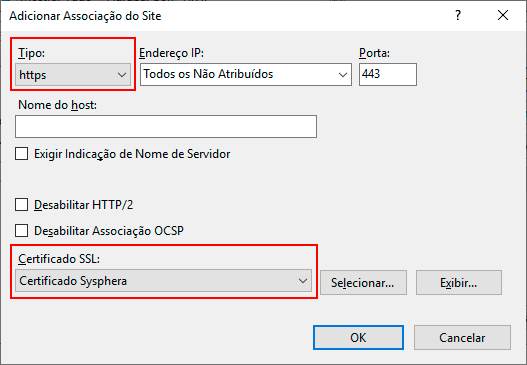
The Site Bindings dialog box will appear. Click the Add button.
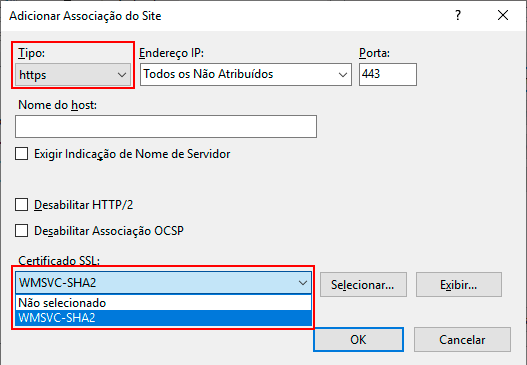
In the Add Site Binding dialog box, in the Type field, select "https". In the SSL Certificate field, select the certificate imported for this purpose, and then click OK.
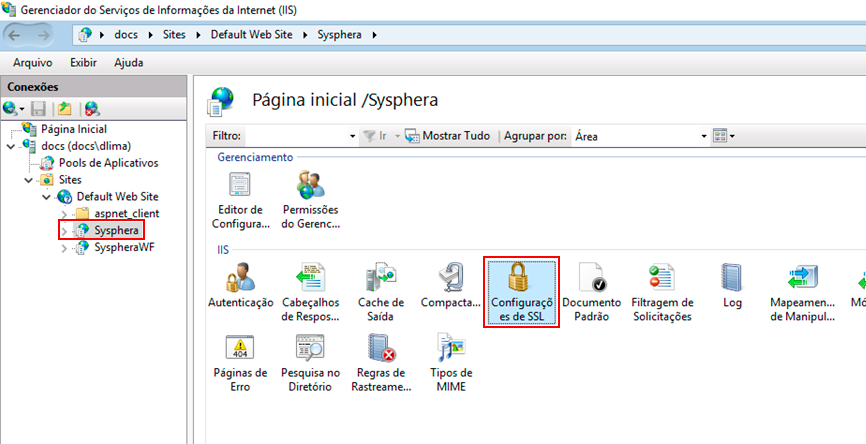
If you want all connections to T6 Planning to be made via HTTPS, return to the IIS 8 screen, click on the Sites folder, and then choose the WebSite related to T6 Planning. In the options that appear on the side, double-click on the "SSL Settings" icon.
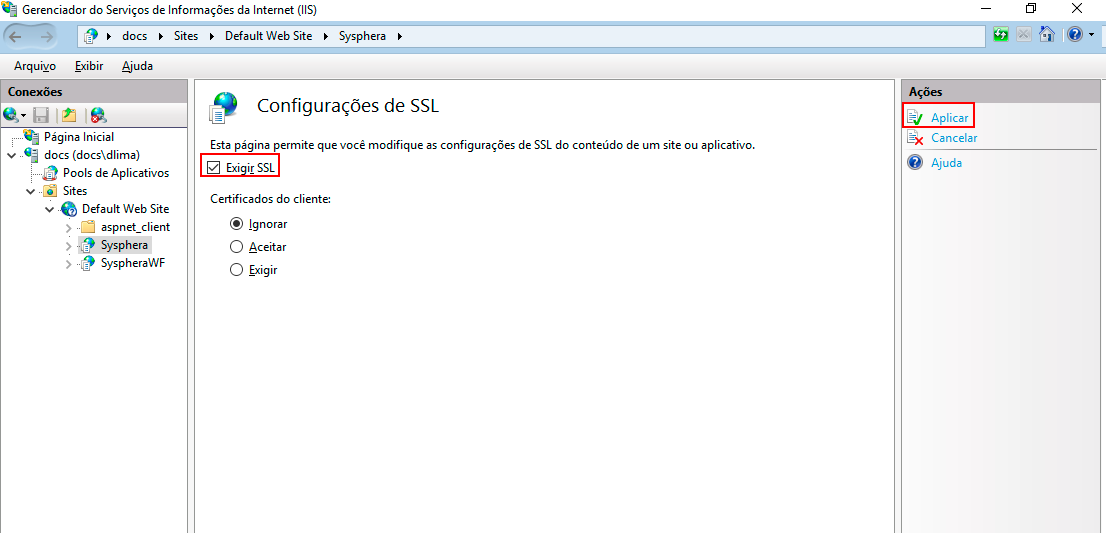
The properties of SSL Settings will be displayed. Check the "Require SSL" checkbox and in the Actions panel, click the Apply option.
¶ 4.4 Enabling WCF (Excel Add-In) with HTTPS
To use WCF (Excel Add-In) with HTTPS, follow these steps:
- After installing Sysphera, locate where the folder was saved and open it (by default, it's saved in Program Files);
- Inside the Sysphera folder, locate the folder with the version you are using and open it (for example, Sysphera 12.0.2407.0803);
- After opening the version folder, open the WebSysphera folder;
- Locate the
web.configfile and open it using a text editor; - Inside the
web.configfile, find the line<serviceMetadata httpGetEnabled="true" />and comment it out using<!-- -->
- Right above the line we commented, there will be the following commented line:
<!--<serviceMetadata httpGetEnabled="true" httpsGetEnabled="true"/>-->`;
- Remove the comment from the line:
<serviceMetadata httpGetEnabled="true" httpsGetEnabled="true"/>; - Still in the
web.configfile, find the line<wcfHttpTransport hostNameComparisonMode="StrongWildcard" manualAddressing="False" maxReceivedMessageSize="500000000" authenticationScheme="Anonymous" bypassProxyOnLocal="False" realm="" useDefaultWebProxy="True" />and comment it out using<!-- -->;
- Right below the line we commented, there will be the following commented line:
<!--<httpsTransport hostNameComparisonMode="StrongWildcard" manualAddressing="False" maxReceivedMessageSize="500000000" authenticationScheme="Anonymous" bypassProxyOnLocal="False" realm="" useDefaultWebProxy="True"/>-->`;
- Remove the comment from the line:
<httpsTransport hostNameComparisonMode="StrongWildcard" manualAddressing="False" maxReceivedMessageSize="500000000" authenticationScheme="Anonymous" bypassProxyOnLocal="False" realm="" useDefaultWebProxy="True"/>; - Save the changes made to the
web.configfile;
Inside the
web.configfile, there will be the following line that will help us locate where to make the changes:<!-- Uncomment to allow HTTPS support -->;
¶ 5. Microsoft IIS and ASP.NET Security Model
¶ 5.1 Overview
This chapter provides an overview of how the basic security of ASP.NET works and the best practices for configuring it for use with T6 Planning.
Since T6 Planning relies on Microsoft IIS and the .NET Framework, it is also affected by their security model. Therefore, it is often not enough to configure T6 Planning’s security while neglecting the security aspects of the environment where T6 Planning is deployed.
Essentially, here’s what you need to know about the IIS security model:
- Communication Protocols: HTTP or HTTPS;
- Authentication Types: Their definitions and differences.
¶ 5.2 ASP.NET Authentication
Authentication is the process of obtaining credentials (such as login and password) and validating this information against an entity (such as a database or domain server). If this validation is successful, the authorization process determines the access level for the authenticated user.
ASP.NET provides three types of authentication:
- Windows: Provides user authentication based on their Windows accounts. This type of authentication uses IIS to authenticate users. It is the default authentication method for ASP.NET.
- Passport: Uses Microsoft’s Passport service for authentication. This service operates uniquely and centrally on Microsoft servers. The user’s credentials are the same as those used for accessing Hotmail and other Microsoft sites.
- Forms: Uses a login screen to authenticate the user. All authentication logic is handled by the application, in this case, T6 Planning. User credentials are stored in a cookie used throughout the session.
¶ 5.2.1 Windows Authentication
This authentication model is most suitable when T6 Planning is accessed via the company’s intranet. In this model, Microsoft Active Directory architecture is typically used to authenticate users. Depending on the configuration and parameters set for T6 Planning, a login screen may not be necessary, as the credentials used for Windows login will be reused.
When using this model, the following IIS authentication methods must be considered:
- Anonymous: IIS performs no validation here. This method is not recommended.
- Basic Authentication: The user must provide a login and password to connect. However, this information is transmitted over the network in plain text.
- Windows Integrated: No password information is transmitted over the network. The user still provides login credentials, but the application uses Kerberos. Kerberos provides authentication tools and strong encryption to secure information transmitted over the network.
¶ 5.2.2 Forms Authentication
This authentication model is most suitable when T6 Planning is accessed over the Internet. A login screen is used where the user enters their credentials to access T6 Planning. The entire authentication process is managed by T6 Planning itself.
¶ 5.3 Communication Protocols
Communication protocols like HTTP and HTTPS were developed to standardize the distribution of information over the Internet between clients and web servers. These protocols also define how transactions between client and server are conducted by establishing basic rules.
The aim here is not to describe these protocols in technical detail but to highlight their security differences.
¶ 5.3.1 HTTP Protocol
Most web server applications use HTTP (Hypertext Transfer Protocol) as their communication protocol. HTTP is an application-level protocol responsible for handling requests and responses between client and server.
In HTTP, data is transmitted as plain text over the network. This means that anyone monitoring traffic between client and server can view all the transmitted information.
¶ 5.3.2 HTTPS Protocol
HTTPS is an extension of HTTP that adds a layer of security to make browsing more secure. HTTPS encrypts transmitted data, scrambling it so that only the intended recipient can decipher it. While such data can still be intercepted, it will be unreadable to unauthorized individuals or computers.
HTTPS also ensures that the website being accessed is authentic. This is achieved through a certificate issued only by certification authorities. Browsers recognize major certification authorities and automatically accept certificates signed by them, verifying their authenticity and the legitimacy of the corresponding website.
¶ 5.3.3 T6 Planning
Choosing whether to use HTTP or HTTPS with T6 Planning is entirely up to the company, and decisions vary case by case. However, it is highly recommended to use HTTPS, even if it involves costs for acquiring a digital certificate. Doing so ensures that all information is transmitted securely, preventing unauthorized access to sensitive data by intruders.
¶ 6. Enabling Secure Connection in IIS
To enable a secure connection in the Internet Information Service (IIS), follow these steps:
- Open IIS and click on the name of the IIS server. In the options that appear on the side, double-click on the Server Certificates icon.
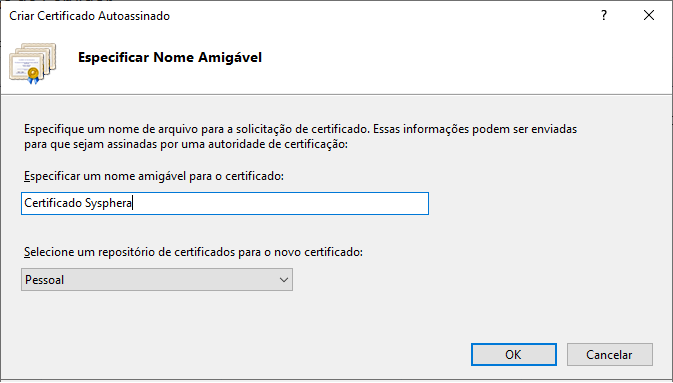
- In the Server Certificates screen, in the Actions panel, click on Create Self-Signed Certificate...
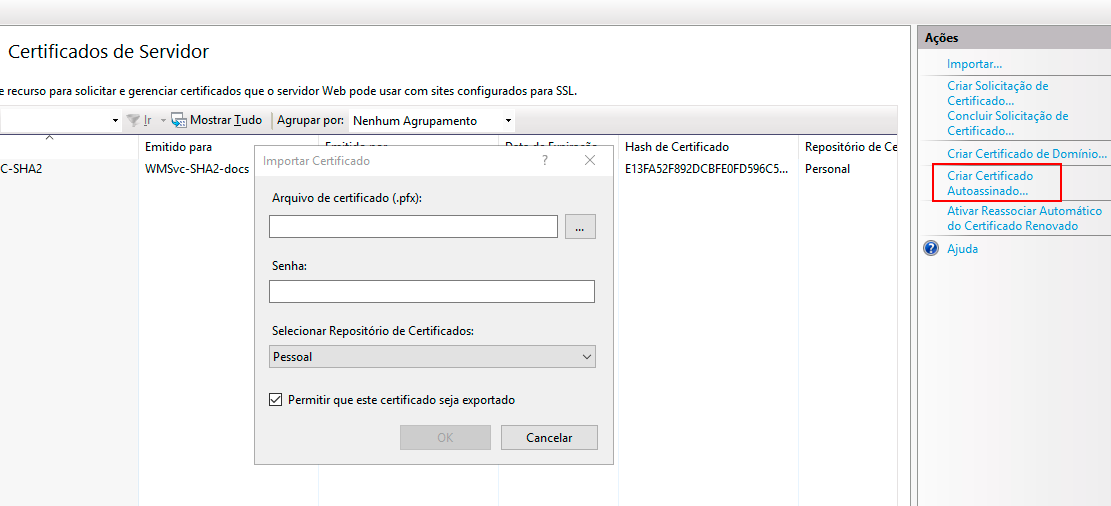
- Choose a name for the certificate and click OK.
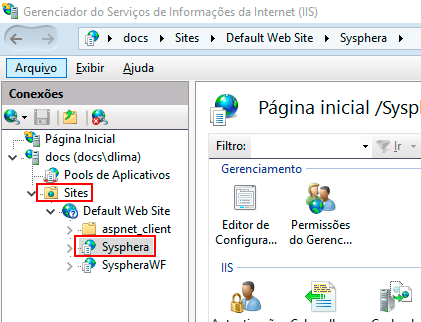
- Returning to the IIS screen, in the Connections panel, click on the Sites folder and select a WebSite related to T6 Planning.
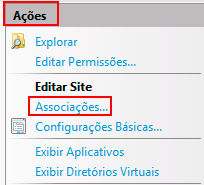
- Then in the Actions panel, click on Bindings...
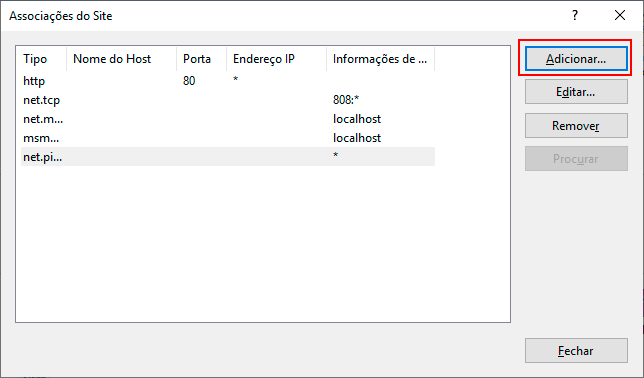
- In the Site Bindings screen, click on Add.
- To enable SSL usage on the chosen site, select "https" in the Type option, find the previously created certificate in the SSL Certificate option, and click OK.
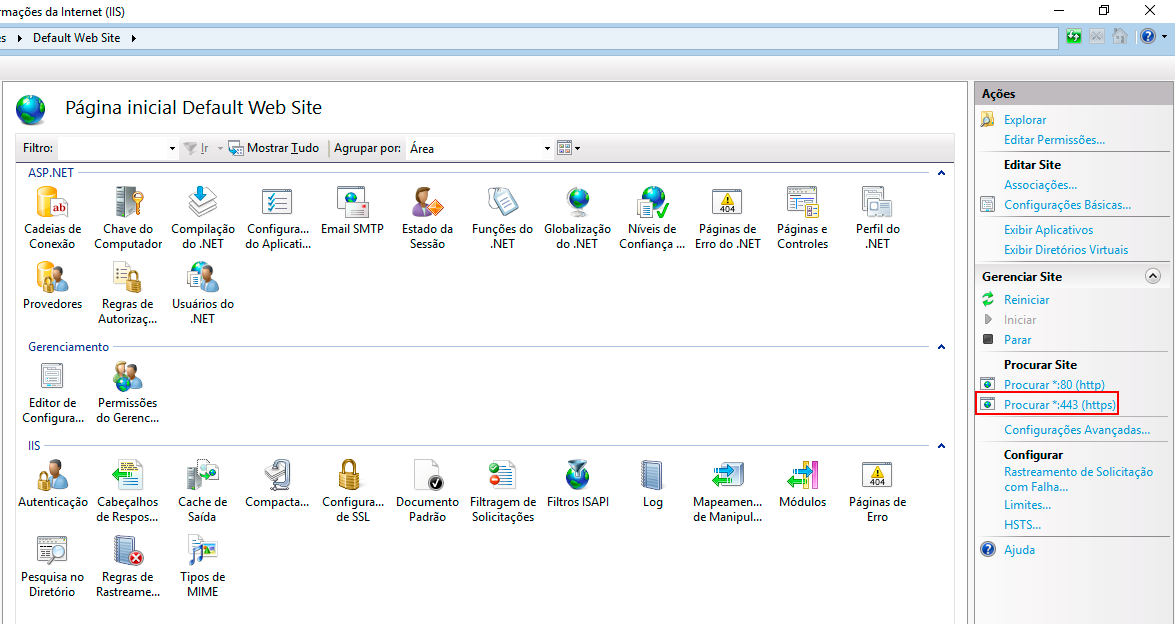
- To verify that the Binding was created, in the Actions panel, select the site again and click Browse*:443 (https).
¶ 7. Cryptography Algorithms
Below is a table of algorithms supported by types of cryptography protocols. This table is also available at the link: https://msdn.microsoft.com/en-us/library/mt767781(v=vs.85).aspx.
| Cipher suite string | TLS/SSL Protocol Versions |
|---|---|
| TLS_ECDHE_RSA_WITH_AES_256_CBC_SHA384_P256 | TLS 1.2 |
| TLS_ECDHE_RSA_WITH_AES_256_CBC_SHA384_P384 | TLS 1.2 |
| TLS_ECDHE_RSA_WITH_AES_128_CBC_SHA256_P256 | TLS 1.2 |
| TLS_ECDHE_RSA_WITH_AES_128_CBC_SHA256_P384 | TLS 1.2 |
| TLS_ECDHE_RSA_WITH_AES_256_CBC_SHA_P256 | TLS 1.2, TLS 1.1, TLS 1.0 |
| TLS_ECDHE_RSA_WITH_AES_256_CBC_SHA_P384 | TLS 1.2, TLS 1.1, TLS 1.0 |
| TLS_ECDHE_RSA_WITH_AES_128_CBC_SHA_P256 | TLS 1.2, TLS 1.1, TLS 1.0 |
| TLS_ECDHE_RSA_WITH_AES_128_CBC_SHA_P384 | TLS 1.2, TLS 1.1, TLS 1.0 |
| TLS_DHE_RSA_WITH_AES_256_GCM_SHA384 | TLS 1.2 |
| TLS_DHE_RSA_WITH_AES_128_GCM_SHA256 | TLS 1.2 |
| TLS_DHE_RSA_WITH_AES_256_CBC_SHA | TLS 1.2, TLS 1.1, TLS 1.0 |
| TLS_DHE_RSA_WITH_AES_128_CBC_SHA | TLS 1.2, TLS 1.1, TLS 1.0 |
| TLS_RSA_WITH_AES_256_GCM_SHA384 | TLS 1.2 |
| TLS_RSA_WITH_AES_128_GCM_SHA256 | TLS 1.2 |
| TLS_RSA_WITH_AES_256_CBC_SHA256 | TLS 1.2 |
| TLS_RSA_WITH_AES_128_CBC_SHA256 | TLS 1.2 |
| TLS_RSA_WITH_AES_256_CBC_SHA | TLS 1.2, TLS 1.1, TLS 1.0 |
| TLS_RSA_WITH_AES_128_CBC_SHA | TLS 1.2, TLS 1.1, TLS 1.0 |
| TLS_ECDHE_ECDSA_WITH_AES_256_GCM_SHA384_P384 | TLS 1.2 |
| TLS_ECDHE_ECDSA_WITH_AES_128_GCM_SHA256_P256 | TLS 1.2 |
| TLS_ECDHE_ECDSA_WITH_AES_128_GCM_SHA256_P384 | TLS 1.2 |
| TLS_ECDHE_ECDSA_WITH_AES_256_CBC_SHA384_P384 | TLS 1.2 |
| TLS_ECDHE_ECDSA_WITH_AES_128_CBC_SHA256_P256 | TLS 1.2 |
| TLS_ECDHE_ECDSA_WITH_AES_128_CBC_SHA256_P384 | TLS 1.2 |
| TLS_ECDHE_ECDSA_WITH_AES_256_CBC_SHA_P256 | TLS 1.2, TLS 1.1, TLS 1.0 |
| TLS_ECDHE_ECDSA_WITH_AES_256_CBC_SHA_P384 | TLS 1.2, TLS 1.1, TLS 1.0 |
| TLS_ECDHE_ECDSA_WITH_AES_128_CBC_SHA_P256 | TLS 1.2, TLS 1.1, TLS 1.0 |
| TLS_ECDHE_ECDSA_WITH_AES_128_CBC_SHA_P384 | TLS 1.2, TLS 1.1, TLS 1.0 |
| TLS_DHE_DSS_WITH_AES_256_CBC_SHA256 | TLS 1.2 |
| TLS_DHE_DSS_WITH_AES_128_CBC_SHA256 | TLS 1.2 |
| TLS_DHE_DSS_WITH_AES_256_CBC_SHA | TLS 1.2, TLS 1.1, TLS 1.0 |
| TLS_DHE_DSS_WITH_AES_128_CBC_SHA | TLS 1.2, TLS 1.1, TLS 1.0 |
| TLS_RSA_WITH_3DES_EDE_CBC_SHA | TLS 1.2, TLS 1.1, TLS 1.0 |
| TLS_DHE_DSS_WITH_3DES_EDE_CBC_SHA | TLS 1.2, TLS 1.1, TLS 1.0, SSL 3.0 |
| TLS_RSA_WITH_RC4_128_SHA | TLS 1.2, TLS 1.1, TLS 1.0, SSL 3.0 |
| TLS_RSA_WITH_RC4_128_MD5 | TLS 1.2, TLS 1.1, TLS 1.0, SSL 3.0 |
| TLS_RSA_WITH_NULL_SHA256* | TLS 1.2 |
| TLS_RSA_WITH_NULL_SHA* | TLS 1.2, TLS 1.1, TLS 1.0, SSL 3.0 |
| SSL_CK_RC4_128_WITH_MD5* | SSL 2.0 |
| SSL_CK_DES_192_EDE3_CBC_WITH_MD5 | SSL 2.0 |
| TLS_ECDHE_RSA_WITH_AES_256_CBC_SHA384_P521 | TLS 1.2 |
| TLS_ECDHE_RSA_WITH_AES_128_CBC_SHA256_P521 | TLS 1.2 |
| TLS_ECDHE_RSA_WITH_AES_256_CBC_SHA_P521 | TLS 1.2, TLS 1.1, TLS 1.0 |
| TLS_ECDHE_RSA_WITH_AES_128_CBC_SHA_P521 | TLS 1.2, TLS 1.1, TLS 1.0 |
| TLS_ECDHE_ECDSA_WITH_AES_256_GCM_SHA384_P521 | TLS 1.2 |
| TLS_ECDHE_ECDSA_WITH_AES_128_GCM_SHA256_P521 | TLS 1.2 |
| TLS_ECDHE_ECDSA_WITH_AES_256_CBC_SHA384_P521 | TLS 1.2 |
| TLS_ECDHE_ECDSA_WITH_AES_128_CBC_SHA256_P521 | TLS 1.2 |
| TLS_ECDHE_ECDSA_WITH_AES_256_CBC_SHA_P521 | TLS 1.2, TLS 1.1, TLS 1.0 |
| TLS_ECDHE_ECDSA_WITH_AES_128_CBC_SHA_P521 | TLS 1.2, TLS 1.1, TLS 1.0 |
| TLS_RSA_WITH_DES_CBC_SHA | TLS 1.2, TLS 1.1, TLS 1.0, SSL 3.0 |
| TLS_RSA_EXPORT1024_WITH_RC4_56_SHA | TLS 1.2, TLS 1.1, TLS 1.0, SSL 3.0 |
| TLS_RSA_EXPORT1024_WITH_DES_CBC_SHA | TLS 1.2, TLS 1.1, TLS 1.0, SSL 3.0 |
| TLS_RSA_EXPORT_WITH_RC4_40_MD5 | TLS 1.2, TLS 1.1, TLS 1.0, SSL 3.0 |
| TLS_RSA_WITH_NULL_MD5 | TLS 1.2, TLS 1.1, TLS 1.0, SSL 3.0 |
| TLS_DHE_DSS_WITH_DES_CBC_SHA | TLS 1.2, TLS 1.1, TLS 1.0, SSL 3.0 |
| TLS_DHE_DSS_EXPORT1024_WITH_DES_CBC_SHA | TLS 1.2, TLS 1.1, TLS 1.0, SSL 3.0 |
| SSL_CK_DES_64_CBC_WITH_MD5 | SSL 2.0 |
| SSL_CK_RC4_128_EXPORT40_WITH_MD5 | SSL 2.0 |
* Used only when the application explicitly requests.
¶ 8. SSL/TLS Protocols
SSL (Secure Sockets Layer) and its successor TLS (Transport Layer Security) are encryption protocols designed for the internet that allow secure communication between the "Client" and "Server" sides of a web application. SSL/TLS work essentially in the same way, using public and private keys and a digital certificate. Below, we will show how to enable and disable support for SSL and TLS protocols through the Windows Registry Editor to help you manage and troubleshoot security issues.
¶ 8.1 SSL 2.0
To add subkeys and change their respective values to enable or disable SSL 2.0 support, follow the steps below.
-
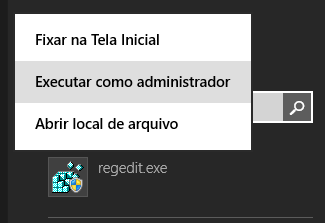
To open the Registry Editor, go to the Windows start screen, type "regedit.exe," right-click, and choose the "Run as administrator" option.
The Registry Editor's navigation area displays folders, with each folder representing a pre-defined key on the local computer.
-
In the Registry Editor, navigate to the following key:
HKEY_LOCAL_MACHINE\SYSTEM\CurrentControlSet\Control\SecurityProviders\Schannel\Protocols\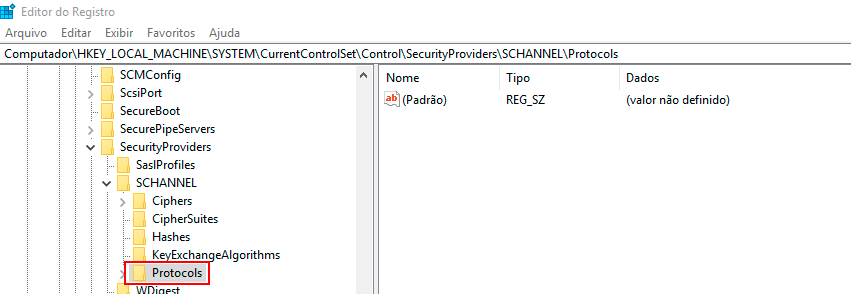
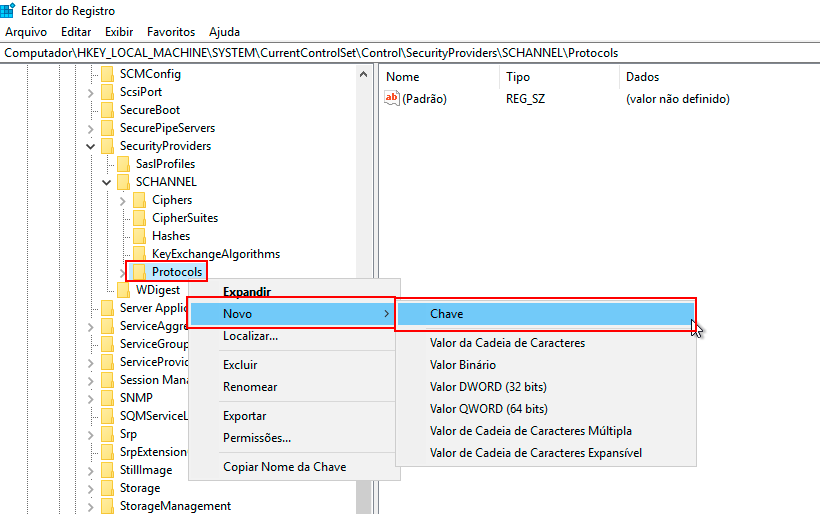
-
Right-click on the Protocols key, then click New -> Key and name the new subkey SSL 2.0.
-
Right-click on the SSL 2.0 subkey, click New -> Key, and name it Client for this new subkey.
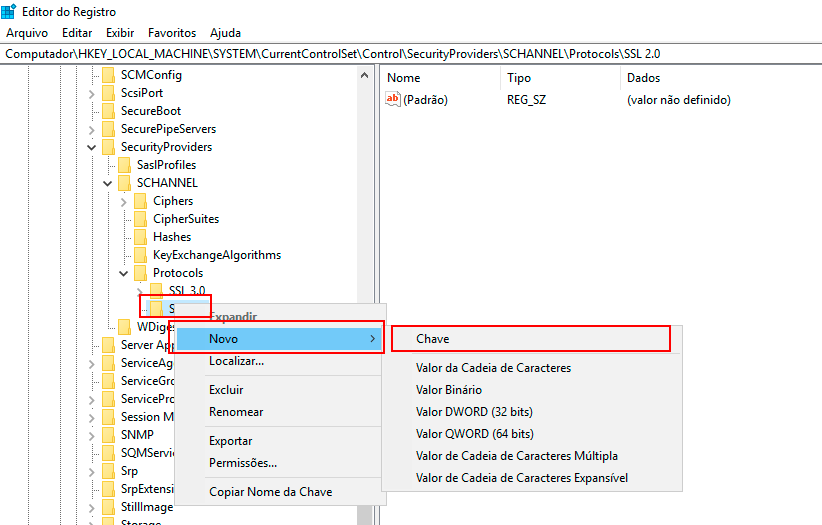
-
Right-click again on the SSL 2.0 subkey, click New -> Key, and name it Server for this new subkey.
-
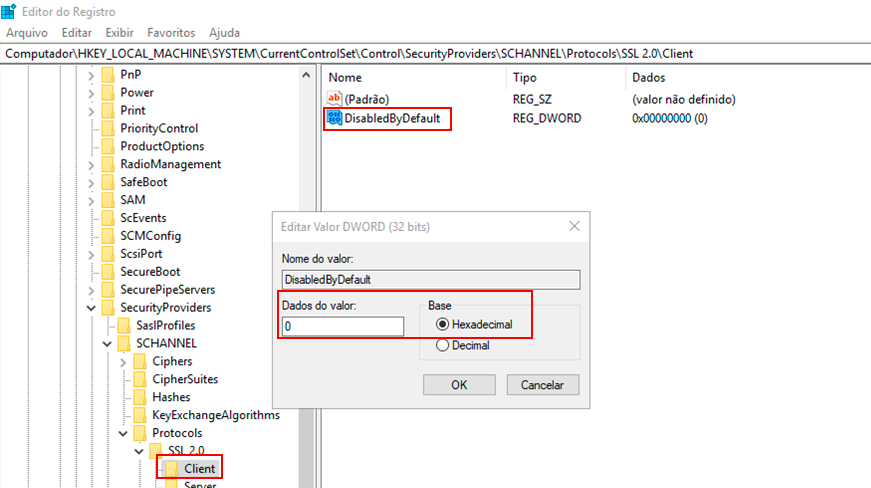
Right-click on the Client subkey, click New -> DWORD (32-bit) Value, and name the new value DisabledByDefault.

-
Double-click the DWORD value DisabledByDefault, and the Edit DWORD (32-bit) Value screen will appear.
- To enable SSL 2.0 on the Client side, type "0" in the Value Data field and choose "Hexadecimal" in the Base field, then click OK.
- To disable SSL 2.0 on the Client side, type "1" in the Value Data field and choose "Hexadecimal," then click OK.
-
Right-click on the Server subkey, click New -> DWORD (32-bit) Value, and name it "Enabled."
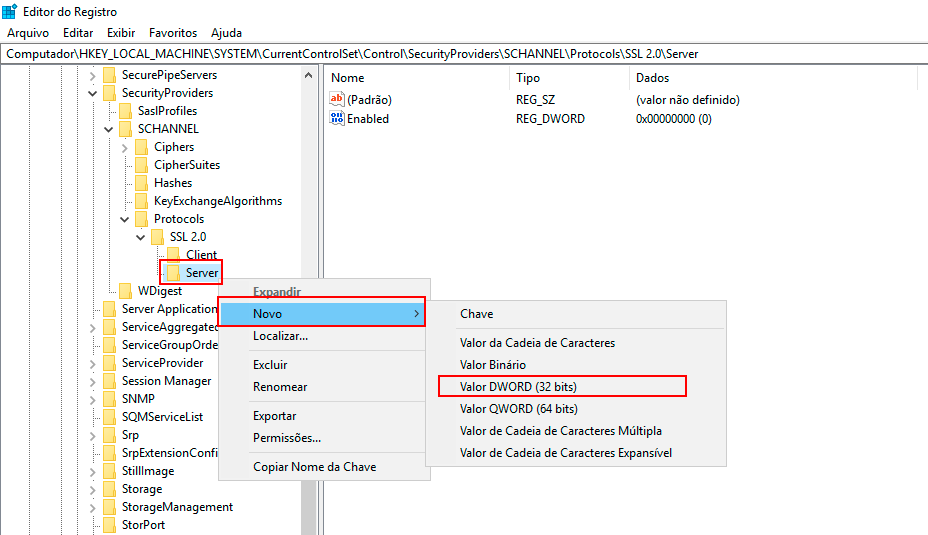
-
Double-click the DWORD value Enabled, and the Edit DWORD (32-bit) Value screen will appear.
- To enable SSL 2.0 on the Server side, type "1" in the Value Data field, choose "Hexadecimal" in the Base field, and click OK.
- To disable SSL 2.0 on the Server side, type "0" in the Value Data field, choose "Hexadecimal," and click OK.

-
Close the Registry Editor. The changes will take effect the next time Windows is restarted.
¶ 8.2 SSL 3.0
To add subkeys and change their respective values to enable or disable SSL 3.0 support, follow these steps:
-
To open the Registry Editor, go to the Windows start screen, type "regedit.exe," right-click, and choose the "Run as administrator" option.
The Registry Editor's navigation area displays folders. Each folder represents a pre-defined key on the local computer.
-
In the Registry Editor, navigate to the following key:
HKEY_LOCAL_MACHINE\SYSTEM\CurrentControlSet\Control\SecurityProviders\Schannel\Protocols\ -
Right-click with the mouse on the Protocols key, click New -> Key, and name the new key SSL 3.0.
-
Right-click with the mouse on the SSL 3.0 key, click New -> Key, and name it Client for the new key.
-
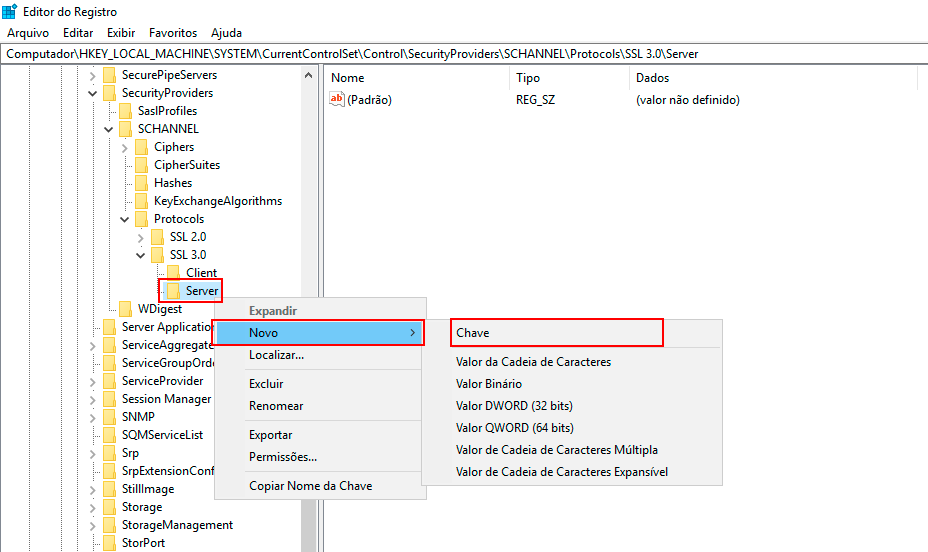
Right-click again on the SSL 3.0 key, click New -> Key, and name it Server for the new key.
-
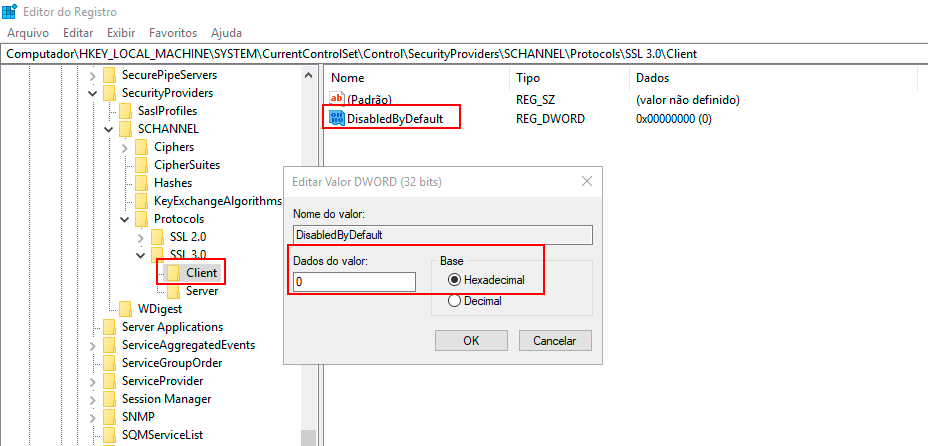
Right-click with the mouse on the Client key, click New -> DWORD (32-bit) Value, and name the new DWORD value "DisabledByDefault."
-
Double-click the DWORD value DisabledByDefault, and the Edit DWORD (32-bit) Value screen will appear.
- To enable SSL 3.0 on the Client side, type "0" in the Value Data field, choose "Hexadecimal" in the Base field, and click OK.
- To disable SSL 3.0 on the Client side, type "1" in the Value Data field, choose "Hexadecimal," and click OK.
-
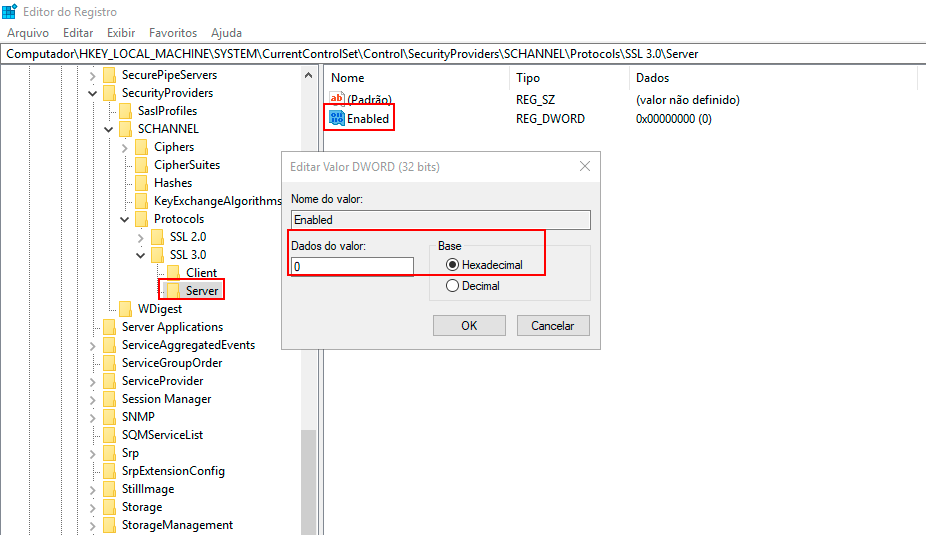
Right-click with the mouse on the Server key, click New -> DWORD (32-bit) Value, and name it "Enabled."
-
Double-click the DWORD value Enabled, and the Edit DWORD (32-bit) Value screen will appear.
- To enable SSL 3.0 on the Server side, type "1" in the Value Data field, choose "Hexadecimal" in the Base field, and click OK.
- To disable SSL 3.0 on the Server side, type "0" in the Value Data field, choose "Hexadecimal," and click OK.
-
Close the Registry Editor. The changes will take effect the next time Windows is restarted.
Note: A vulnerability has been found in version 3.0 of the SSL protocol. To ensure that only secure versions are used, we suggest disabling it on Windows and migrating to more secure security protocols such as TLS 1.0, TLS 1.1, or TLS 1.2.
¶ 8.3 TLS 1.0
To add subkeys and change their respective values to enable or disable TLS 1.0 support, follow the steps below:
-
To open the Registry Editor, go to the Windows start screen, type "regedit.exe," right-click, and choose the "Run as administrator" option.
The Registry Editor's navigation area displays folders. Each folder represents a pre-defined key on the local computer.
-
In the Registry Editor, navigate to the following key:
HKEY_LOCAL_MACHINE\SYSTEM\CurrentControlSet\Control\SecurityProviders\Schannel\Protocols\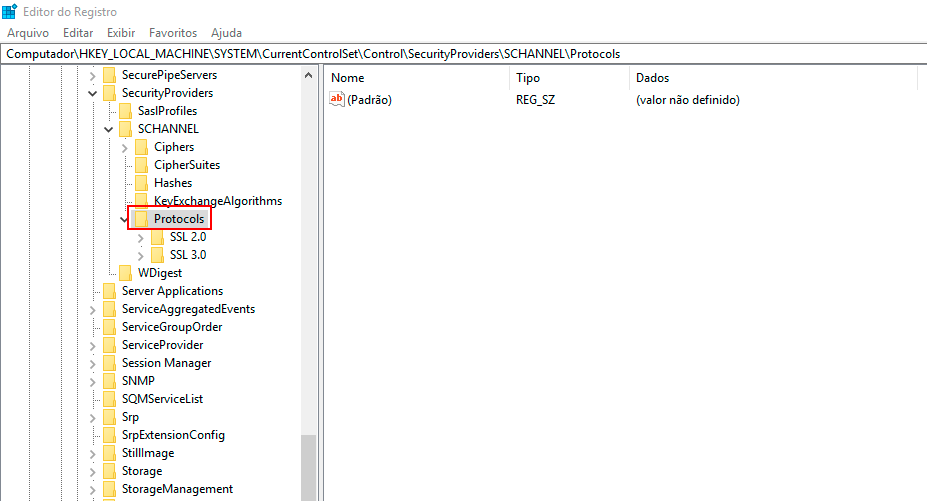
-
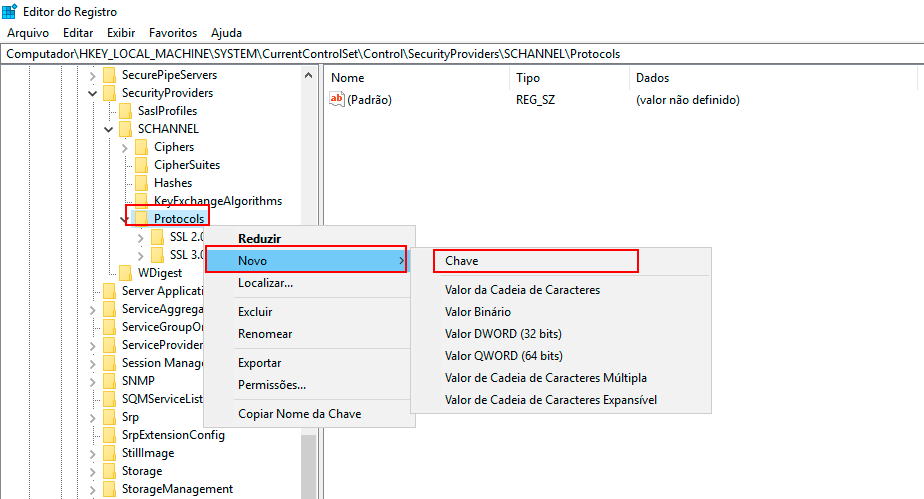
Right-click with the mouse on the Protocols key, click New -> Key, and name the new key TLS 1.0.
-
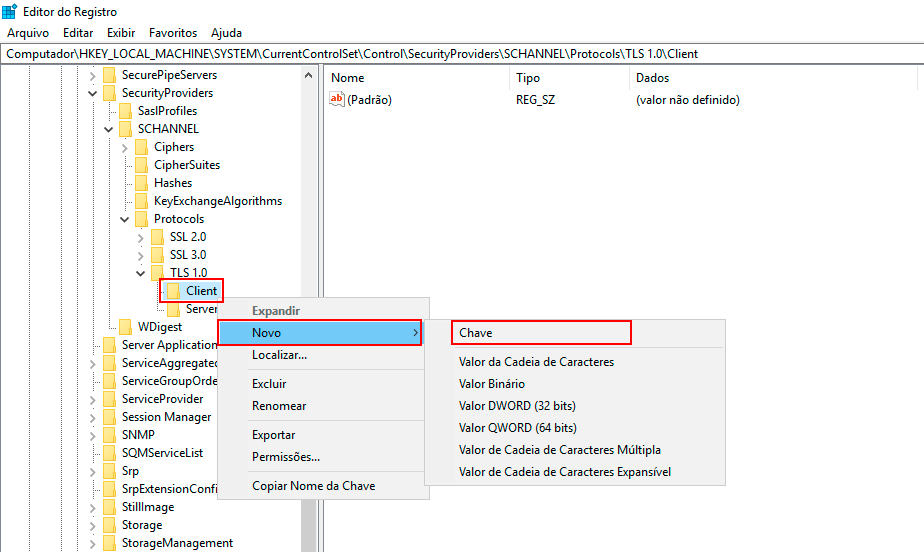
Right-click with the mouse on the TLS 1.0 key, click New -> Key, and name it Client for the new key.

-
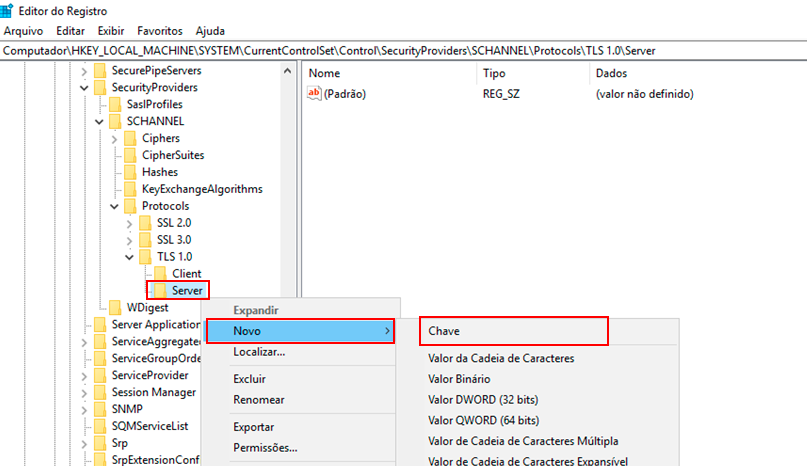
Right-click again on the TLS 1.0 key, click New -> Key, and name it Server for the new key.
-
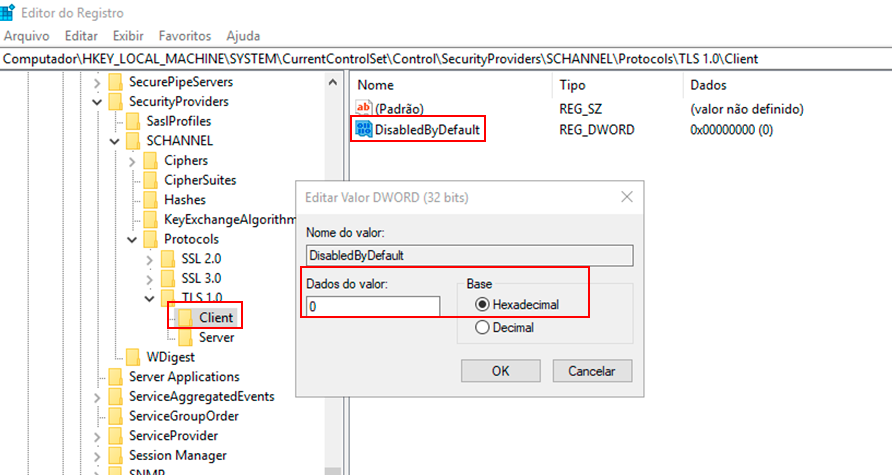
Right-click with the mouse on the Client key, click New -> DWORD (32-bit) Value, and name the new DWORD value "DisabledByDefault."
-
Double-click the DWORD value DisabledByDefault, and the Edit DWORD (32-bit) Value screen will appear.
- To enable the TLS 1.0 protocol on the Client side, type "0" in the Value Data field and choose "Hexadecimal" in the Base field, then click OK.
- To disable the TLS 1.0 protocol on the Client side, type "1" in the Value Data field and choose "Hexadecimal," then click OK.
-
Right-click with the mouse on the Server key, click New -> DWORD (32-bit) Value, and name it "Enabled."
-
Double-click the DWORD value Enabled, and the Edit DWORD (32-bit) Value screen will appear.
- To enable the TLS 1.0 protocol on the Server side, type "1" in the Value Data field, choose "Hexadecimal" in the Base field, and click OK.
- To disable the TLS 1.0 protocol on the Server side, type "0" in the Value Data field, choose "Hexadecimal," and click OK.

-
Close the Registry Editor. The changes will take effect the next time Windows is restarted.
¶ 8.4 TLS 1.1
To add subkeys and change their respective values to enable or disable TLS 1.1 support, follow these steps:
-
To open the Registry Editor, go to the Windows start screen, type "regedit.exe," right-click, and choose the "Run as administrator" option.
The Registry Editor's navigation area displays folders. Each folder represents a pre-defined key on the local computer.
-
In the Registry Editor, navigate to the following key:
HKEY_LOCAL_MACHINE\SYSTEM\CurrentControlSet\Control\SecurityProviders\Schannel\Protocols\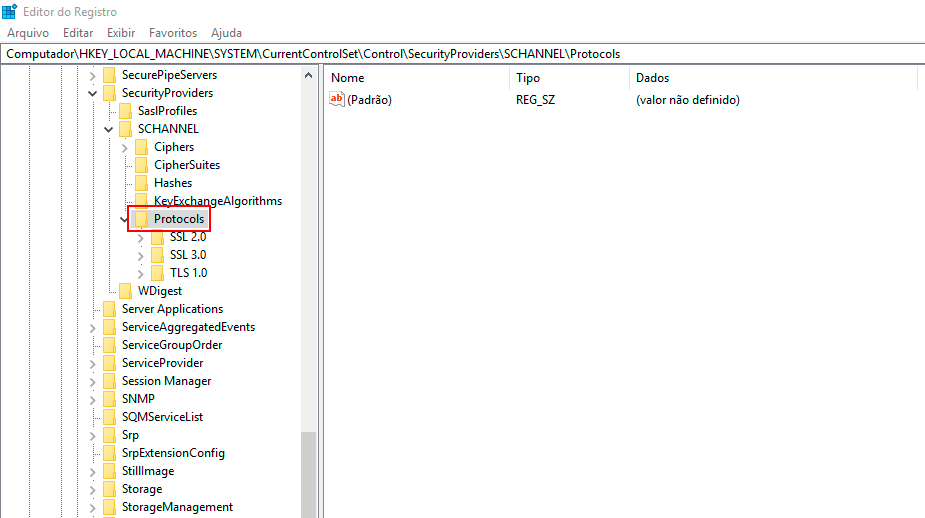
-
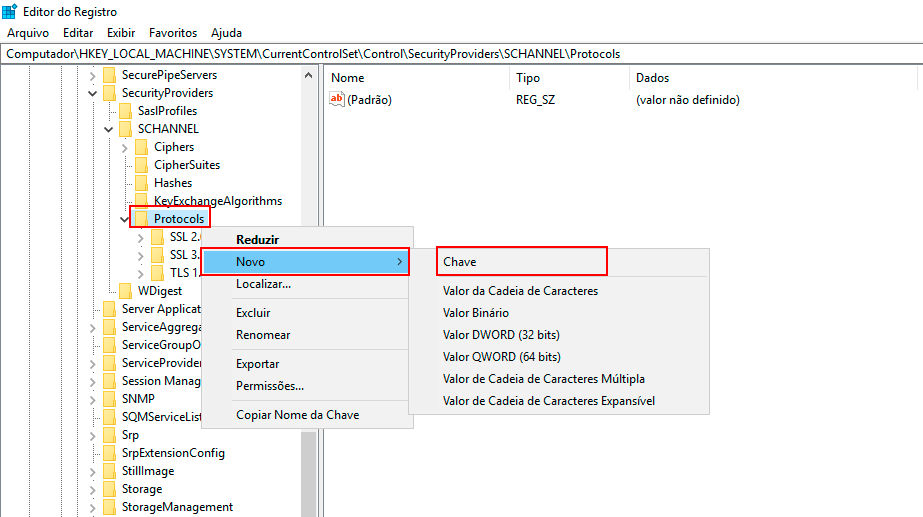
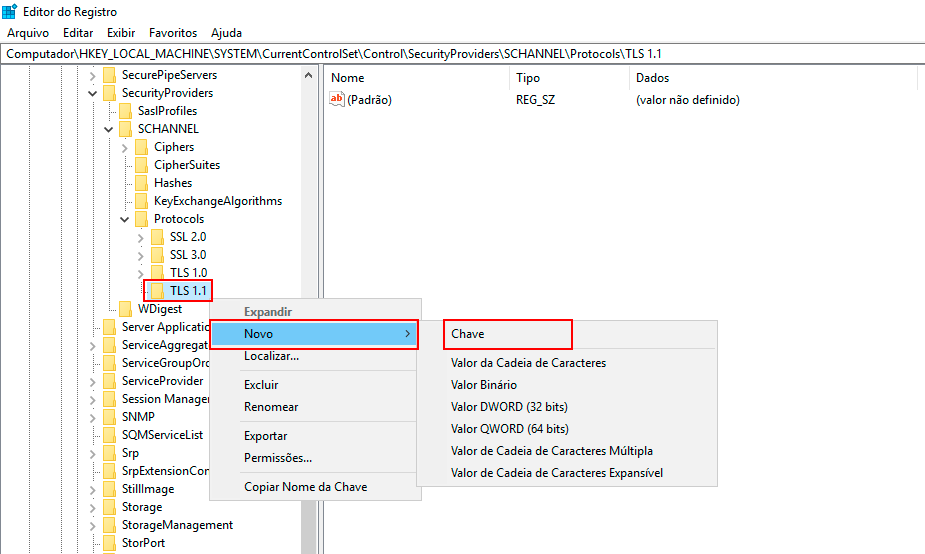
Right-click with the mouse on the Protocols key, click New -> Key, and name the new key TLS 1.1.
-
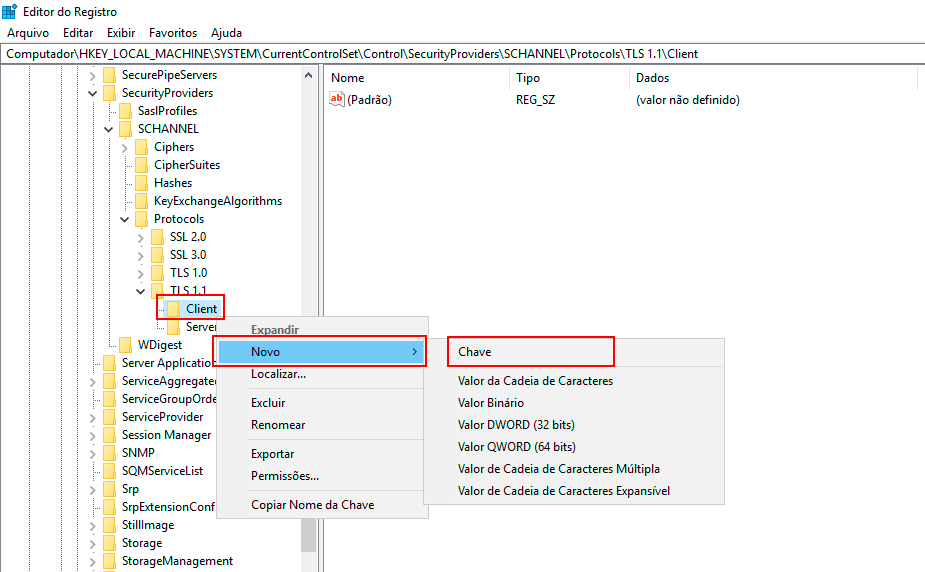
Right-click with the mouse on the TLS 1.1 key, click New -> Key, and name it Client for the new key.
-
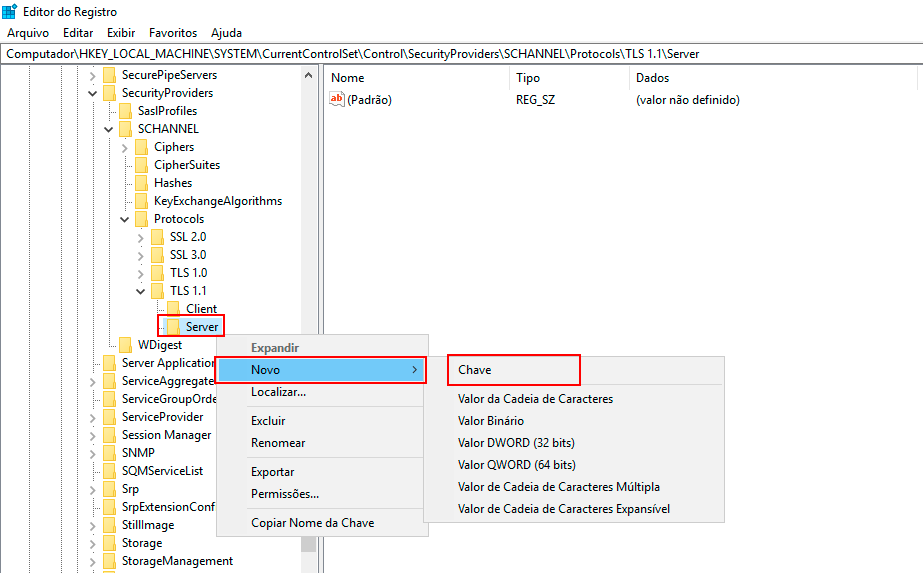
Right-click again on the TLS 1.1 key, click New -> Key, and name it Server for the new key.
-
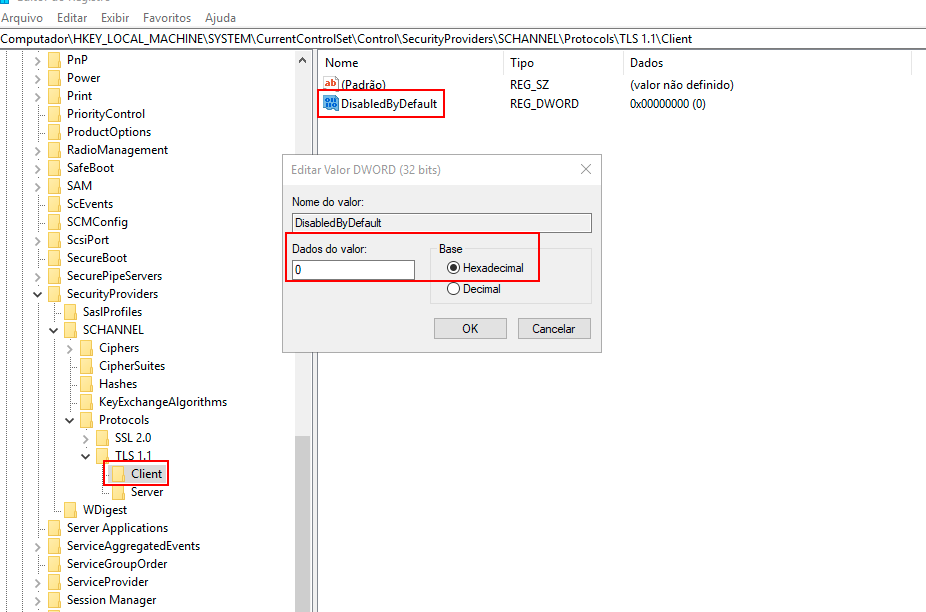
Right-click with the mouse on the Client key, click New -> DWORD (32-bit) Value, and name the new DWORD value "DisabledByDefault."
-
Double-click the DWORD value DisabledByDefault, and the Edit DWORD (32-bit) Value screen will appear.
- To enable the TLS 1.1 protocol on the Client side, type "0" in the Value Data field and choose "Hexadecimal" in the Base field, then click OK.
- To disable the TLS 1.1 protocol on the Client side, type "1" in the Value Data field, choose "Hexadecimal," and click OK.
-
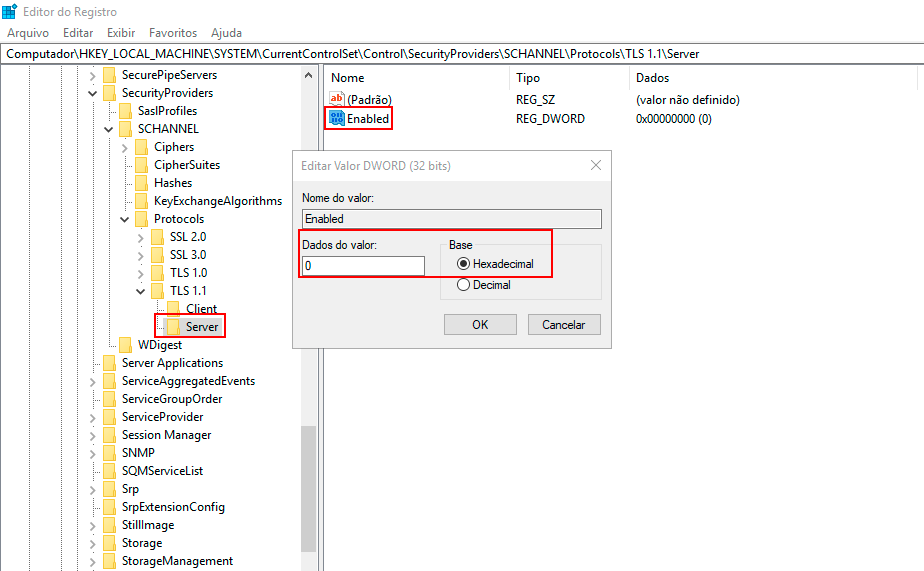
Right-click with the mouse on the Server key, click New -> DWORD (32-bit) Value, and name it "Enabled."
-
Double-click the DWORD value Enabled, and the Edit DWORD (32-bit) Value screen will appear.
- To enable the TLS 1.1 protocol on the Server side, type "1" in the Value Data field, choose "Hexadecimal" in the Base field, and click OK.
- To disable the TLS 1.1 protocol on the Server side, keep the value "0" in the Value Data field, and choose "Hexadecimal" in the Base field, then click OK.
-
Close the Registry Editor. The changes will take effect the next time Windows is restarted.
¶ 8.5 TLS 1.2
Below are the steps to add subkeys and change their respective values to enable or disable TLS 1.2 support.
-
To open the Registry Editor, go to the Windows start screen, type "regedit.exe," right-click, and choose the "Run as administrator" option.
The Registry Editor's navigation area displays folders. Each folder represents predefined keys or subkeys on the local computer.
-
In the Registry Editor, navigate to the following key:
HKEY_LOCAL_MACHINE\SYSTEM\CurrentControlSet\Control\SecurityProviders\Schannel\Protocols\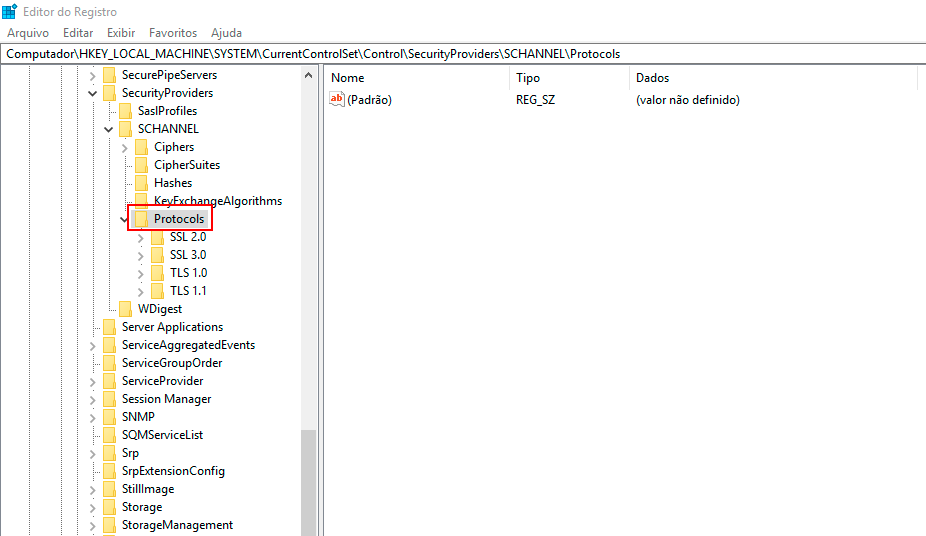
-
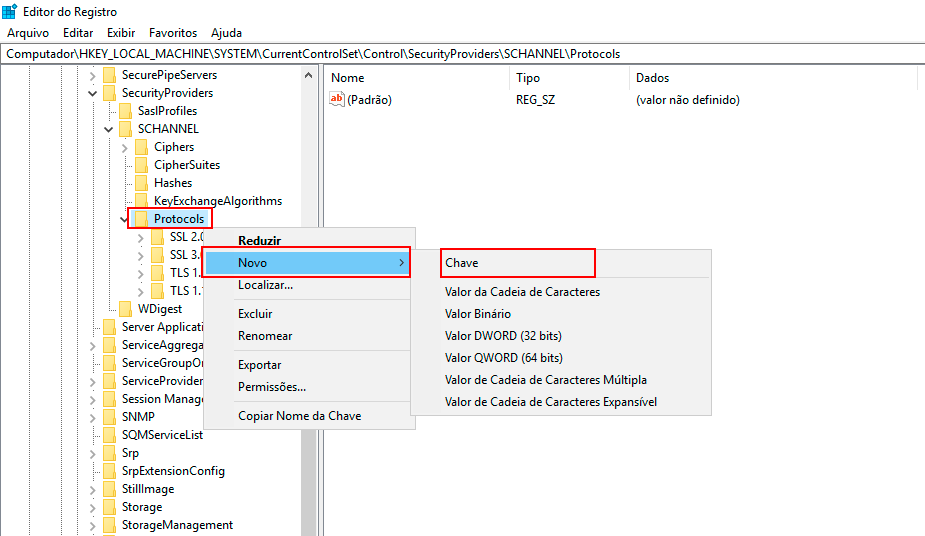
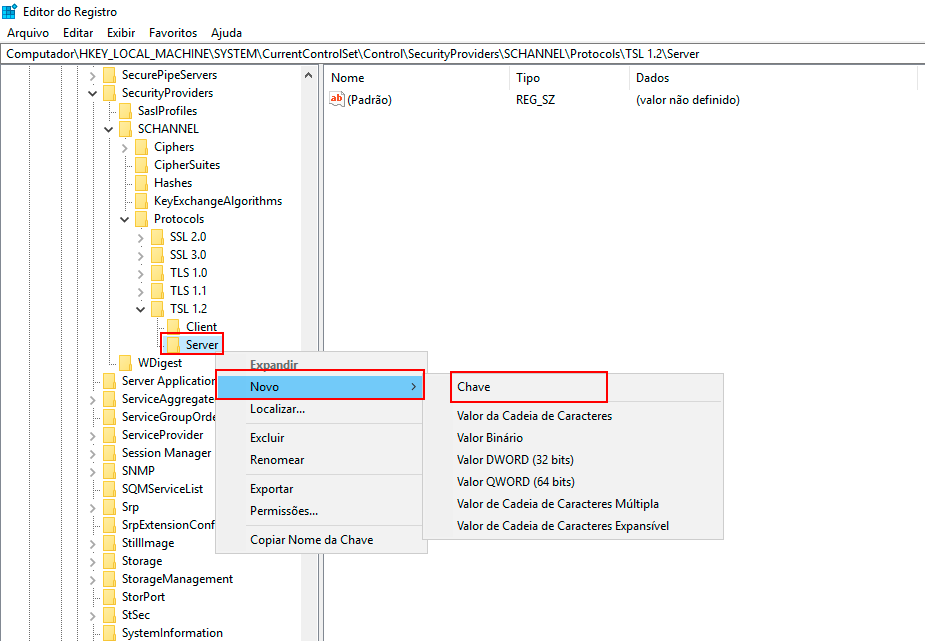
Right-click with the mouse on the Protocols key, click New -> Key, and name the new key TLS 1.2.
-
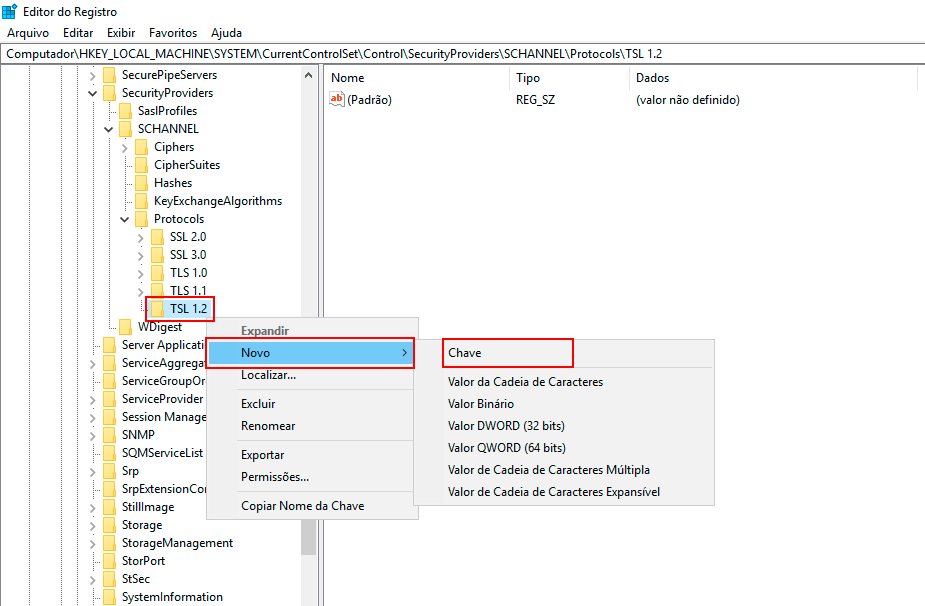
Right-click with the mouse on the TLS 1.2 key, click New -> Key, and name it Client for the new subkey.
-
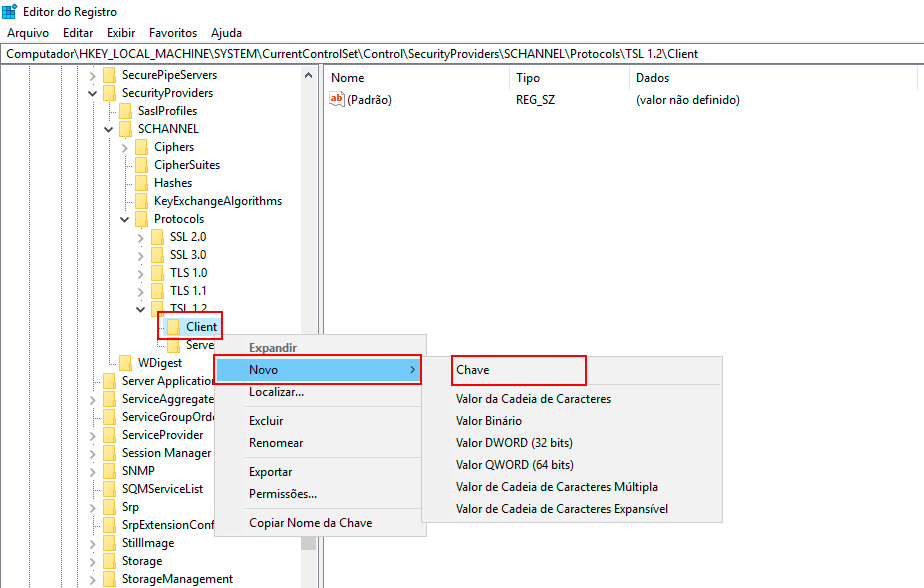
Right-click again on the TLS 1.2 key, click New -> Key, and name it Server for this new subkey.
-
Right-click with the mouse on the Client subkey, click New -> DWORD (32-bit) Value, and name the new DWORD value "DisabledByDefault."
-
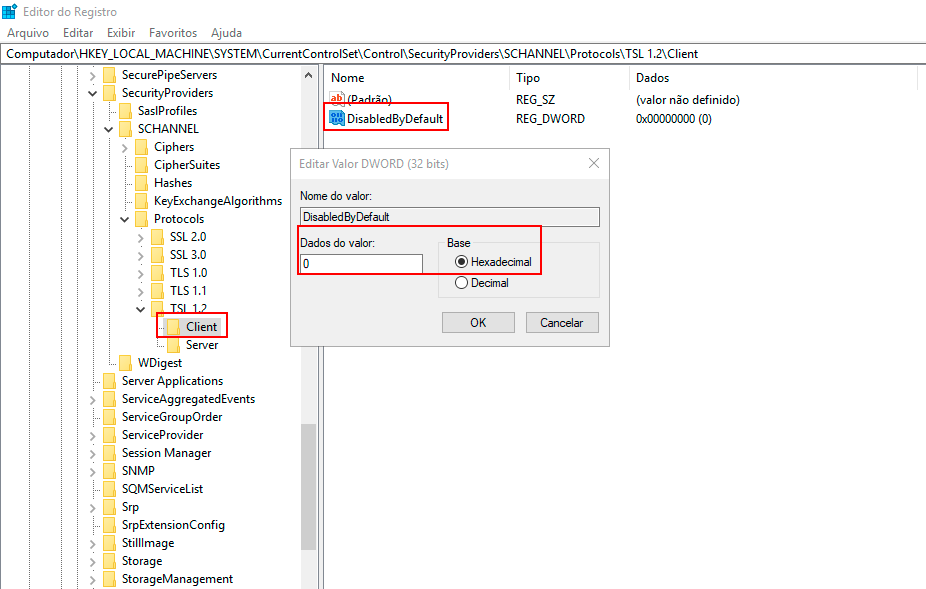
Double-click the DWORD value DisabledByDefault, and the Edit DWORD (32-bit) Value screen will appear.
- To enable the TLS 1.2 protocol on the Client side, type "0" in the Value Data field and choose "Hexadecimal" in the Base field, then click OK.
- To disable the TLS 1.2 protocol on the Client side, type "1" in the Value Data field, choose "Hexadecimal," and click OK.
-
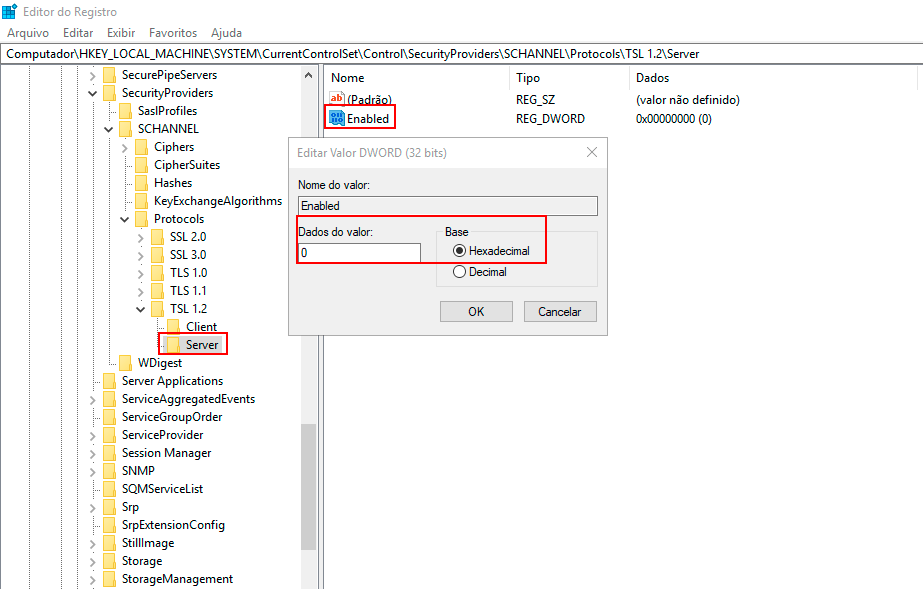
Right-click with the mouse on the Server key, click New -> DWORD (32-bit) Value, and name it "Enabled."
-
Double-click the DWORD value Enabled, and the Edit DWORD (32-bit) Value screen will appear.
- To enable the TLS 1.2 protocol on the Server side, type "1" in the Value Data field, choose "Hexadecimal" in the Base field, and click OK.
- To disable the TLS 1.2 protocol on the Server side, keep the value "0" in the Value Data field, choose "Hexadecimal," and click OK.
-
Close the Registry Editor. The changes will take effect the next time Windows is restarted.