¶ 1. Abstract
This guide is a step-by-step manual for installing, updating, uninstalling, and using an Excel add-in called T6 Planning Excel Add-In. It provides detailed instructions on performing these operations from the T6 Planning and MicroStrategy portals, in case of integration. In addition to installation and update steps, it offers guidance on accessing, using forms, switching between pages, working with data, interacting with tasks, and other features available in the T6 Planning Excel Add-In directly in Microsoft Excel. It is a highly specific and detailed guide to facilitate the use of this planning tool.
¶ 2. Installing T6 Planning Excel Add-In
¶ 2.1 Overview
The installation of T6 Planning Excel Add-In can be done from the T6 Planning portal and the MicroStrategy portal (if integrated with T6 Planning).
With a redesigned interface, the new version of T6 Planning Excel Add-In provides users with improved performance, supporting heavier and more extensive forms. Additionally, T6 Planning Excel Add-In comes with a new installer that is faster, more intuitive, and full of new features.
¶ 2.1.1 Prerequisites
For Excel Add-In installation, the following prerequisites are required:
- Microsoft .Net Framework 4.8 or higher:
https://support.microsoft.com/en-us/help/4503548/microsoft-net-framework-4-8-offline-installer-for-windows
¶ 2.2 Installing from T6 Planning Portal
To start the installation of Excel Add-In from the T6 Planning portal, follow these steps:
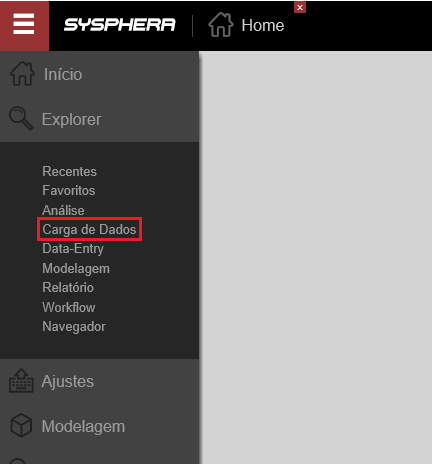
Access the T6 Planning menu and click on Data Load.
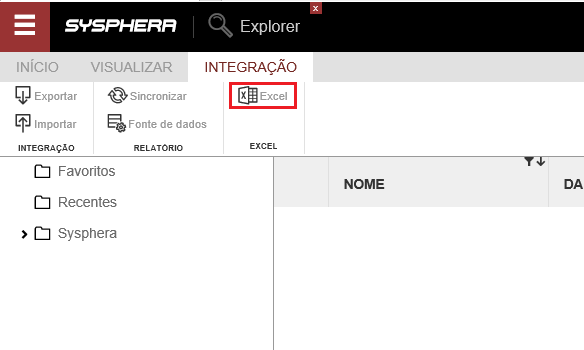
On the next screen, click on the Integration tab and then on the Excel item.
A warning message will be displayed. Click the Run button to start the installation setup.

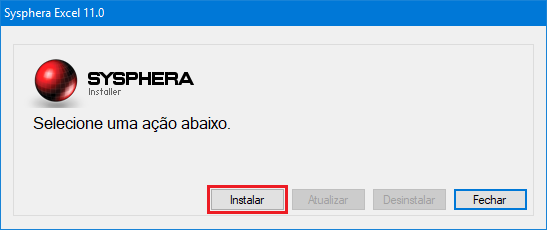
In the installer pop-up window, click on the Install option.
The T6 Planning Excel Add-In installer will check if all installation requirements, such as software and settings, are in order. In case of a negative result, a warning message will be displayed, indicating the necessary action. In case of a positive result, the installation will proceed normally.
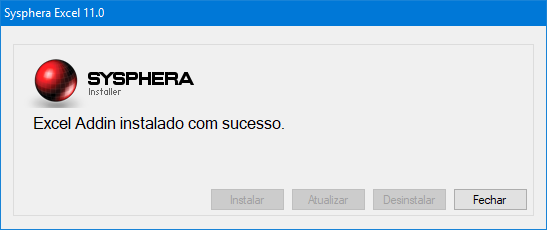
Upon seeing the message that the installation was successful, click Close, and the installer will close automatically.
¶ 2.3 Installing from MicroStrategy Portal
To start the installation of Excel Add-In from the MicroStrategy portal, click on the T6 Planning button, and then go to the menu -> Data Entry -> Forms.
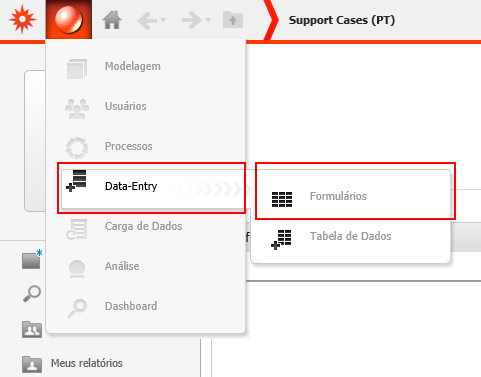
You will be directed to the T6 Planning forms screen, where you should click on the Excel V2 button.

A warning message will be displayed. Click the Run button to start the installation setup.
In the installer pop-up window, click on the Install option.
The T6 Planning Excel Add-In installer will check if all installation requirements, such as software and settings, are in order. In case of a negative result, a warning message will be displayed, indicating the necessary action. In case of a positive result, the installation will proceed normally.
Upon seeing the message that the installation was successful, click Close, and the installer will close automatically.
¶ 3. Updating T6 Planning Excel Add-In
¶ 3.1 Overview
Whenever the T6 Planning portal is updated, it is necessary to update the T6 Planning Excel Add-In. The update of T6 Planning Excel Add-In can be done from the T6 Planning portal and the MicroStrategy portal (if integrated with T6 Planning).
¶ 3.2 Updating from T6 Planning Portal
To update the Excel Add-In from the T6 Planning portal, follow these steps:
Access the T6 Planning menu and click on Data Load.
On the next screen, click on the Integration tab and then on the Excel item.
A warning message will be displayed. Click the Run button to start the installation setup.
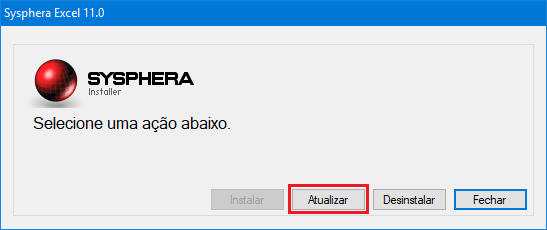
In the installer pop-up window, click on the Update option.
The T6 Planning Excel Add-In installer will check if all update requirements, such as software and settings, are in order. In case of a negative result, a warning message will be shown, indicating the necessary action. In case of a positive result, the update will proceed normally.
Upon seeing the message that the update installation was successful, click Close, and the installer will close automatically.

¶ 3.3 Updating from MicroStrategy Portal
To update the Excel Add-In from the MicroStrategy portal, click on the T6 Planning button, and then go to the menu -> Data Entry -> Forms.
You will be directed to the T6 Planning forms screen, where you should click on the Excel V2 button.
A warning message will be displayed. Click the Run button to start the installation setup.
In the installer pop-up window, click on the Update option.
The T6 Planning Excel Add-In installer will check if all update requirements, such as software and settings, are in order. In case of a negative result, a warning message will be shown, indicating the necessary action. In case of a positive result, the update will proceed normally.
Upon seeing the message that the update installation was successful, click Close, and the installer will close automatically.
¶ 4. Uninstalling T6 Planning Excel Add-In
¶ 4.1 Overview
This chapter covers the uninstallation of T6 Planning Excel Add-In.
¶ 4.2 Uninstalling T6 Planning Excel Add-In
The uninstallation of T6 Planning Excel Add-In V2 is done from the installer itself. To view it, follow these steps:
Access the T6 Planning menu and click on Data Load.
On the next screen, click on the Integration tab and then on the Excel item.
The uninstallation of T6 Planning Excel Add-In V2 is done from the installer itself. To view it, go to the menu -> Data Entry -> Forms and click on the Excel V2 button.
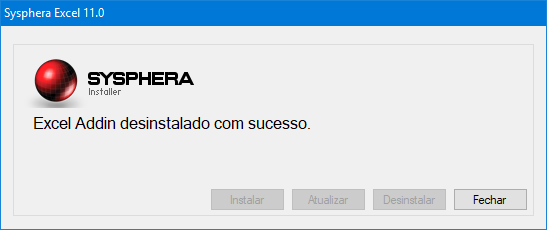
In the installer pop-up window, click on the Uninstall option.

Upon seeing the message that the uninstallation was successful, click Close, and the installer will close automatically.
¶ 5. Using T6 Planning Excel Add-In
¶ 5.1 Overview
This chapter focuses on using the T6 Planning Excel Add-In to familiarize the user with its features.
¶ 5.2 First Access to T6 Planning Excel Add-In
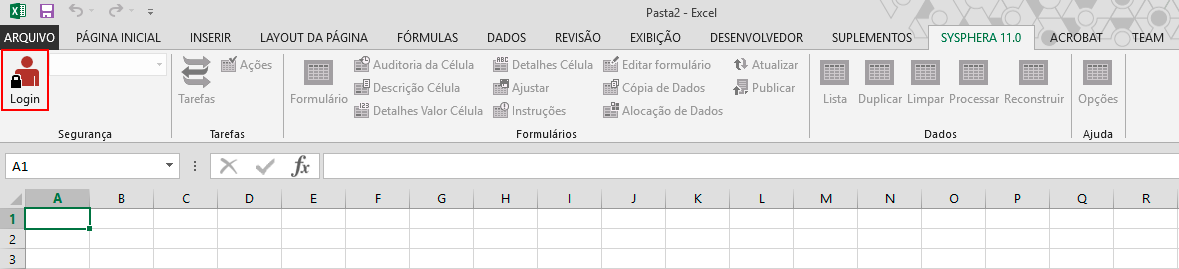
After installing T6 Planning Excel Add-In, when you open Microsoft Excel, you will see T6 Planning 11.1 in the menu bar.
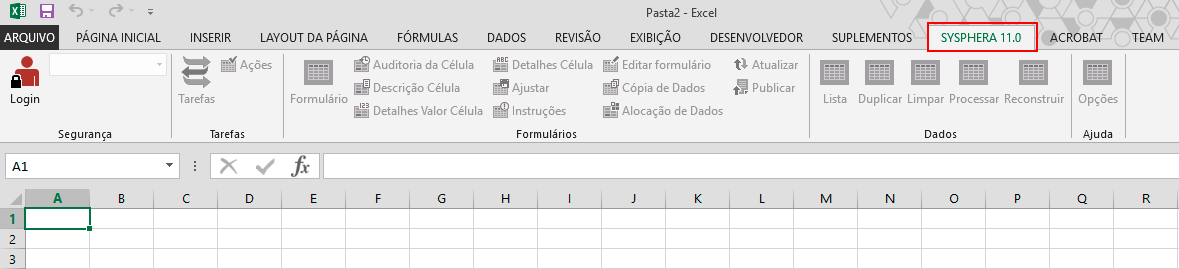
Click on the T6 Planning 11.1 menu and then click on the Login option to access the application.
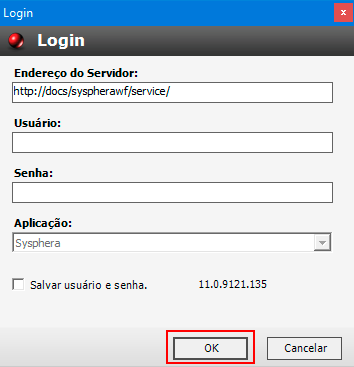
The T6 Planning Excel Add-In login window will be displayed. To log in, follow these steps:
- Insert the T6 Planning application server address, remembering that it must always end with /Service/ as in this example: http://<server_name>/<portal_name>/Service/
- Enter your T6 Planning username.
- Enter your T6 Planning portal access password.
- Select the application you want to log in to if the database has more than one application.
- If you want the T6 Planning Excel Add-In to remember the login and password, check the Save User and Password checkbox.
- Click OK.
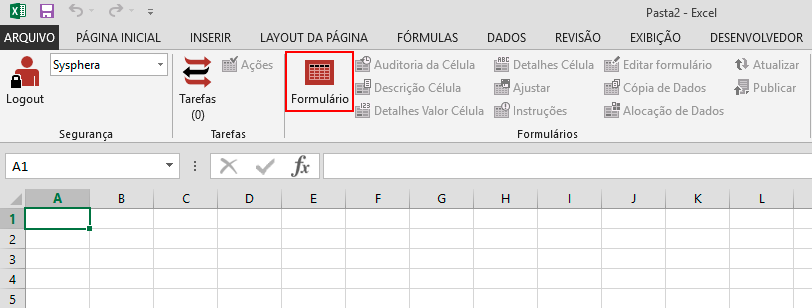
From then on, you can start using the T6 Planning features within Microsoft Excel.
¶ 5.3 Accessing Forms in T6 Planning Excel Add-In
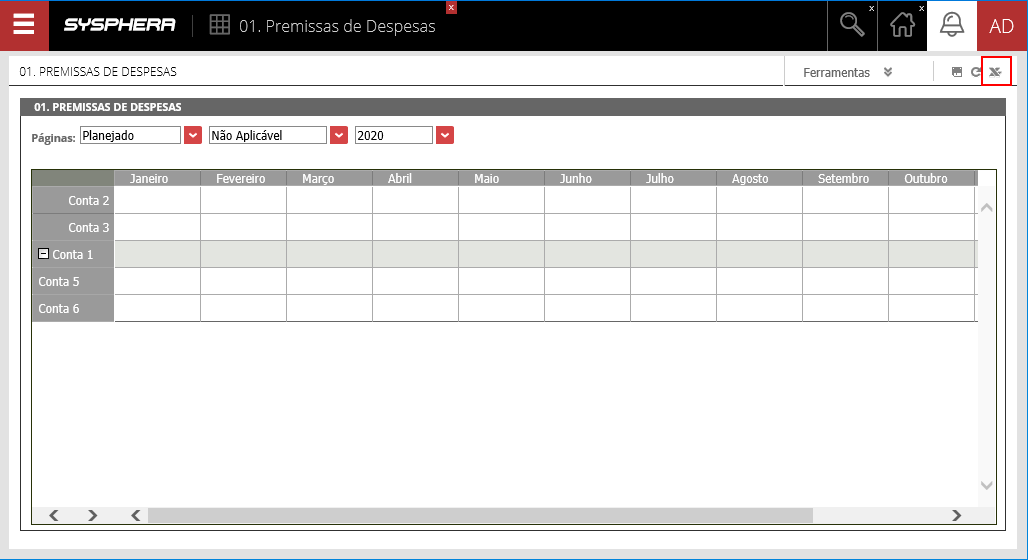
After logging into the T6 Planning Excel Add-In, you will see integrated T6 Planning features within Microsoft Excel. To open application forms, click on the Form option.
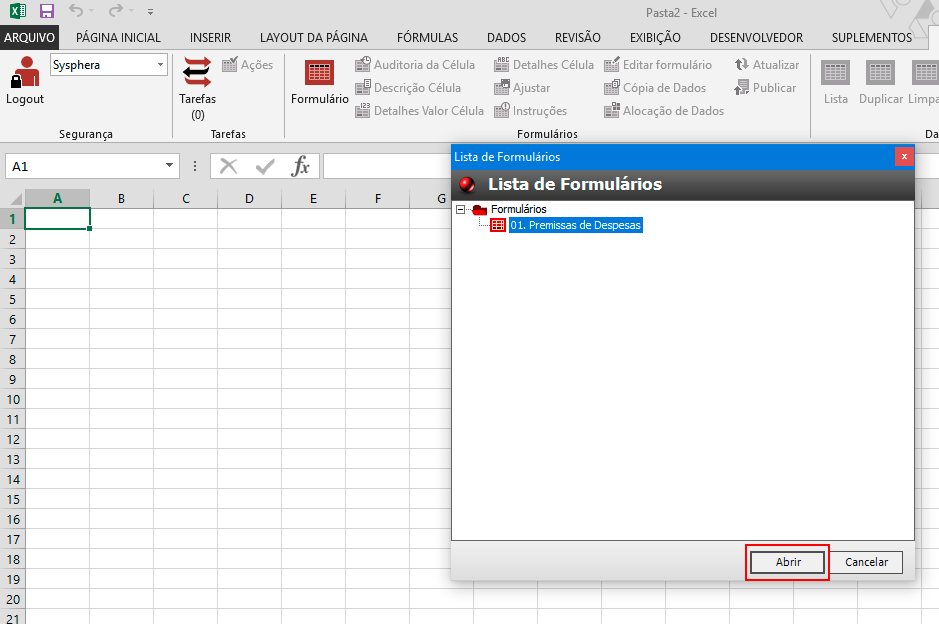
A pop-up window will appear, displaying a list of forms. Select the desired form and click Open.
If you need to work with multiple forms simultaneously, such as using one form for Expense Entry with Employees and another for analyzing the impact of entries on HR Assumptions, or even copying data from one form to another, you can open them all in the same tab, a distinctive feature of T6 Planning Excel Add-In V2.

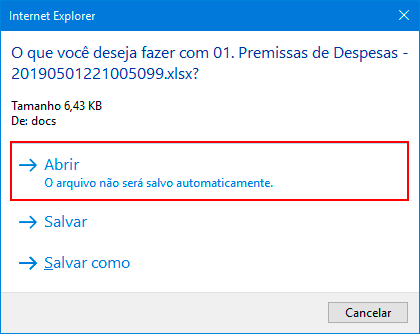
You can also open a form directly from the T6 Planning web portal to Excel. Simply view the form in T6 Planning and click the Excel icon. An xlsx file will be generated.
In the pop-up window, click Open.
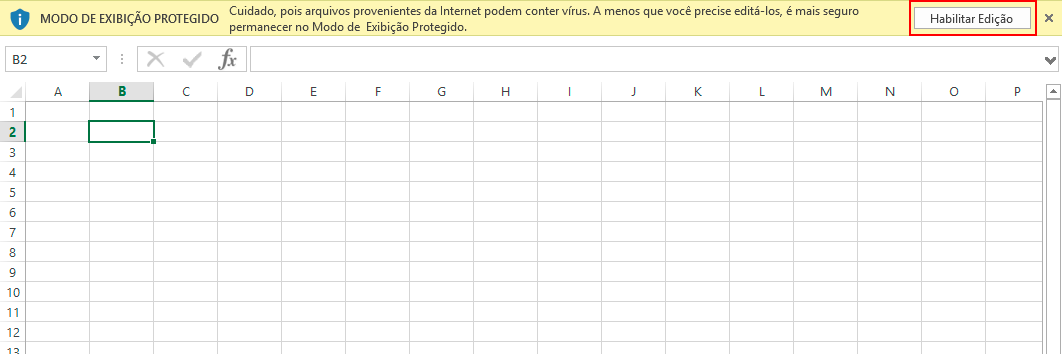
Microsoft Excel will open. In some cases, the screen may open in protected view, depending on Windows settings. If this happens, click Enable Editing.
Next, the form will be displayed normally in Excel.
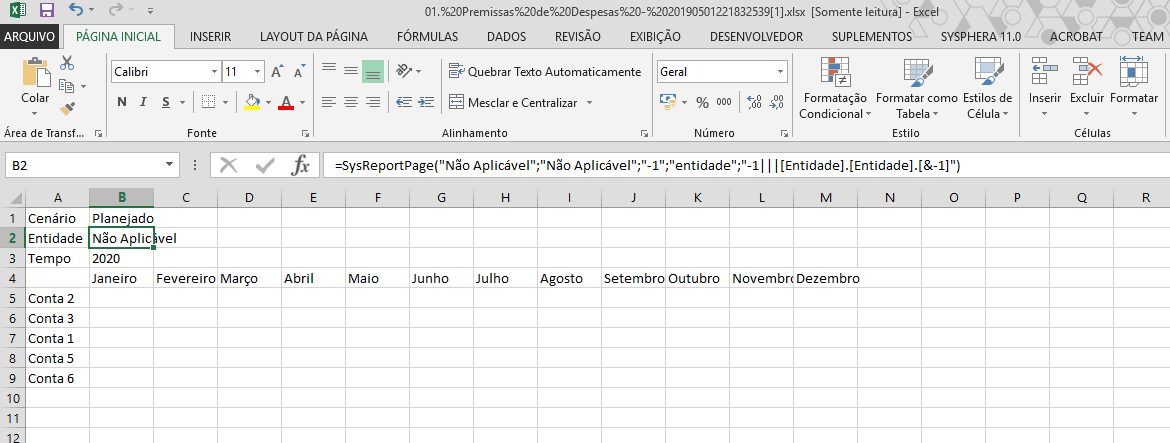
¶ 5.4 Switching Between Form Pages in T6 Planning Excel Add-In
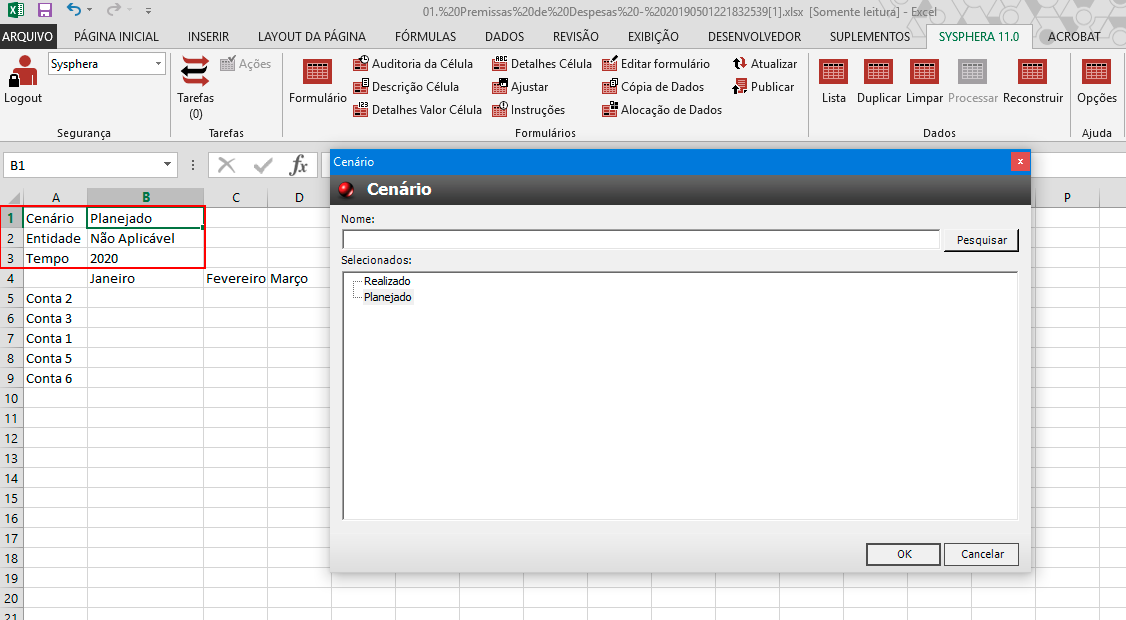
After logging into T6 Planning Excel Add-In and viewing the desired form, you can easily switch between pages like Scenario and Entity. To do this, double-click on the respective Excel cell. A pop-up window will appear with available options for selection.
¶ 5.5 Working with Data Forms in T6 Planning Excel Add-In
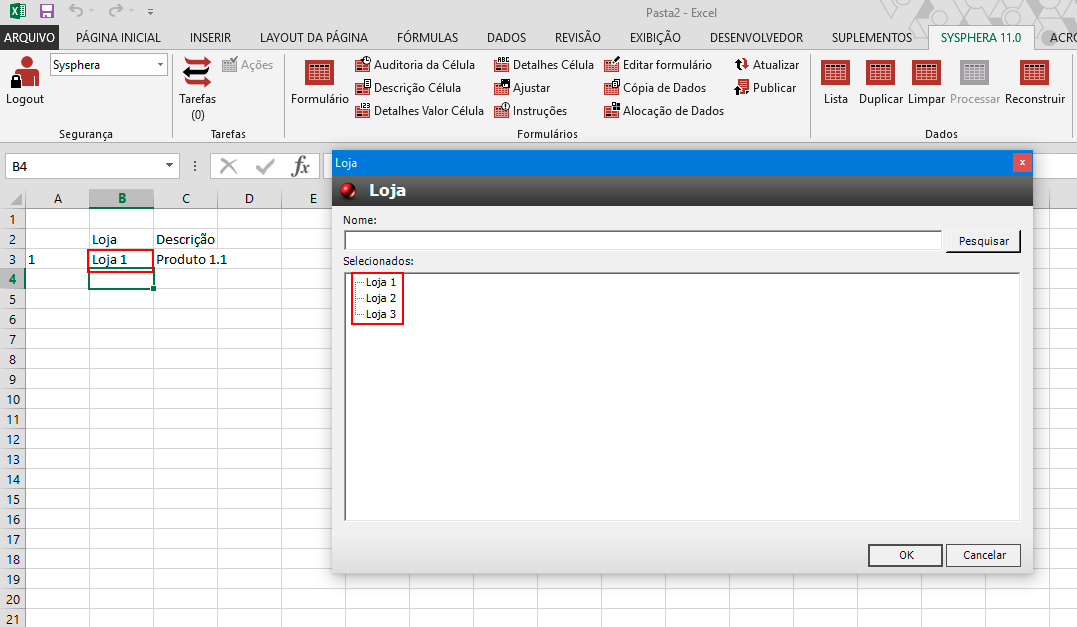
When opening a data form containing links for option selection, double-clicking on the link field will show a pop-up window with linked fields for selection.
When typing a word in the link field, the Auto-Complete feature will search for the full name of the link. If there are multiple options for the entered word, a pop-up window will display the options for selection.

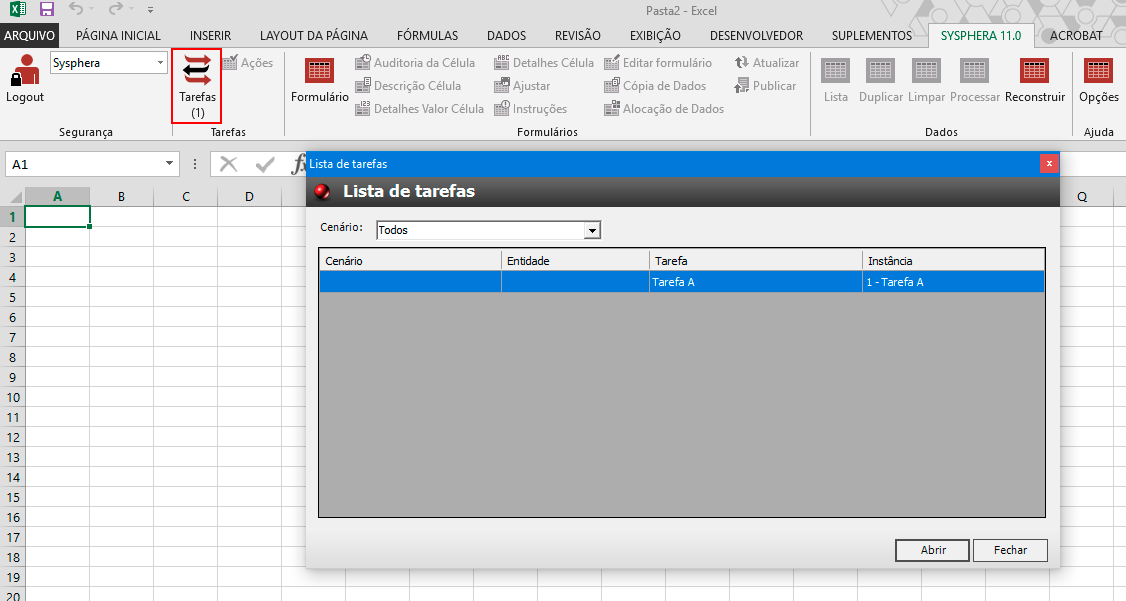
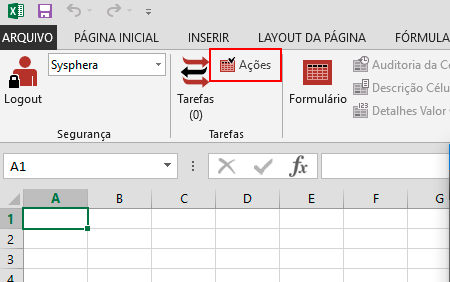
¶ 5.6 Interacting with Tasks through T6 Planning Excel Add-In
The tasks button is displayed in the header of T6 Planning Excel Add-In along with the user's task count. Clicking the button will show a pop-up window containing the task list. If a task is about to expire, there will be a yellow sign next to the total tasks. Just like executing tasks in T6 Planning, selecting a task in the T6 Planning Excel Add-In task list and clicking Open will redirect you to the form of the respective task.
¶ 5.7 Reviewing and Completing Tasks through T6 Planning Excel Add-In
The task review and completion process, as in the T6 Planning environment, is also done in the Excel Add-In and should be done after publishing changes.
To complete a task after execution or review, simply click the Actions button.
The task approval pop-up window will be displayed identically to the T6 Planning environment, and you only need to complete the process as usual.
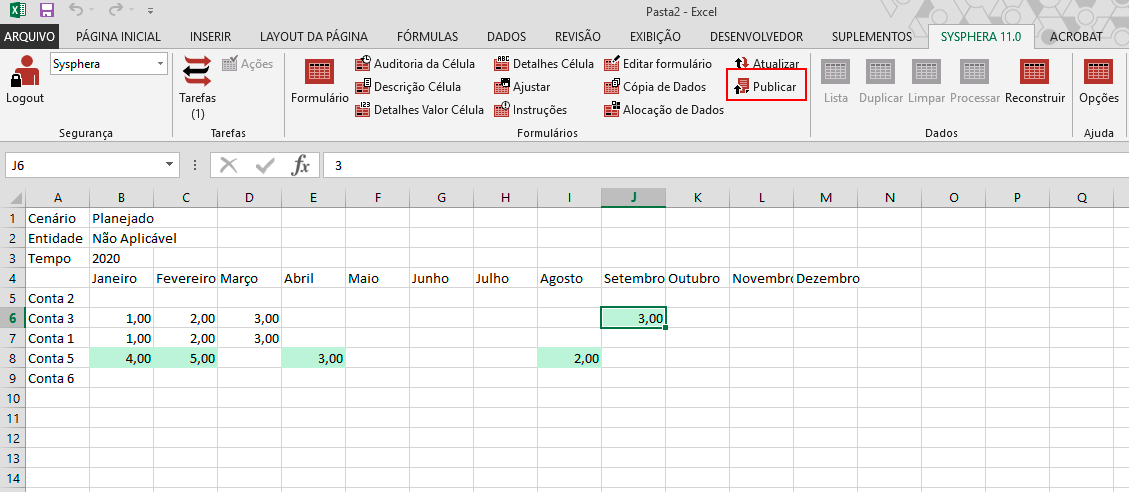
¶ 5.8 Publishing Data through T6 Planning Excel Add-In
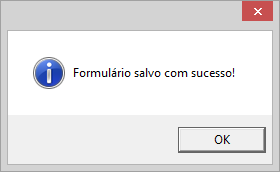
Whenever an action is performed on forms via Excel Add-In, you should publish the data to update it in T6 Planning by clicking the Publish option in the Forms button. If you click Save instead of publish, the form will be saved in your files as an Excel spreadsheet, and the changes made will not be updated in T6 Planning.
Upon completion of the publication, the Excel Add-in will display a message indicating that the form was successfully saved.
¶ 5.9 Working with Data in T6 Planning Excel Add-In
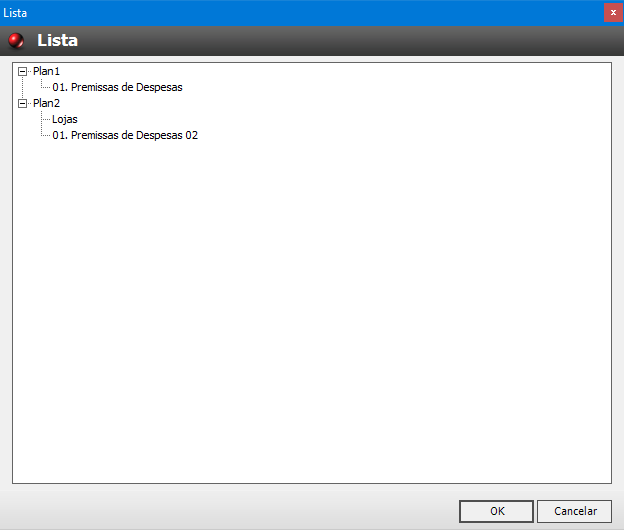
The T6 Planning Excel Add-in allows you to work with and view data and forms open in Excel tabs.

The first option is the List. This option will open a pop-up window displaying the list of forms open in Excel, indicating which Excel tab they are on.
The other functions are:
- Duplicate: Allows you to open the loaded forms in a new Excel.
- Clear: Clears the data from the forms loaded in the active Excel tab.
- Process: Processes the forms and data in the active tab.
- Rebuild: Reloads the forms and data in the active tab.
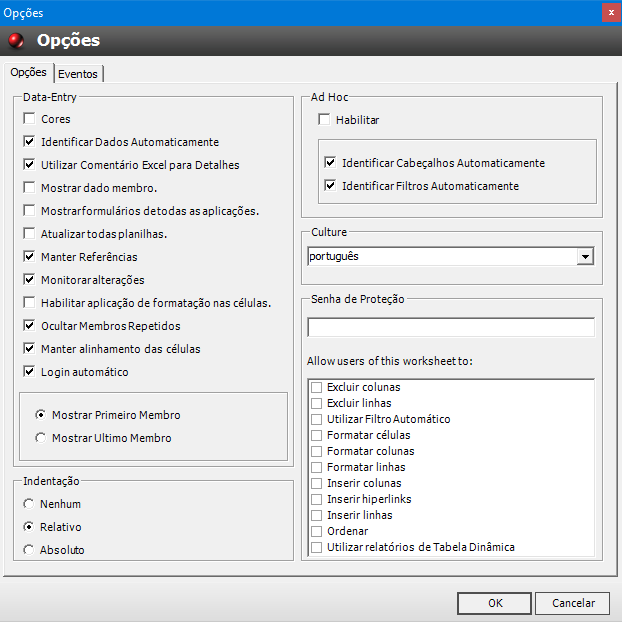
¶ 5.10 Understanding Options and Settings in T6 Planning Excel Add-In
The options button in the T6 Planning Excel Add-In allows various configurations, making its use very similar to T6 Planning when accessed via the web.

By clicking the options button, the options pop-up window will be displayed, where the following settings can be defined:
-
Colors: Allows highlighting form cells with various colors, emphasizing cells calculated by formulas, read-only cells, and others, according to your needs.
-
Automatically Identify Data: When entering data in a List-type cell, it will identify the information even if the data is partially filled. If there is more than one option corresponding to the entered data, the system will open a pop-up window with options for selection.
-
Use Excel Comment for Details: Allows you to use Excel's own comment function to include Cell Details in forms.
-
Show Data Member: Displays the Data Member of all members with children.
-
Show Forms from All Applications: Displays the complete list of forms from all applications in the form list pop-up.
-
Update All Sheets: Updates all open forms in one or more Excel tabs, reflecting changes in all instances of open forms, regardless of the tab.
-
Maintain References: Maintains formula references so that, when reloading the data of a form in which some cells already had different values calculated by the previous formula, simply saving the form will store the new calculated values.
-
Monitor Changes: Highlights by filling in green the cells that had data inserted or changed, as with T6 Planning forms via the web.
-
Hide Duplicate Members: Hides members with the same name.
-
Maintain Cell Alignment: Maintains cell alignment.
-
Automatic Login: Saves login information to access without entering a username and password.
-
Show First Member: Displays the first member with a repeated name, hiding the others. For example:
Member A 10 10 10 -
Show Last Member: Displays the last member with a repeated name, hiding the others. For example:
10 10 Member A 10 10 -
Indentation: Allows selecting the indentation option None, Relative, and Absolute.
-
Enable Ad Hoc: Enables the possibility of making Ad Hoc changes in forms.
-
Automatically Identify Headers: Allows identifying form headers.
-
Automatically Identify Filters: Allows identifying Filters in the form.
-
Culture: Allows changing the language of the Excel add-in.
-
Protection Password: Allows setting a password to access the Excel spreadsheet.
-
Allow users of this spreadsheet to: Allows defining actions that spreadsheet users can perform, such as Delete Columns, Format Cells, among others.
¶ 6. Troubleshooting
¶ 6.1 Overview
This chapter focuses on resolving potential installation or update issues with the Excel Add-In in Microsoft Excel.
¶ 6.2 Installation
After installing the T6 Planning Excel Add-In, upon opening Microsoft Excel, you will see T6 Planning 11.1 in the menu bar. If this does not happen, consider the following reasons to troubleshoot this issue.
¶ 6.2.1 T6 Planning Excel Add-In Disabled Add-In in Excel
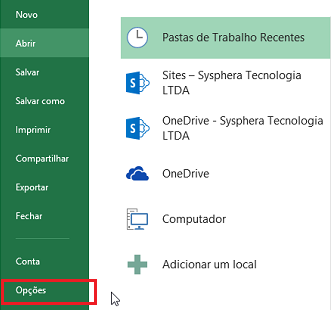
Open Excel and go to "File" -> "Options".
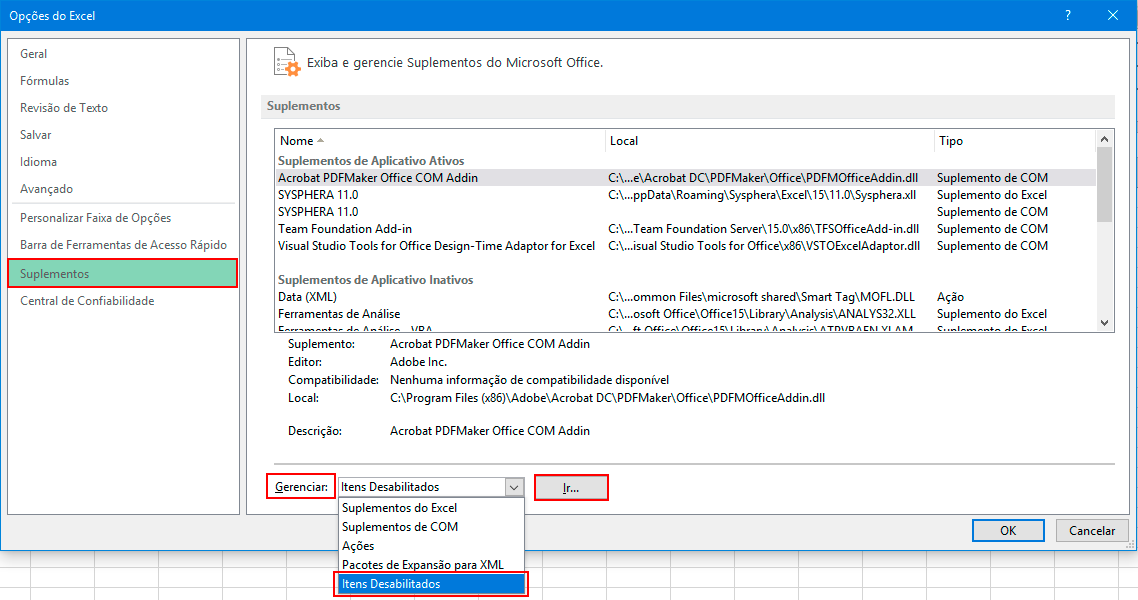
In the Excel Options window, go to the "Add-ins" tab, locate the "Manage" option, and select the last option "Disabled Items" and click "Go...”.
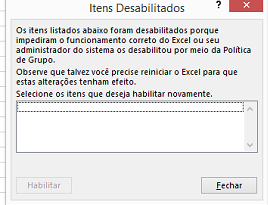
If T6 Planning 11.1 appears in the list, select it and click the "Enable" button.
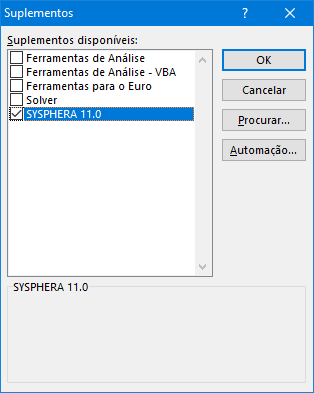
¶ 6.2.2 T6 Planning Excel Add-In Unchecked Add-In in Excel
Open Excel and go to "File" -> "Options".
In the Excel Options window, go to the "Add-ins" tab, locate the "Manage" option, and select the last option "Excel Add-ins" and click "Go...”.

Check if the “T6 Planning 11.1” checkbox is selected, then click “OK”.