¶ 1. Overview
Tech6 Artificial Intelligence (TAI) is an AI integration feature that helps automate tasks and analyze data inside T6. It provides assisted documentation, strategic analysis, and executable commands directly in the product. With an intuitive chat interface, providing fast and accurate responses, TAI improves workflow efficiency and decision-making.
¶ 1.1. Prerequisites
To use Tech6 Artificial Intelligence (TAI), you must enable the preview feature and the required group features.
¶ Preview Feature:
- In T6, open the main menu and click Settings.
- In settings, open Preview.
- A side panel opens with all preview features and a switch for each one.
- Find TAI and enable its switch.
- Close the panel by clicking X or clicking outside the panel.
- Refresh the T6 page.
- After refreshing, the TAI icon appears in the top-right corner.

¶ Group Features:
To manage TAI, the user must belong to a group with Administrator Features and Manage TAI enabled. This allows creating, editing, and deleting prompts.
To use TAI, the user must belong to a group with Planner Features and Access TAI enabled.
¶ Enabling in On-Premises Environments
TAI enablement in on-premises environments is available starting from version 12.0.
To enable TAI in On-Premises, follow these steps:
Open the folder where T6Enterprise is installed. Locate
appsettings.json, open it in a text editor, and add:"KernelHubUrl": "https://dev-tai.tech6cloud.com/kernelhub".
- After adding this line, the file should look similar to:
{
  "connectionString": "Data Source=DUGONGO;Initial Catalog=T6;Trusted_Connection=false;Persist Security Info=True;User ID=databaseUser;Password=databasePassword",
  "LoggerLevel": "6",
  "LoggerInternal": "false",
  "KernelHubUrl":"http://localhost:7700/kernelhub"
}
After any change to
appsettings.json, in IIS you must stop the T6 application pools, restart the server, and start the pools again.


¶ 2. Usage
You can interact with Tech6 Artificial Intelligence (TAI) using natural language requests. In the example below, a form is open and TAI is used to analyze its data:
- With the form open, click the TAI icon to open the side chat panel.
- In this example, Prompt Type is set to System and Category to Analysis and Insights.
- Select a predefined system prompt for anomaly detection and analysis.
- When selected, the prompt is sent automatically and TAI responds based on the open form data.

- Continue the conversation in the same context by entering a new question in the text box.

¶ 2.1. Ways to Use
Follow these steps to use Tech6 Artificial Intelligence (TAI):
- Click the TAI icon inside T6.
- A side panel opens with the AI chat.
- The panel includes two dropdowns:
- Type: All, System, User.
- Category: All, Documentation, Analysis and Insights, Command.
- All: default option; TAI automatically identifies context from the prompt.
- Documentation: responses are based on the Help Center.
- Analysis and Insights: data analysis prompts, including anomaly analysis when the object is open.
- Command: product command prompts that can run actions (list objects, open forms, publish cubes, etc.).
Whenever a system prompt mentions "Current Data", an object must be open in T6 for accurate execution.
- Select a predefined prompt from the list.
If the selected prompt requires parameters, they appear in brackets (for example: [Example]). You can interact only after filling them.
- Type your question in the bottom text box and click
 .
Voice input is also available: click and hold
, speak, then release to transcribe.
- After receiving a response, click
 to copy content.
TAI responses are generated in RTF (Rich Text Format), so text, tables, and CSV can be copied to other apps without losing formatting.
- File upload is also supported in conversations.
Allowed formats: .txt | .html | .xml | .csv | .md | .pdf | .xlsx | .docx.
- To upload a file, click
 , then choose the file in your file explorer.
- Wait for confirmation with the uploaded file name.
- After that, ask TAI to perform actions based on the file type.
Example: upload a .pdf with quarterly expenses and ask TAI to make a projection for the next 3 months and to only get back to me after completing the analysis.

After a few seconds, TAI returns the requested output.
TAI can also perform real-time internet lookups for IPCA, INPC, IGP-M, Selic, and currencies USD, EUR, AUD, CAD, GBP, JPY.
To discover available actions, ask TAI. Prompt tip:
Based on the uploaded file, how can you help me?
¶ 2.1.1. Permissions
You can ask Tech6 Artificial Intelligence (TAI) to show permissions for users, groups, and objects.
Example:
Use List user permissions [username] to return object permissions for that user.

The same applies to group and object permissions by adjusting the prompt.
¶ 2.1.2. Process Tasks
With Tech6 Artificial Intelligence (TAI), you can list, open, approve, and reject workflow tasks.
- Start a new TAI chat.
- Use:
List my pending tasks.
- TAI returns pending tasks with Code, Task Name, Application Name/Code, and Due Date.

- In the same context, request a task open action:
Open task [task name].
- TAI opens it in a new tab for review and execution.

You can also approve/reject directly from chat:
Approve task [task name]orReject task [task name].
- TAI shows task info and asks for confirmation.
- Confirm with:
I confirm.
- Confirm with:

After confirmation, T6 shows a completion notification.
You can also approve or reject all pending tasks in one request.
¶ 2.1.3. Data Changes
Tech6 Artificial Intelligence (TAI) can update object data directly through chat requests, as long as the object is open.
Example:
- Open a Form object in T6.
- Ask TAI to insert/update data.
- Prompt example:
In the current form, change [member] in [time member] to [value].- The requested value is applied to the declared member and period.

You can combine features, such as converting values to euros using current exchange rates and applying the adjustment.

In the current version, TAI does not save data automatically. Users must manually save or publish changes.
¶ 2.1.4. Scenario Actions
Tech6 Artificial Intelligence (TAI) also supports scenario-related actions inside applications.
List current scenario states
Description: shows scenario state/type across years and applications.
Usage:
- Prompt:
List current scenario states for application [application name]. - Return: scenario list with year and current state (for example: Planned, Actual, Closed).

Change scenario state
Description: updates scenario state/type for a selected year.
Flow:
- Prompt:
Change scenario [scenario name] for year [year] to [new state]. - TAI asks for confirmation.

- User confirms with
I confirmand the change is executed.
- To verify, request the scenario state listing again.

Detail a specific scenario
Description: returns detailed information for a specific scenario.
Usage:
- Prompt:
Detail scenario [scenario name] for year [year] in application [application name]. - Return: scenario type across different periods.

- You can also request metrics or comparisons with other scenarios.

¶ 2.1.5. Dimension Actions
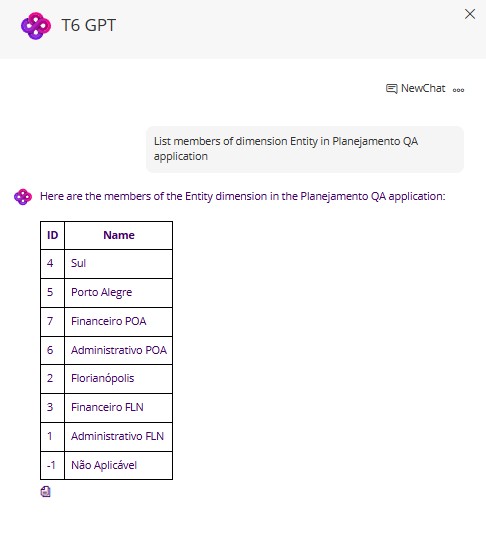
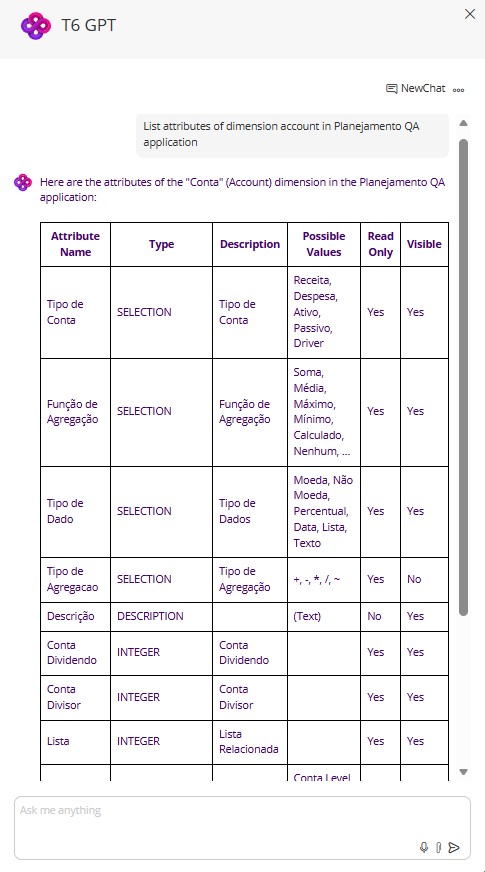
Tech6 Artificial Intelligence (TAI) also supports dimension-related actions, such as listing members and/or attributes of a specific dimension.
List dimension members
Description: displays members of a selected dimension.
Usage:
- Prompt:
List members of dimension [dimension name] in [application name] application. - Return: list of dimension members.
List dimension attributes
Description: displays attributes of a selected dimension.
Usage:
- Prompt:
List attributes of dimension [dimension name] in [application name] application. - Return: list of dimension attributes.
¶ 2.1.6. Formulas
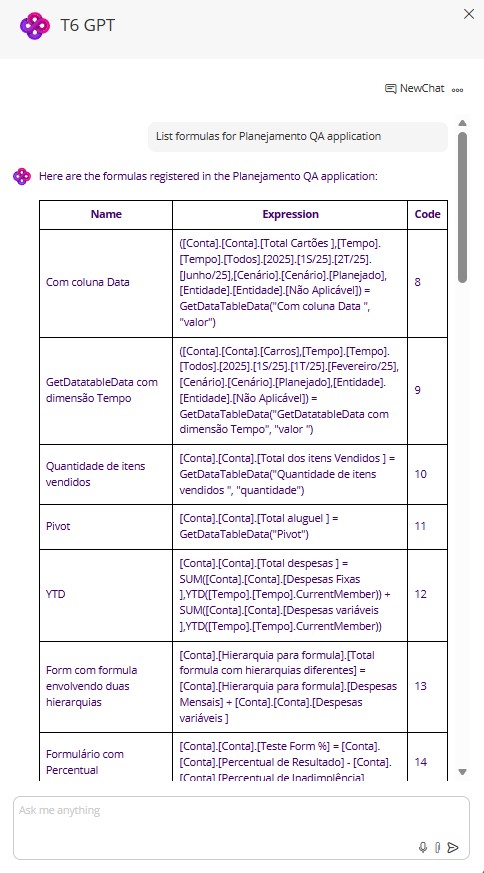
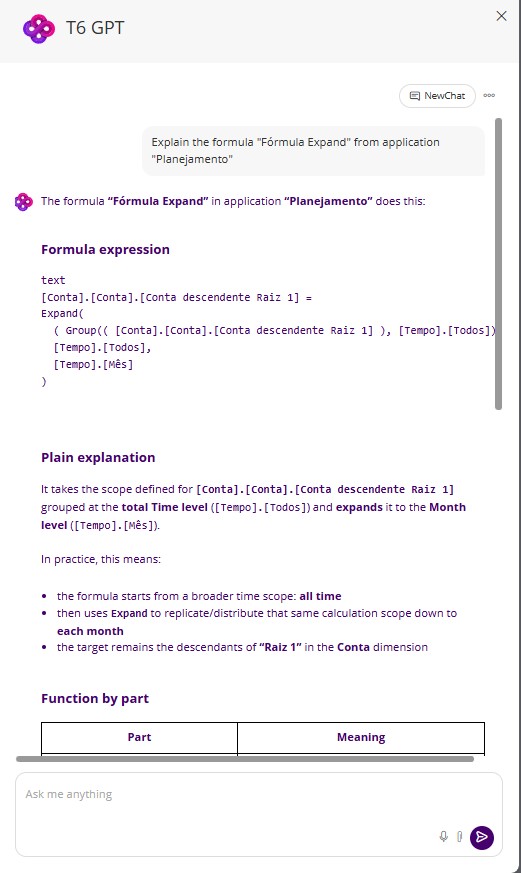
TAI can also display and explain existing formulas.
Display application formulas
Description: displays formulas of a selected application.
Usage:
- Prompt:
List formulas for [application name] application. - Return: list of application formulas.
Explain a formula
Description: provides a detailed explanation of a selected formula.
Usage:
- Prompt:
Explain the formula [formula name] from application [application name] - Return: detailed formula explanation.
¶ 2.2. Artificial Intelligence
New entry in the main menu with Artificial Intelligence features. To enable the new menu entry with Prompts, Skills, and Design Systems, the user must have the Manage TAI feature enabled.
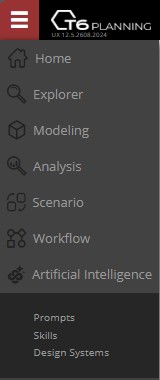
The Skills and Design Systems features are available starting with T6 version 12.4.
¶ 2.2.1. Design Systems
A Design System is a set of patterns, guidelines, and visual elements used to maintain a consistent experience across different parts of the product.
It defines, for example, how buttons, fields, menus, colors, text, and other elements should be presented and used. This way, different screens and features follow the same identity and behavior.
The goal is to make the system easier to use and make the experience clearer, more organized, and predictable for the user, avoiding unnecessary differences between screens and features.
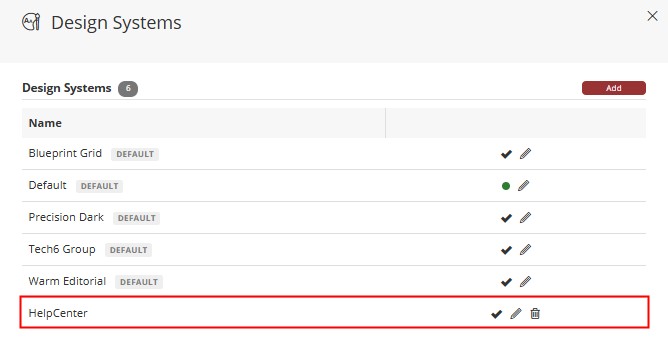
Clicking Design Systems opens a side panel displaying the system's default design systems. In the panel, you can create, edit, and delete Design Systems, as well as create, edit, and delete components within each Design System.
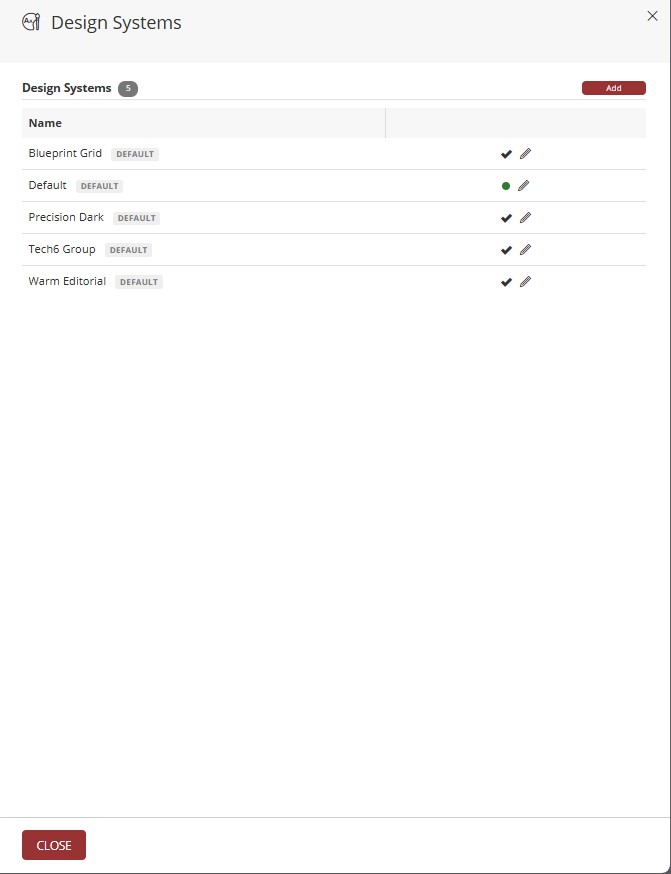
The system's default Design Systems cannot be deleted; only those created by the user can be deleted.
In the displayed list, click the pencil icon ( ) next to a design system to edit it.
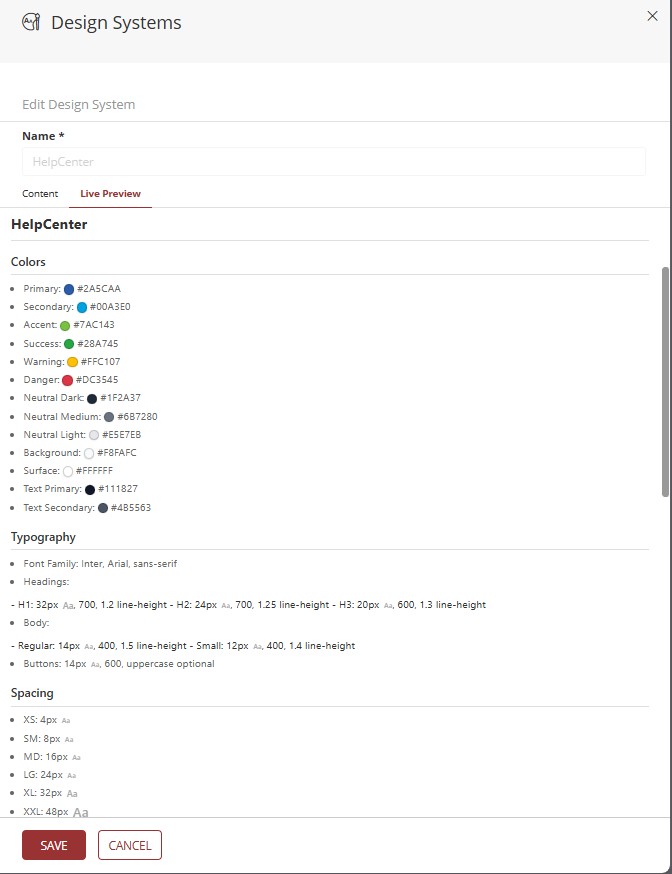
Clicking the pencil icon opens a side panel displaying the details of the selected design system. In the Content tab, you can create, edit, and delete components within the design system.
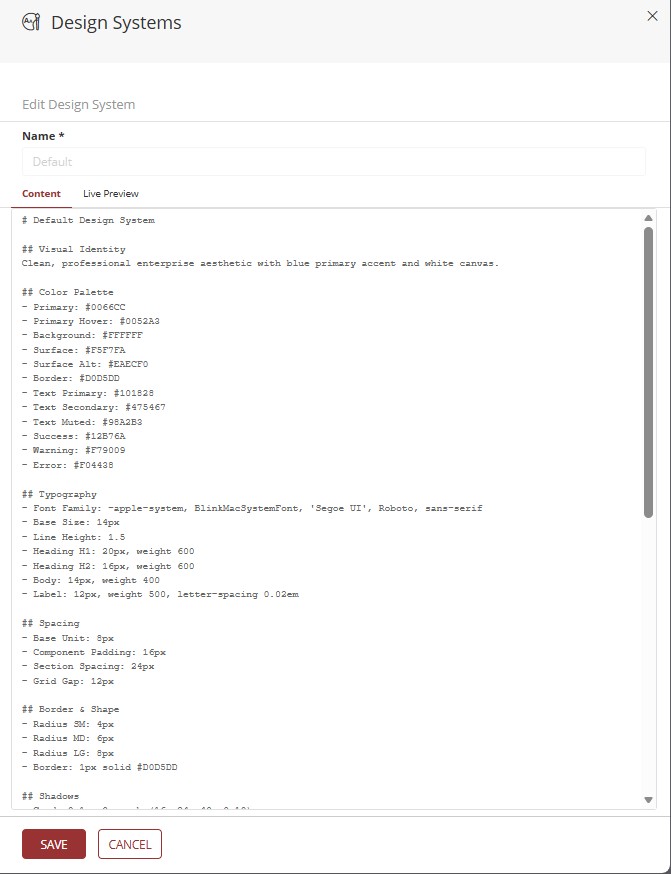
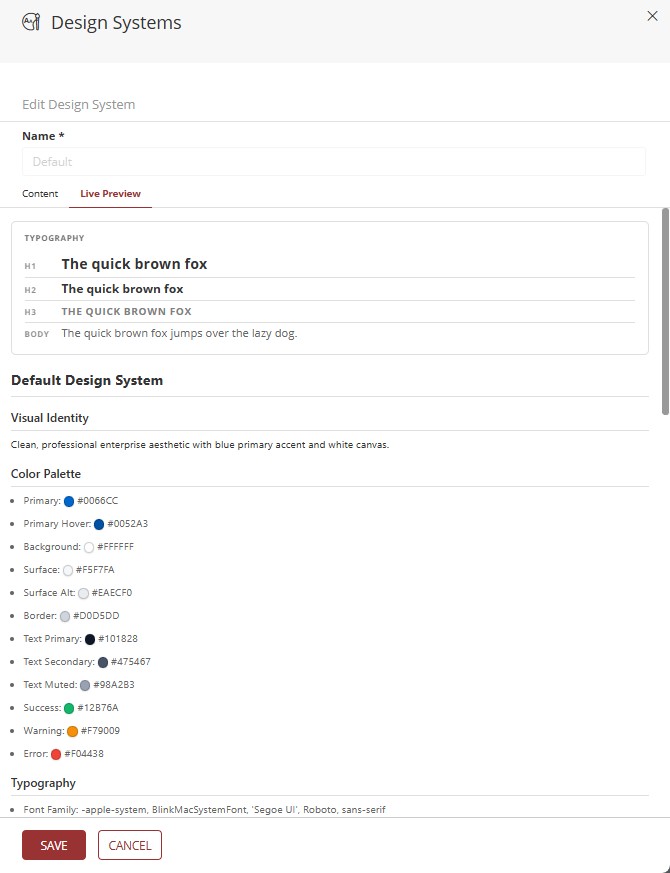
You can view the rendering of components added in the Content tab in real time by clicking the Live Preview tab.
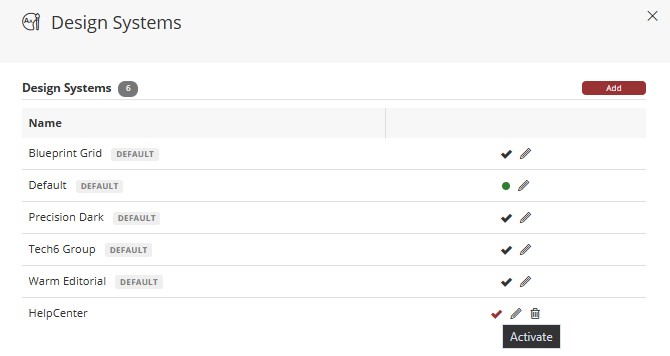
To select a design system, click the
icon. The design system will be selected and become active.
To create a new design system, click add at the top of the panel, where you can define a name and its content.
When creating a new design system, you can use the system's default design systems as a reference by copying the content of a default design system to the new one and changing it as needed.
¶ 2.2.1.1. Design Systems - TAI
A simpler way to create a new design system is by using Tech6 Artificial Intelligence (TAI). Just provide a prompt describing the design system you want to create.
Access TAI and, through the chat, request the creation of a new design system, for example: Create a new design system called [design system name] using the following colors: [color description].
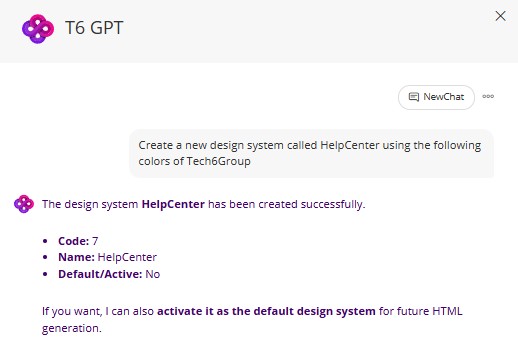
After the new design system is created through TAI, access the Design Systems screen to edit it and change its content as needed.
After clicking the pencil icon to edit the created design system, you can view the content created by TAI.
To select a design system, click the

¶ 2.2.2. Dynamic Data Forms
Through Tech6 Artificial Intelligence (TAI), you can create, edit, and delete dynamic data forms, as well as add, change, and delete data within those forms, provided that you have a configured Data Table and an associated Data Form. You can change how data is displayed, change the form layout, and even create new fields for data entry.
Initially, when you request the creation of a new dynamic data form, TAI creates a draft that you can view and edit before publishing it. After publication, the dynamic data form is available for use.
Creating Dynamic Data Forms
Description: allows you to create a new dynamic data form within an application.
Usage:
- Prompt:
Create a new visual for the data form [form name] - Return: draft of the new dynamic data form, which can be edited and published.
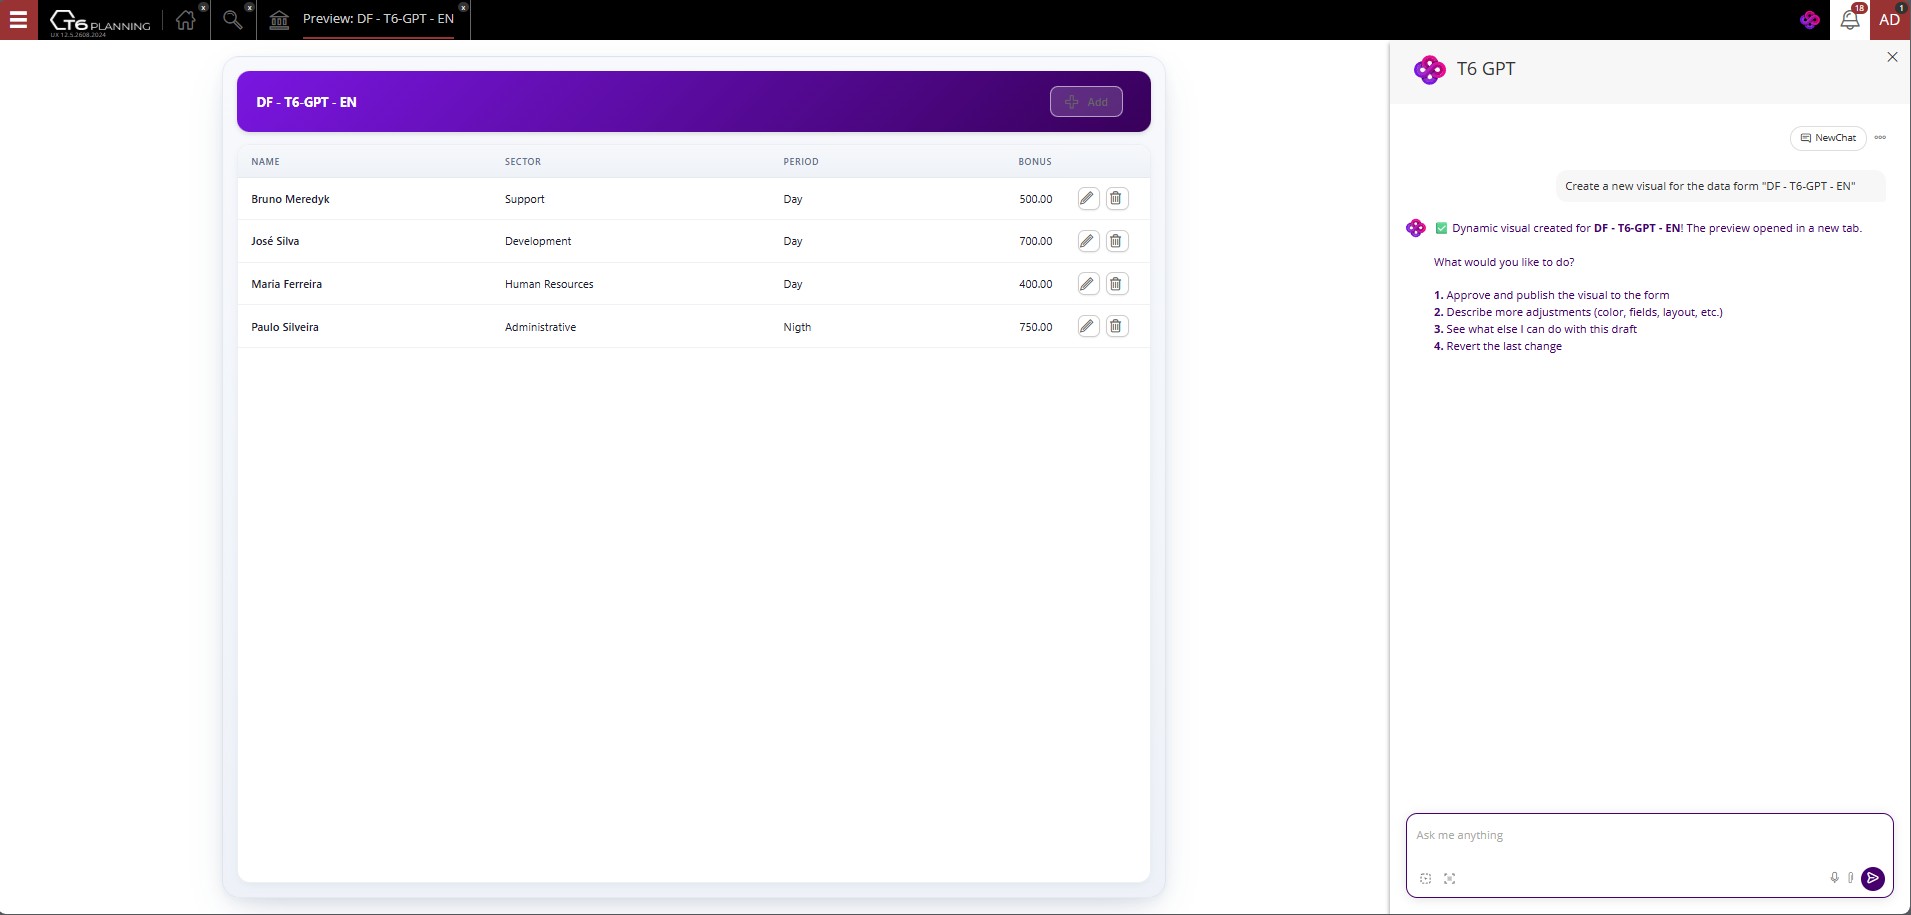
After the request, the dynamic data form draft is created and displayed on the screen to the side. Through the chat, you can request changes, additions, or deletions of fields in the form, as well as other necessary modifications. You can even ask TAI which actions can be performed on the form.
- Prompt:
See what else I can do with this draft - Return:
🎨 Here are the actions available for this draft:

Visual
- Change the colors / apply brand colors (e.g., "use Tech6 colors")
- Create or apply a design system

Data
- Add a chart (pie, bar, line, doughnut, polar area, radar) using the form data
- Add another data form as a second source (e.g., "add the Employees form")

Images
- Add a logo or image (e.g., "add the company logo")

Publication
- Approve and publish the visual
- Discard the draft

Tell me what you want and I will do it immediately.
We will request that a Design System be applied to the form and adjust it as needed.
- Prompt:
Apply the design system named [Design System Name] to this form - Return: the dynamic data form will be updated with the requested design system and can be changed in real time on the screen to the side.
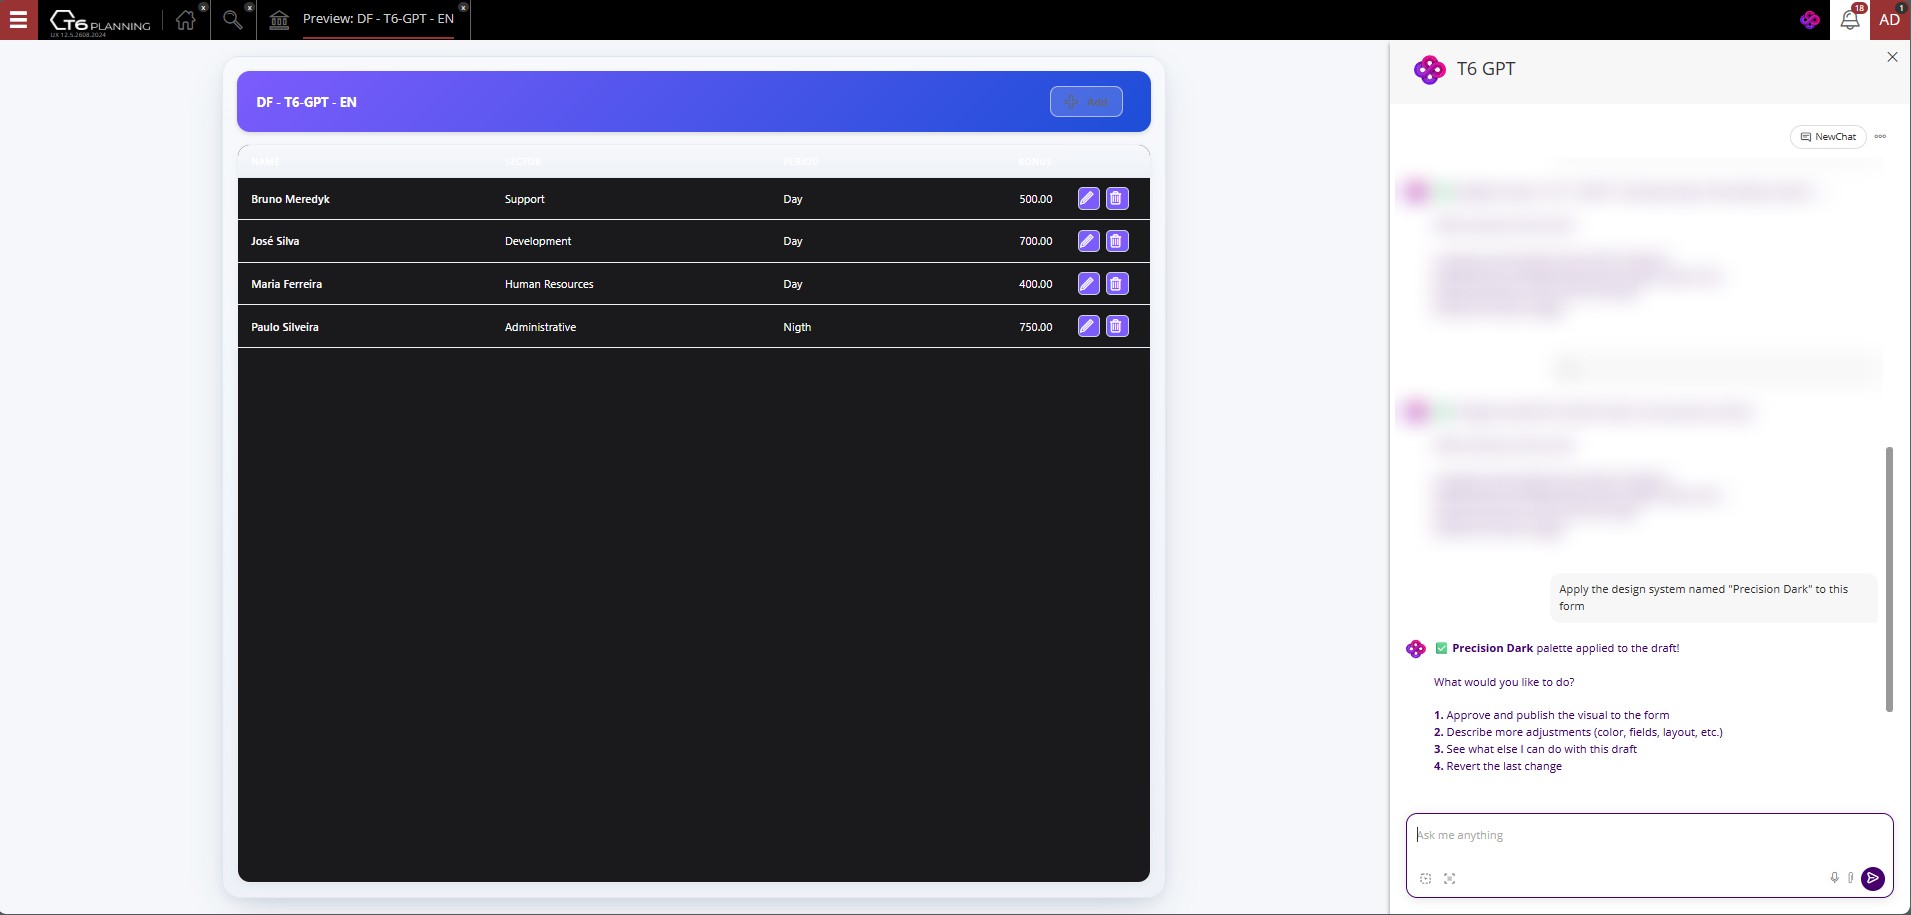
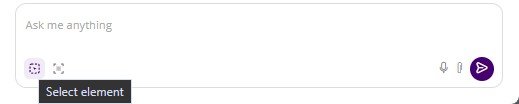
You can make general changes to the draft or change specific elements through the chat. To select a specific element, click the Select element button in the chat and then click the desired element in the form. TAI will identify the selected element and allow you to make specific changes to it.
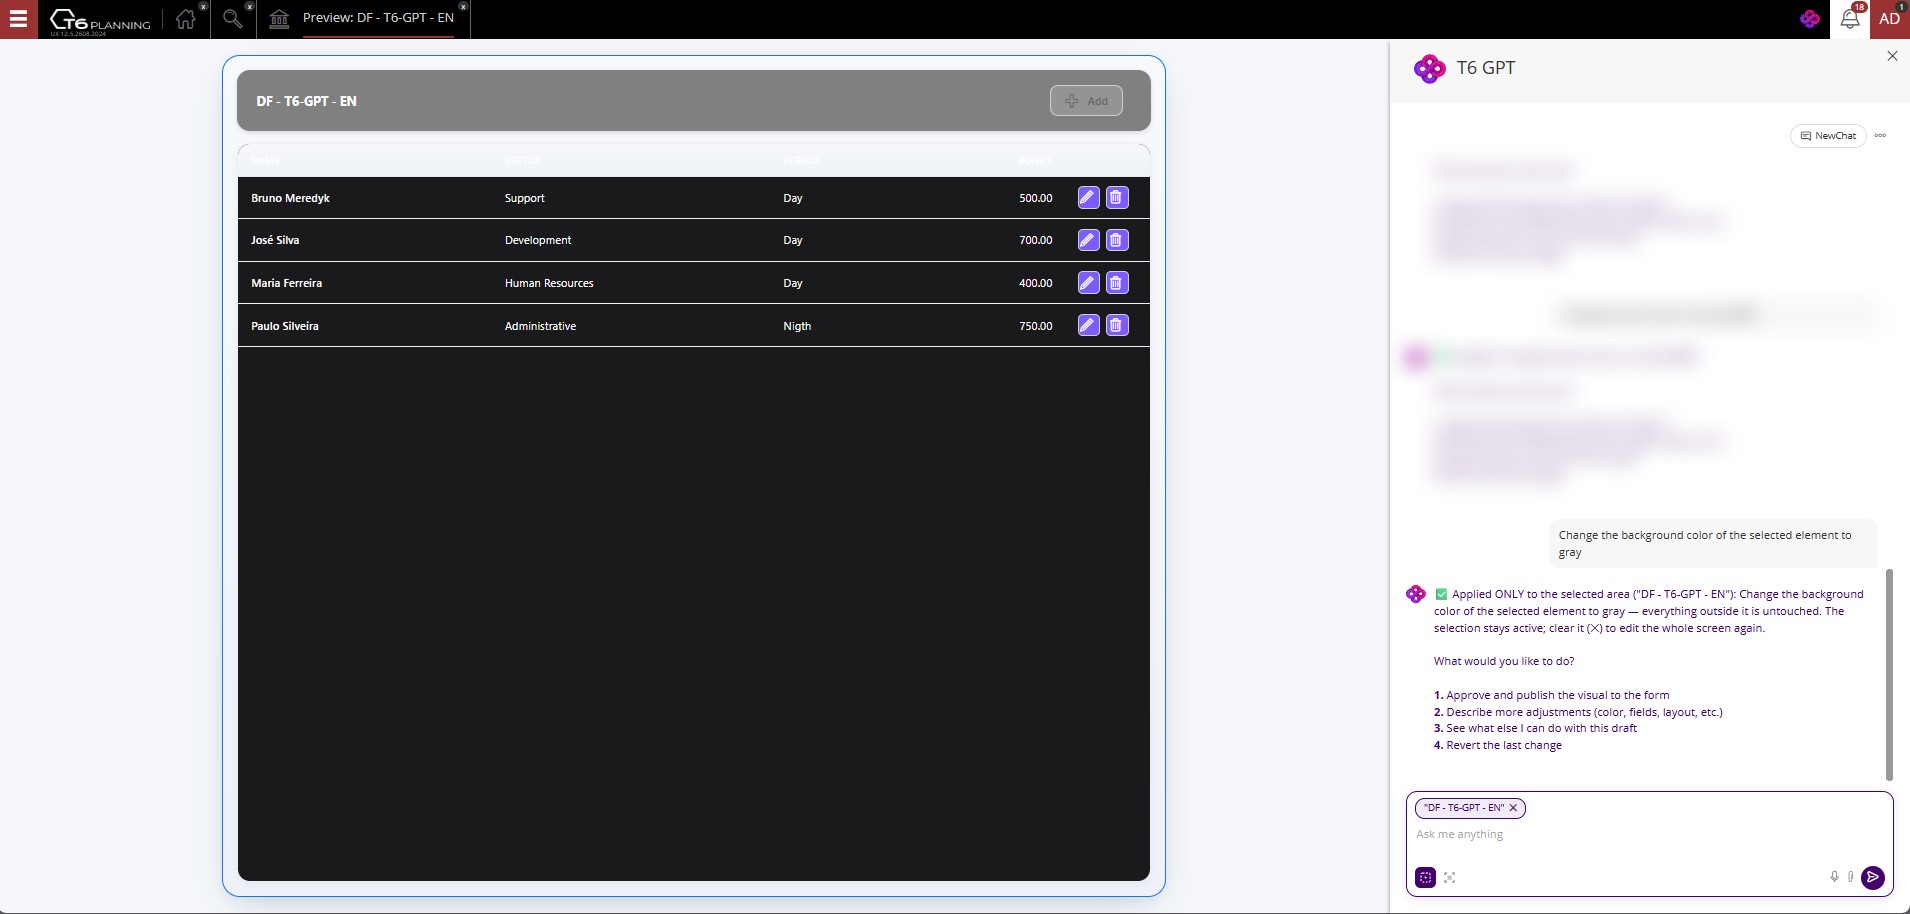
After selecting the desired element, request the change, for example: Change the background color of the selected element to gray. TAI will change the color of the selected element to gray.
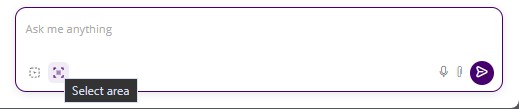
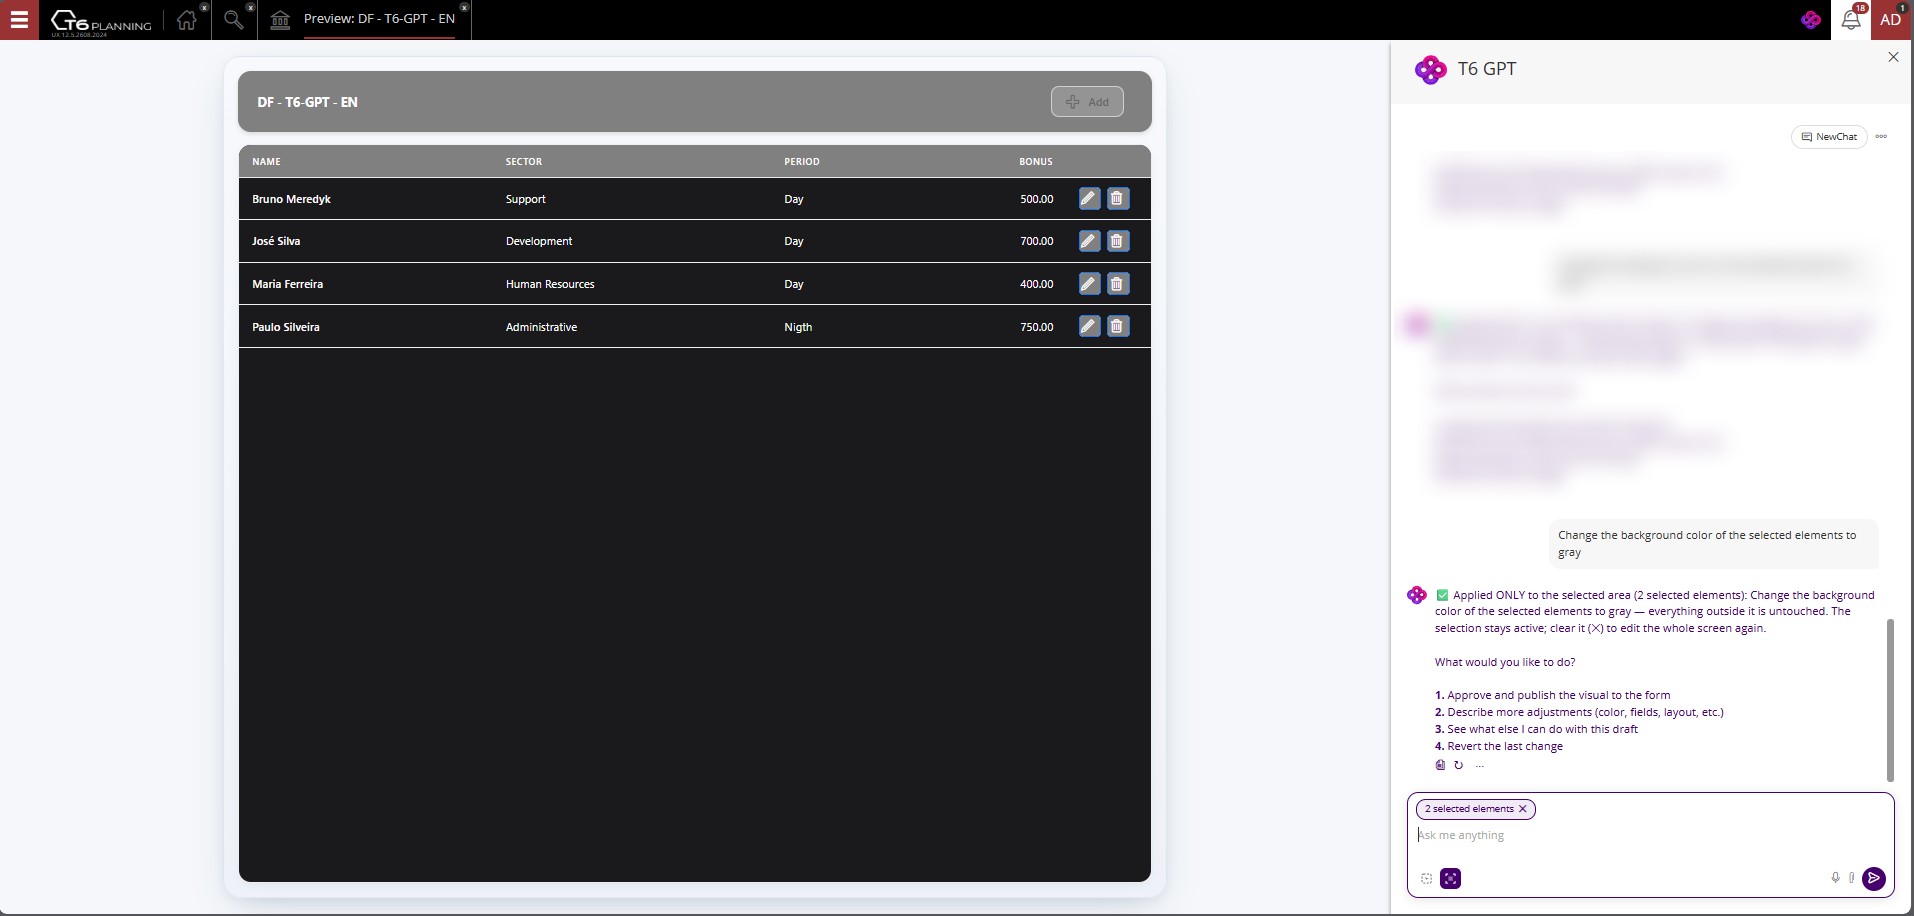
You can also change multiple elements at once through the chat by clicking Select Area and then selecting the area containing the desired elements in the form. TAI will identify the selected elements and allow you to make specific changes to them.
After selecting the desired area, request the changes, for example: Change the background color of the selected elements to gray. TAI will change the color of the selected elements to gray.
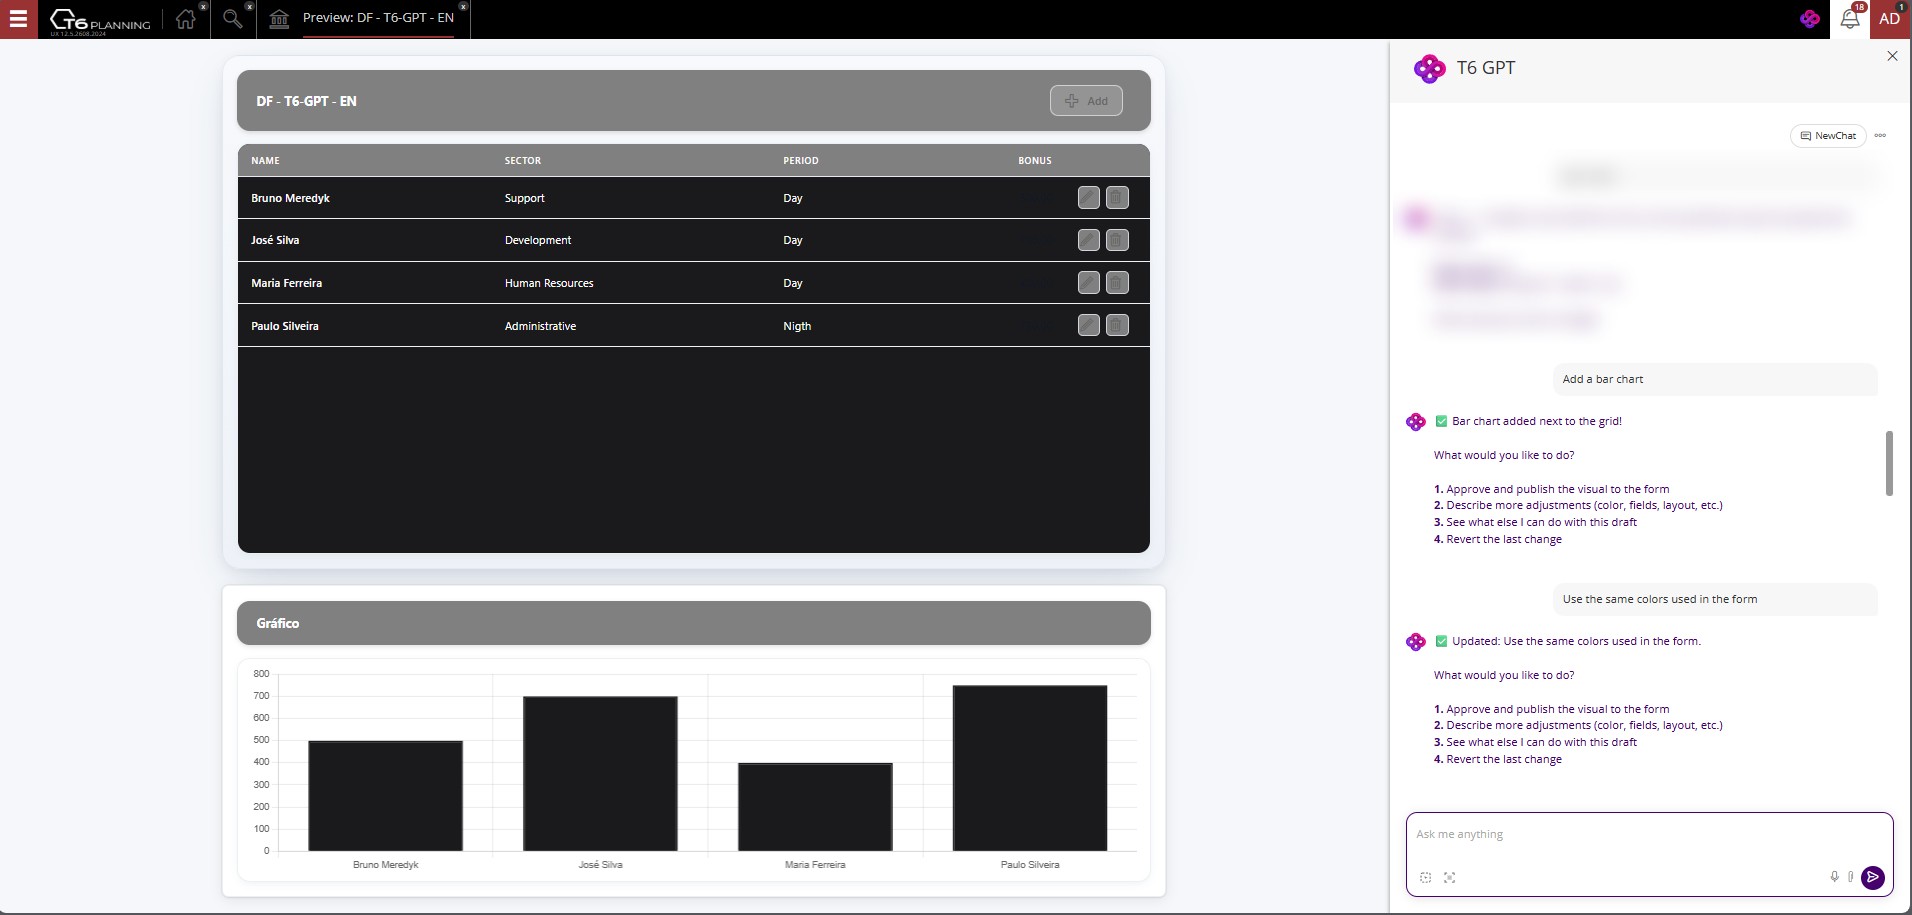
We will now add a bar chart to the form. To do this, ask TAI: Add a bar chart. TAI will add the bar chart to the form.
Request a color adjustment to match the applied design system, for example: Use the same colors used in the form. TAI will change the chart colors to the colors used in the form.
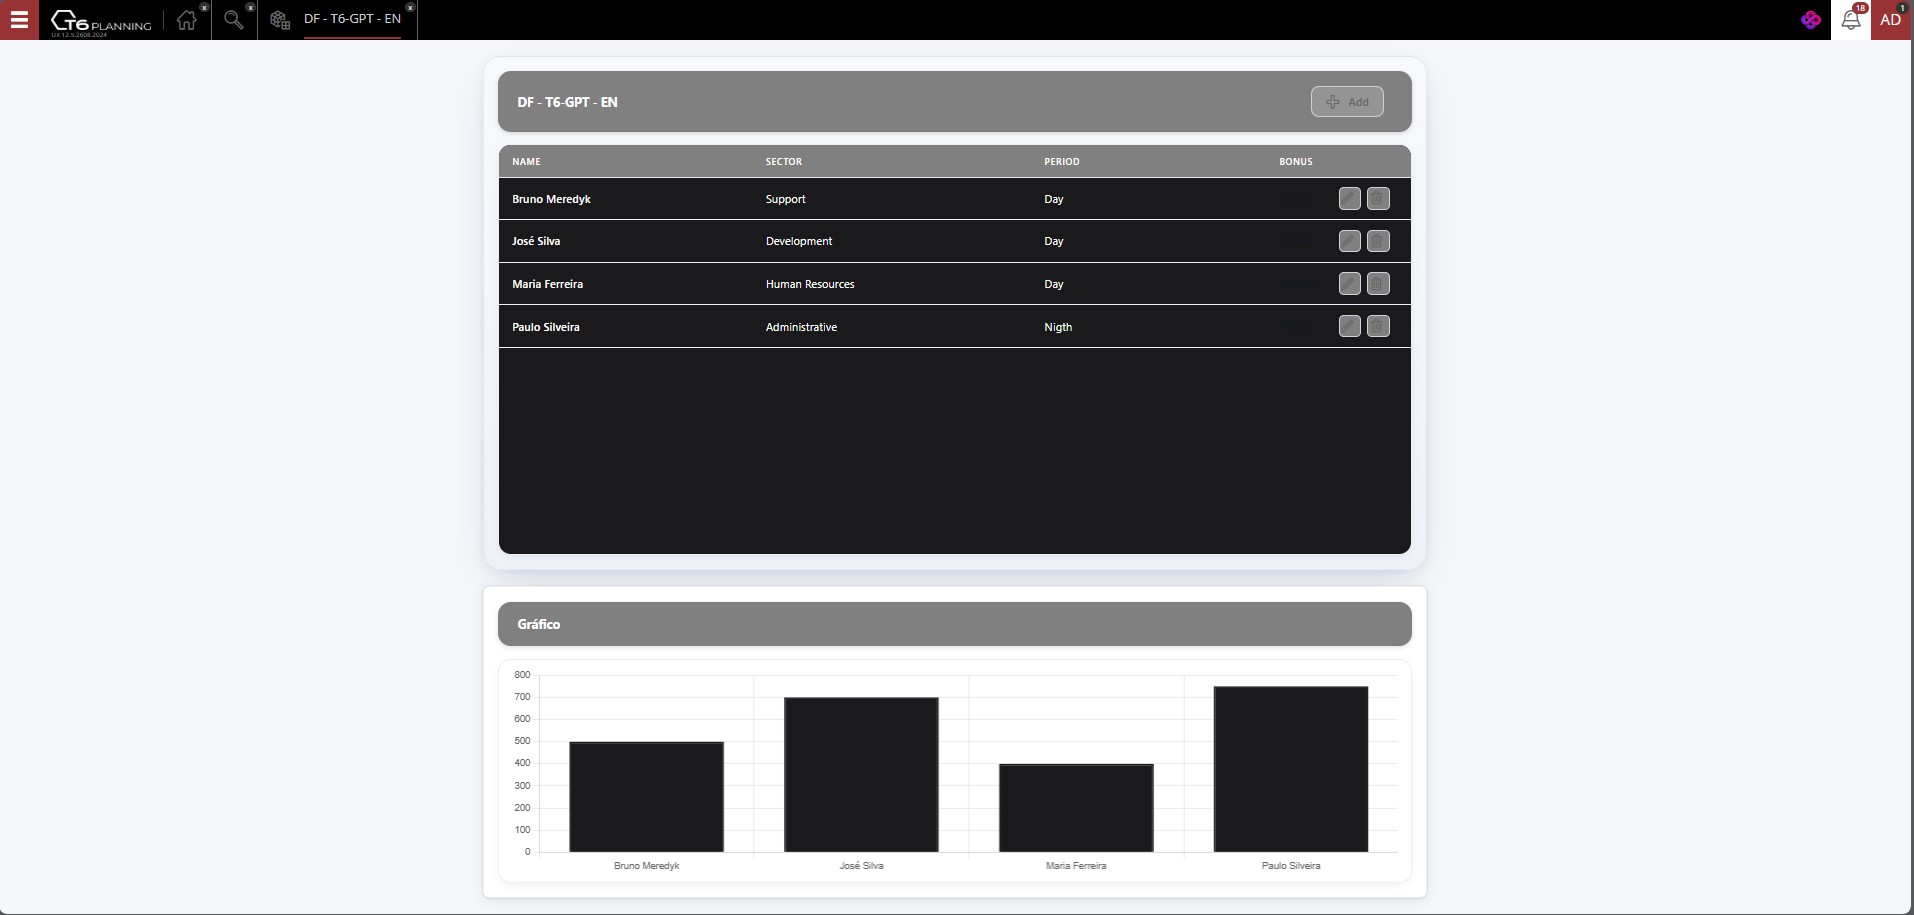
If you are satisfied with the final result, you can ask TAI to publish the created dynamic data form by requesting: Approve and publish the visual. TAI will publish the created dynamic data form.
After publication, the dynamic data form is available for use. Locate the Data Form in Explorer and open it.
After approving a dynamic data form, to edit it again, request from TAI: Edit the visual of the data form [form name]. TAI will create a new dynamic data form draft, allowing you to make changes and publish it again.
With the new draft created, you can make changes to the dynamic data form without changing the previously saved visual, allowing you to make and publish changes only when you are satisfied with the final result.
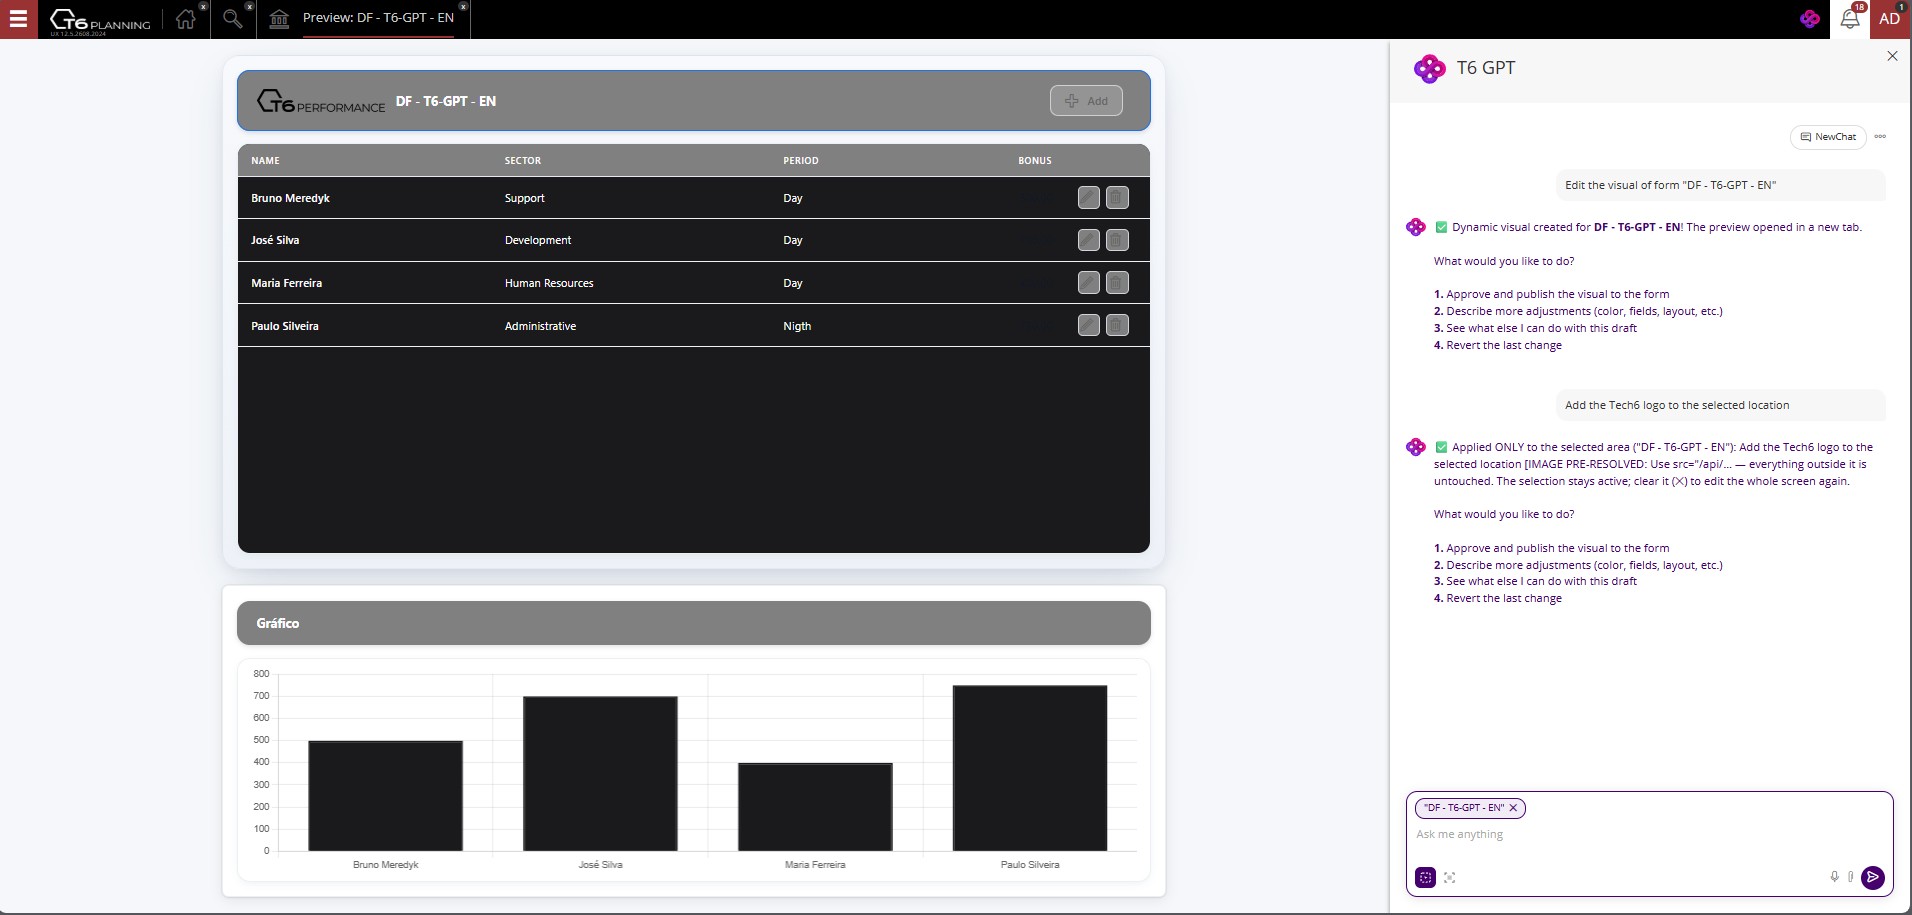
To add an image to the dynamic data form, save an Image object in T6, select where you want to add the image, and ask TAI: Add the image [image name] to the selected location. TAI will add the image to the dynamic data form.
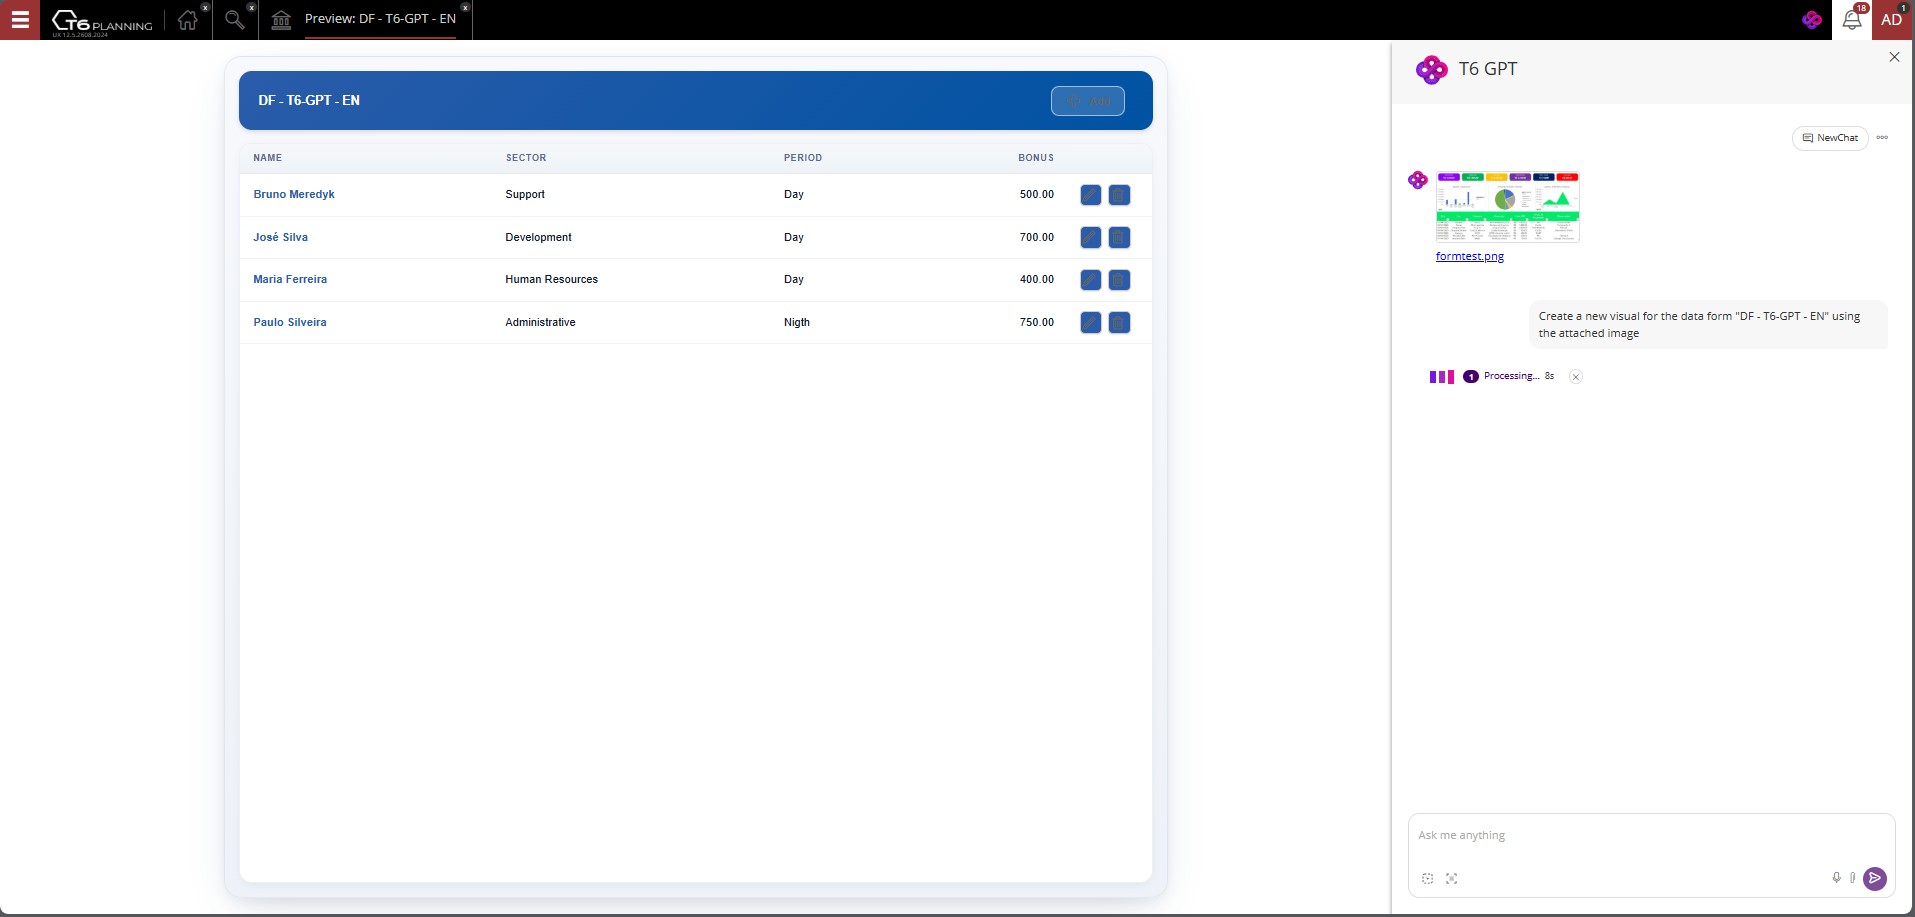
You can also create a dynamic data form based on an image. Add the desired image as an attachment and ask TAI: Create a new visual for the data form [form name] using the attached image. TAI will create a dynamic data form draft based on the provided image.
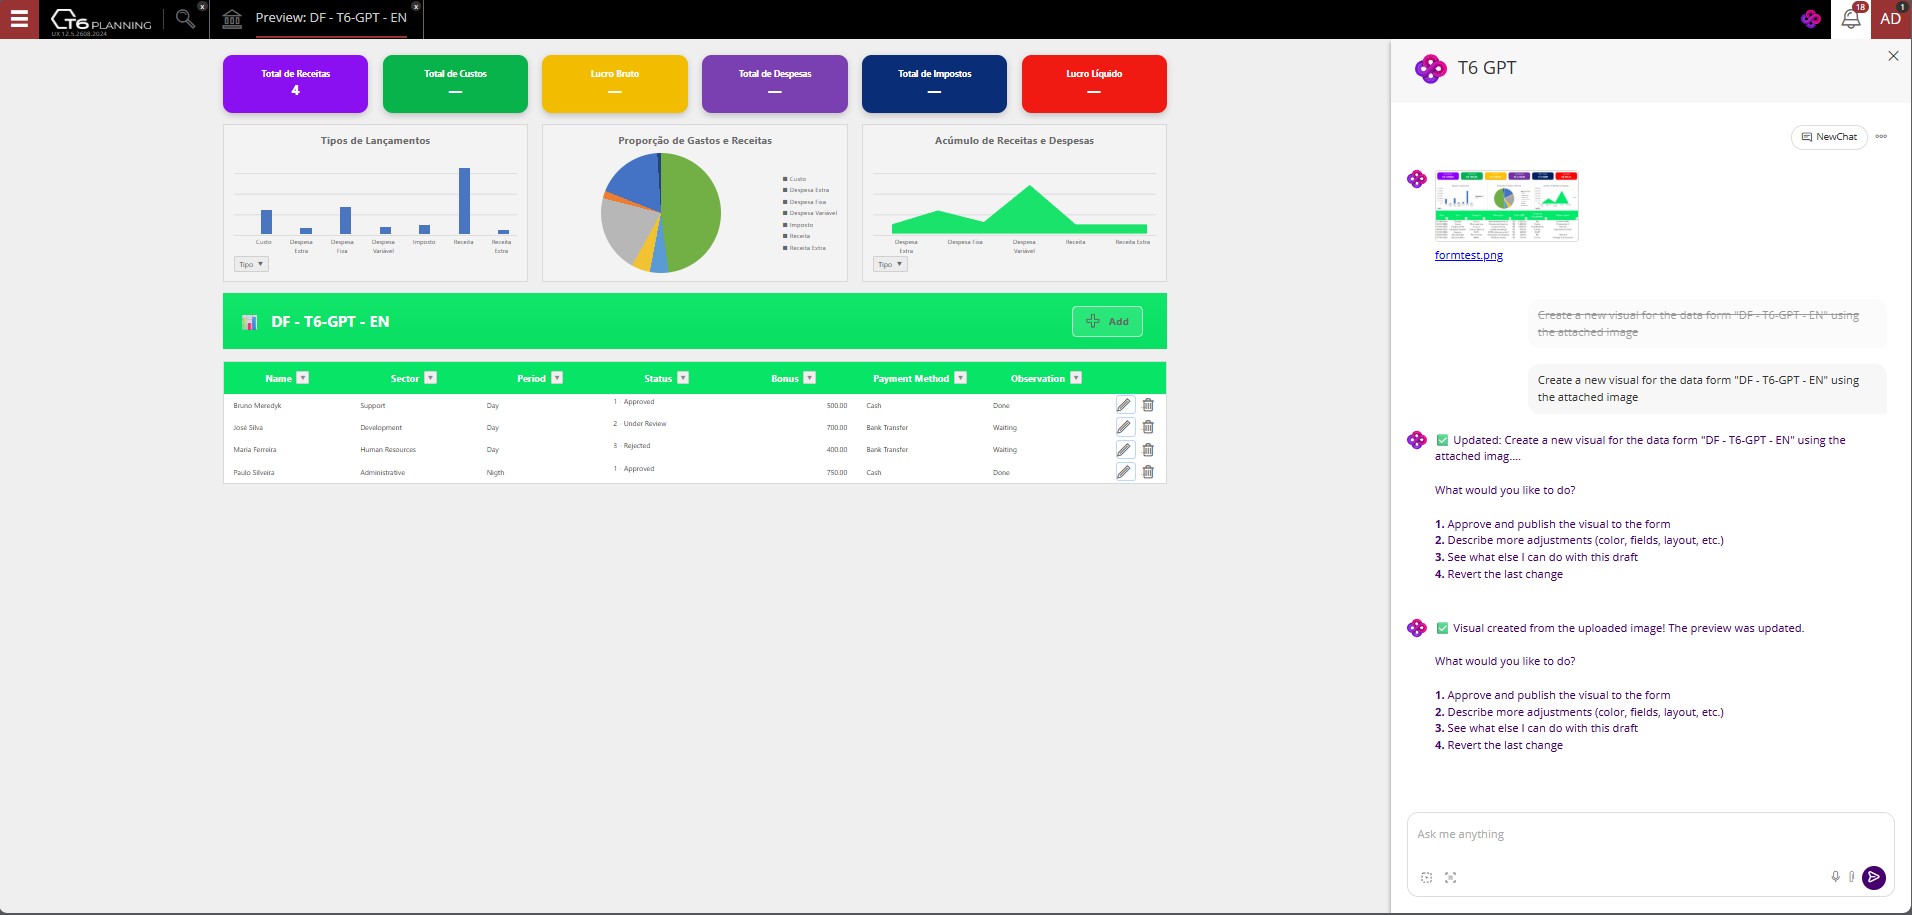
Initially, TAI displays a dynamic data form draft that is not based on the provided image, but after processing the attached image, the draft is updated to reflect the image content.
After the image is processed, the dynamic data form draft is adjusted to reflect the provided image content.
¶ 2.2.3. Skills
Skills allow you to register and maintain customized Skills for use in the T6 Artificial Intelligence ecosystem.
A Skill represents an organized set of instructions and context that guides Tech6 Artificial Intelligence (TAI) in performing tasks in a specific domain. Organizations can create customized Skills to record their own knowledge, procedures, and criteria, reducing variations in responses and helping standardize how TAI handles specific scenarios.
The Skill content is defined in the SKILL.md file. This file documents the instructions that should guide TAI. Scripts are optional and can be included as supporting files when they are part of the documented solution; the presence of a script alone does not guarantee automatic execution or replace the SKILL.md instructions.
To access:
- In the T6 main menu, click Artificial Intelligence;
- Then click Skills.
A panel will open with:
- a count of registered skills;
- a list of skills by Name;
- Add, Import, Edit, Export, and Delete actions.
¶ Creating a skill
- Click Add;
- Fill in the fields:
- Name (required);
- Content (skill content in Markdown);
- Scripts (optional), using the Add button in the scripts section.
- Click Save.
When adding a script, a new panel opens with:
- File name (example:
subfolder/example.py); - the script Content;
- an Apply button to add or update the script in the skill.
¶ Editing, exporting, importing, and deleting
- Edit: opens the skill to maintain its content and scripts;
- Export: generates a
.zipfile for the skill; - Import: allows you to upload a
.zipfile to register a new skill; - Delete: removes the selected skill.
- the skill name may contain only lowercase letters, numbers, and hyphens (
-), must start with a letter, and may contain up to 64 characters;
To view skills, the user must have Access TAI enabled. Adding, editing, importing, exporting, and deleting require Manage TAI or administrator access.
¶ 2.3. Managing Cube Forms with Tech6 Artificial Intelligence (TAI)
Starting with T6 version 12.4, TAI can create and modify cube forms through natural-language requests. This allows users to describe the desired structure without manually configuring every form property.
Cube-form operations modify T6 objects. Always review the proposed change and the validation result before confirming it.
¶ 2.3.1. Creating a Cube Form
To create a cube form, open TAI and clearly identify that the requested object is a cube form. Include the application, cube, account or member, dimensions, and layout whenever possible.
Example:
- Prompt:
Create a cube form for "Operating Expenses" with years in columns.
TAI searches the available metadata and proposes the form definition. The request can include:
- The application and cube to use.
- The account or member that should be displayed in the rows.
- The dimensions and members to use as restrictions or pages.
- The members to display in columns, such as scenarios or years.
- Whether child members should be displayed.
- The form name and location in Explorer.
If the request does not contain enough information, TAI may ask for clarification or may not find the intended object. Use exact names when possible and provide additional context in a follow-up message.
A cube form created through the first creation request is saved as an object and becomes available in Explorer. It is not handled as an unpublished draft.
¶ 2.3.2. Editing an Existing Cube Form
TAI can change the layout of an existing cube form. Open the form or identify it by its exact name, then describe the desired modification.
Example:
- Prompt:
Place the Actual and Planned scenarios in columns.
Before saving, TAI:
- Reads the current form definition and its metadata.
- Identifies the requested change.
- Validates whether the change is valid.
- Displays a summary of the proposed result.
- Requests confirmation before saving the change.
After confirmation, the updated form is available in T6 and the modified layout can be reviewed in the form designer.
¶ 2.3.3. Parameterizing a Member
A member shown in a row, column, or page can be converted to a parameter through a natural-language request. This is useful when users need to select the member dynamically instead of keeping a fixed member in the layout.
Example:
- Prompt:
Keep Actual fixed in the columns and make Planned a parameter.
When the change is complete, the parameter appears in the form pages. Users can select a value there, and the corresponding column or row is updated according to the selected member.
Describe which member must remain fixed and which member must become a parameter. This avoids changing the wrong part of the form.
¶ 2.3.4. Adding a Calculated Member
TAI can add calculated members to a cube form and create the corresponding expression.
Example:
- Prompt:
Show the variation between the Actual and Planned scenarios.
The resulting calculated member can use an expression such as:
[Actual] - [Planned]
After saving, review the calculated member in the form designer and confirm that the expression, format, and position match the intended result.
¶ 2.3.5. Cloning a Cube Form with TAI
To create a copy of an existing form, TAI asks you to identify the source form and describe the desired layout of the copy.
Example:
- Prompt:
Make a copy of the Operating Expenses form with the years in columns.
The cloned form preserves the relevant configuration of the source form, including calculated members and other layout settings, while applying the requested changes to the new object.
¶ 2.3.6. Reviewing, Confirming, and Undoing Changes
TAI validates changes before saving and shows a summary of what will be changed. Depending on the operation, the summary can include:
- The rows, columns, pages, and restrictions in the form.
- Members added, removed, or repositioned.
- Calculated-member expressions.
- The validation status and any errors.
Confirm the operation only after checking that the intended form and members were identified. Changes are recorded in the form history, allowing the previous state to be restored.
Example:
- Prompt:
Undo the last parameterization change.
The undo request applies to the latest recorded form change. Check the returned summary to ensure that only the intended change was reversed.
¶ 2.3.7. Writing Effective Requests
Natural-language operations are not deterministic: the same broad request may produce different search paths or results depending on the available metadata. Use the following practices:
- Specify cube form instead of only form when creating a cube form.
- Use the exact application, cube, account, and member names.
- State the desired row, column, page, and restriction layout.
- Identify whether members should be shown directly or with their children.
- Make one change at a time when validating a new workflow.
- If the result is incomplete, refine the request instead of accepting an incorrect form.
The more precise the request, the less likely TAI is to select an unintended application, cube, or member.
¶ 2.4. Narrative Reports
Available starting in T6 version 12.4, Tech6 Artificial Intelligence (TAI) can turn data from an open cube form into a narrative report. The report combines the form's data with tables, charts, insights, and free-text explanations.
The values shown in a narrative report come from the T6 cube. TAI does not manually add or recalculate the cube data. Use the report to explain and present the result, while the cube remains the source of the calculations.
¶ 2.4.1. Creating a Narrative Report
- Open the cube form that contains the data to analyze.
- Open TAI and start a new chat when a new analysis context is required.
- Describe the result you want in business terms, without needing to know the application's technical metadata.
Example:
- Prompt:
Show payroll and operating expenses for 2024, comparing Actual and Planned.
TAI uses the open form and the cube metadata to generate a report. Depending on the request, the result can include:
- A table with the requested accounts, periods, and scenarios.
- Comparisons such as Actual, Planned, and Variation.
- Charts or other visual elements.
- Insights that summarize the most relevant variations.
- Free text that explains the data or the calculations behind the values.
The report can also be requested directly from the current form:
- Prompt:
Show the current cube form as a report.
Keep the form open when the request refers to current data. If the form is not open, TAI may not have the context required to identify the requested values.
¶ 2.4.2. Refining the Analysis
After the first report is generated, continue in the same chat to refine only the part that needs to change. The rest of the report remains available as context.
Examples:
-
Prompt:
Show the comparison with Planned. -
Prompt:
Include an insight with only the largest variations. -
Prompt:
Break the analysis down month by month. -
Prompt:
Show only payroll accounts and hide the other expenses.
This approach allows you to move from a broad analysis to a focused report without manually rebuilding the form or repeating all the original instructions.
¶ 2.4.3. Adding Explanations and Insights
Use natural-language requests to add explanatory content after the data has been generated. Explanations can describe the hierarchy of accounts, the meaning of a total, or the relationship between parent and child accounts.
Examples:
-
Prompt:
Add a detailed insight about the data below the table. -
Prompt:
Add a text explaining the calculations for each account in the table. -
Prompt:
Add a conclusion at the end of the report.
The generated text may explain items such as:
- How Variation was obtained from Actual - Planned.
- How account hierarchies contribute to an aggregated total.
- What a total account represents.
- Why parent accounts and their child accounts should not be added together manually.
Review generated explanations against the form and its formulas. The report reflects the cube data and metadata available to TAI, but the final interpretation remains the user's responsibility.
¶ 2.4.4. Selecting Elements or Areas
The report canvas provides selection controls that let you target a specific element or area before requesting an edit. This is useful when several tables, insights, or text blocks are displayed.
- Select the element or area to change.
- Ask TAI for a focused modification.
Examples:
-
Prompt:
Remove the selected insight. -
Prompt:
Change the background color of the selected area to dark blue. -
Prompt:
Set the width of the selected buttons to 300 pixels.
The selection remains active while the change is applied, and content outside the selected area is left untouched. Selecting the target first is preferable to describing its location ambiguously in the request.
¶ 2.4.5. Opening and Exporting the Report
Narrative reports can be opened in the report view for a larger presentation and can be exported using the available toolbar actions:
- PDF for a fixed-layout document.
- Excel for tabular analysis.
- PowerPoint for presentation material.
The generated report can contain both structured data and explanatory text. Depending on the report and the available configuration, the PowerPoint output may be more basic than the PDF or Excel output.
¶ 2.4.6. Recommended Practices
For reliable results:
- Start with a clear business question and identify the relevant period or scenario.
- Ask for one refinement at a time.
- Verify totals, formulas, and account hierarchies in the source form.
- Select an element or area before requesting a visual change.
- Treat generated insights as analytical support, not as a replacement for reviewing the underlying data.
¶ 2.5. History
In the TAI panel, click  to access History and Prompts.
- In History, you can reopen previous conversations and continue from the selected context.
- In Prompts, the prompt list is shown again without leaving the current chat context.
- You can also delete past conversations using
 shown in each history item.
Warning: deletion has no confirmation prompt; history is removed immediately.
¶ 3. Creating Prompts
If the user has Manage TAI enabled, they can create custom prompts.
- In T6 main menu, go to Settings > Prompts.
- A side panel opens with user-created prompts.
- Click
 .
- Fill in:
- Name: prompt title.
- Type: Documentation, Analysis and Insights, Command.
- Location:
Click to show options
| Location |
|---|
| Form |
| Report |
| Dashboard |
| Data Form |
| Data Table |
| What-if |
| Profitability Analysis |
| Dimension Data Load |
| Fact Data Load |
| Mapping |
| Load Parameters |
| Data Link |
| Load Routines |
| Adjustment Template |
| Dimension Relationship |
| Workflow Trigger |
| Workflow Process |
| Workflow Lane |
| Adjustment |
| Dimension |
| Hierarchy |
| Application |
| Formula Group |
| Formula |
| Report URL |
| Report File |
| Report Embedded |
| Report On-Premises |
| Automatic Routine |
| Linked List |
| File |
| Cube Context |
| Group |
| User |
| Role |
| Remote Data Load |
| Workflow Image |
| Image |
| Data Load |
If a location is selected, the prompt appears only when that item is open. With no location selected, the prompt is available in any context.
- Description: expected behavior.
- Prompt: input text TAI should interpret. Use brackets [ ] for runtime parameters.
Prompt example: According to the documentation, how does function [function name] work?
- Click to finish.
¶ 3.1. Editing Prompts
To edit prompts, Manage TAI must also be enabled.
- Go to Settings > Prompts.
- A side panel opens with user-created prompts.
- Select the prompt and click .
- Update needed fields.
- Save with
 .
¶ 3.2. Deleting Prompts
To delete prompts, Manage TAI must be enabled.
- Go to Settings > Prompts.
- A side panel opens with user-created prompts.
- Select the prompt and click .
Warning: deletion has no confirmation dialog; the prompt is deleted immediately.
¶ 4. Q&A
Frequently Asked Questions
1. How do I enable *Tech6 Artificial Intelligence* (TAI) in the system?
Go to Main Menu > Settings > Preview, find TAI, and enable the switch.
Then refresh the page to see the icon in the upper-right corner.
2. Which permissions are required to use *Tech6 Artificial Intelligence* (TAI)?
To use TAI: user must be in a global group with planner feature Access TAI enabled.
To manage prompts: user must be in a global group with admin feature Manage TAI enabled.
3. Does *Tech6 Artificial Intelligence* (TAI) work in on-premises environments?
Yes, starting from version 12.0.
Add "KernelHubUrl": "https://dev-tai.tech6cloud.com/kernelhub" to appsettings.json and restart IIS pools.
4. Which file types can I upload in *Tech6 Artificial Intelligence* (TAI)?
Supported file types: .txt, .html, .xml, .csv, .md, .pdf, .xlsx, .docx.
5. Can I use voice commands in *Tech6 Artificial Intelligence* (TAI)?
Yes. Hold the microphone button while speaking, then release to transcribe.
6. Does *Tech6 Artificial Intelligence* (TAI) save changes automatically?
TAI is designed to avoid automatic changes when there is risk of data loss. Final save/publish actions are manual.
7. Which categories are available in *Tech6 Artificial Intelligence* (TAI)?
Available categories: All, Documentation, Analysis and Insights, Command.
8. What does bracketed text in prompts mean?
Bracketed text indicates a required parameter that must be filled before sending.
9. How do I create a custom prompt in *Tech6 Artificial Intelligence* (TAI)?
If you have management permissions, go to Settings > Prompts, click Add, and fill name, type, location, description, and prompt content.
10. Can I manage workflow tasks through *Tech6 Artificial Intelligence* (TAI)?
Yes. You can list, open, approve, and reject tasks using prompts like List my pending tasks or Approve task [name].
11. Can I change form data through the *Tech6 Artificial Intelligence* (TAI) chat?
Yes. With a form open, use prompts like In the current form, change [member] in [time] to [value].
12. How can I check scenario status through *Tech6 Artificial Intelligence* (TAI)?
Use List current scenario states for application [name] to see states such as Planned, Actual, or Closed.
13. Can I change a scenario state through *Tech6 Artificial Intelligence* (TAI)?
Yes. Use Change scenario [name] for year [year] to [new state] and confirm.
14. Does *Tech6 Artificial Intelligence* (TAI) access real-time data?
Yes. TAI accesses real-time data for indicators such as IPCA, INPC, IGP-M, and Selic, as well as USD, EUR, AUD, CAD, GBP, and JPY currencies.
15. How do I view *Tech6 Artificial Intelligence* (TAI) conversation history?
In the chat panel, click the three dots (...) and select History.
16. How do I view user permissions with *Tech6 Artificial Intelligence* (TAI)?
Use prompts such as List user permissions [name].
17. Can I also view group and object permissions?
Yes. Use List group permissions [name] or List object permissions [name].
18. What is a Design System in *Tech6 Artificial Intelligence* (TAI)?
A Design System is a set of patterns, guidelines, and visual elements that helps maintain a consistent experience across the system's screens and features.
19. Can I create a Design System using *Tech6 Artificial Intelligence* (TAI)?
Yes. Open the TAI chat and request its creation by providing the name and desired characteristics, for example: Create a new design system named [system name] using the following colors: [color description].
After it is created, the Design System can be reviewed and edited on the Design Systems screen.
20. Can I apply a Design System to a dynamic data form using *Tech6 Artificial Intelligence* (TAI)?
Yes. While editing the form draft, use a prompt such as Apply the design system named [Design System name] to this form in the TAI chat.
21. What can I change in a dynamic data form using *Tech6 Artificial Intelligence* (TAI)?
You can change the layout and data display, add or remove fields, apply a Design System, add charts and images, and request other changes to the form draft.
22. How do I publish a dynamic data form created with *Tech6 Artificial Intelligence* (TAI)?
After reviewing the draft and making the required adjustments, use the prompt Approve and publish the visual in the TAI chat. Once published, the form will be available for use in the Explorer.
23. What are *Tech6 Artificial Intelligence* (TAI) Skills?
Skills allow you to register custom instructions and context to guide TAI when performing tasks in a specific domain.
The skill content is defined in the SKILL.md file and may include optional scripts as supporting files.
24. Which operations can I perform with a Skill?
On the Skills screen, you can add, import, edit, export, and delete skills.
The Access TAI feature is required to view skills. The other operations require the Manage TAI feature or administrator access.
25. What naming rules must a Skill follow?
The skill name may contain only lowercase letters, numbers, and hyphens (-), must start with a letter, and can have up to 64 characters.
26. Can Tech6 Artificial Intelligence (TAI) create a cube form?
Yes. Clearly state that you want to create a cube form and, whenever possible, provide the application, cube, account or member, dimensions, and desired layout.
For example: Create a cube form for "Operating expenses" with years in columns.
27. Does a cube form created with *Tech6 Artificial Intelligence* (TAI) need to be published?
No. The cube form is created as a T6 object in the first creation request and becomes available in the Explorer. It is not treated as an unpublished draft.
28. Can I undo a change made to a cube form?
Yes. Changes are recorded in the form history. To revert the latest change, use a prompt such as Revert the latest parameter change and review the returned summary before confirming.
29. How can I get better results when requesting changes to cube forms?
Use the exact names of the application, cube, account, and members. Also specify the desired layout for rows, columns, and pages, and make one change at a time.
If the result is incomplete, refine the request instead of confirming an incorrect form.
30. What is a narrative report?
A narrative report combines data from an open cube form with tables, charts, insights, and explanatory text.
The displayed values come from the T6 cube, which remains the source of the calculations.
31. Do I need to keep the cube form open to create a narrative report?
Yes, especially when the request refers to the current form data. With the form open, TAI uses the cube context and metadata to generate the report.
32. Can I refine a narrative report after creating it?
Yes. Continue in the same chat and request the desired change, such as Break the analysis down month by month, Add an insight with only the largest variances, or Show only payroll accounts.
33. Can I change only part of a narrative report?
Yes. Use the Select element or Select Area controls to define the content you want to change, and then send the request in the chat.
Content outside the selection remains unchanged.
34. Which export formats are available for narrative reports?
Narrative reports can be exported as PDF, Excel, and PowerPoint, according to the actions available on the toolbar.
35. Can I rely directly on the *insights* and explanations generated by *Tech6 Artificial Intelligence* (TAI)?
Insights and explanations should be used to support the analysis. Always review the values, totals, formulas, and account hierarchies in the source form, since the final interpretation of the data remains the user's responsibility.