¶ 1. Abstract
The manual covers the T6 Planning Workflow BPM and addresses various topics related to configuring workflows, processes, parameters, responsibilities, email templates, activity design, task types, specific functions, and their syntax. The primary focus is on using the Business Process Modeling Notation (BPMN) to model business processes, aiming to provide greater flexibility to the classic workflow. The document also provides examples of expressions and detailed explanations of each part of the process, including task types, flow design, object identification, and other features associated with T6 Planning Workflow BPM.
¶ 2. Workflows
¶ 2.1 Overview
For each T6 Planning application, we must choose a workflow to be used. Each application can have only one type of workflow. The available types are:
- Classic
- BPM
The workflow type of an application can be changed at any time. To do this, simply edit the desired application and change the workflow type as needed.
Migrated applications will not have their workflow changed. New applications will default to the BPM workflow type.
Enabling the New Workflow Editor
A partir da versão 12.3, o T6 oferece um novo editor de workflow com melhorias significativas de produtividade e usabilidade. Para ativar:
- Acesse o menu principal do T6.
- Expanda a seção Configurações.
- Selecione a opção Preview.
- Habilite o botão switch Workflow Process New.
The new editor is fully compatible with existing workflows and does not require table migration.
Note about Workflow Runtime
In version 12.2, the workflow runtime was introduced. This runtime executes the entire workflow with compiled code inside T6. To enable:
- Access the T6 main menu.
- Expand the Settings section.
- Select the Preview option.
- Enable the Workflow Runtime New switch button.
¶ 2.2 Classic
An application configured to use the classic workflow will behave as the existing workflow in T6 Planning up to that point, where it operates based on the dimensions Scenario and Entity of the model. As the focus of this manual is BPM Workflow, we will not detail the Classic Workflow in this manual.
¶ 2.3 BPM
With the constant need for greater flexibility in our classic workflow, we sought a standard notation for business process modeling in the market. The most plausible option found was the Business Process Modeling Notation (BPMN), developed and provided as a new workflow option for applications.
Currently, a subset of BPMN is supported. Our long-term goal is to cover all available BPMN options.
Some additional options have been provided in the process creation to facilitate filling and executing processes, but these options do not belong to the BPMN standard.
¶ 2.3.1 New Workflow Editor (Version 12.3)
Starting with version 12.3, T6 provides a completely redesigned workflow editor with significant improvements in productivity and usability. The new editor brings advanced features that facilitate the design, editing, and maintenance of BPM processes. See below the main improvements: New Workflow Editor
¶ 3. Process
¶ 3.1 Overview
A process is a group of activities performed in a specific sequence. Processes are independent of the application. Only some specific task types, detailed later, are application-dependent.
The process is the definition of a flow. An instance is a running copy of a process. In the same process, we can have several instances running simultaneously. It is only possible to initialize an instance in a process if it is published.
When saving a process, no validation is performed. Consistency validation only occurs during the publication of the process.
Processes have version control. In other words, every time the process is saved, a new version of the process is saved, keeping the previous version in the process history for future reference.
¶ 3.2 Parameters
A process can have a collection of parameters. Each parameter has a type definition and a configuration. Each process only has parameter definitions, and each process instance must have a value for each process parameter.
If a parameter is configured to accept null values, filling is not required when the user needs to trigger an action.
A parameter configured as internal will not be visible in the parameter list when triggering an action. The purpose of an internal parameter is to abstract the parameter for the user who will trigger the action, as the parameter is only necessary for the internal functioning of the process. Since the parameter is not listed, it is necessarily a parameter that accepts null values.
Below are the possible parameter types.
¶ 3.2.1 Action
Allows storing a value related to the action performed on an instance. For example: Whether the task was approved or not.
¶ 3.2.2 File
Allows the upload of files.
¶ 3.2.3 Boolean
Stores binary values true or false, enabling use in conditionals, for example.
¶ 3.2.4 Date
Used to store a date.
¶ 3.2.5 Decimal
Used to store a floating-point value.
¶ 3.2.6 Integer
Used to store an integer value.
¶ 3.2.7 Member
Used to store the identification of a member of a specific application and dimension.
¶ 3.2.8 Name
Used to store the instance's identification. If this parameter exists in a process, whenever T6 Planning needs to identify an instance, it will use the value contained in this parameter.
¶ 3.2.9 Responsible
Used to store a list of responsibles.
¶ 3.2.10 Single Responsible
Used to store a single responsible.
¶ 3.2.11 Data Table
Used to store the identification of a specific data table.
¶ 3.2.12 Text
Used to store text.
¶ 3.3 Responsibles
Defining the responsibles for the tasks of a process can be a very laborious and difficult maintenance activity. To facilitate defining the responsibles for the tasks of a process, it is possible to configure the process to load the responsibles stored in a data table. To do this, simply choose the data table where the responsibles' information is stored and configure some identification columns.
Below is a description of how to configure the parameters to dynamically load the responsibles:
- Responsible Data Table: Choose the data table where the information about the responsibles is located.
- Identification Column: Choose a column from the data table of type text that has an identification for the task we want to load the responsibles. At the time of loading the responsibles for a task, the value contained in the "Task Identifier" of the task will be used as a filter in the selected "Identification Column."
- Responsible Column: Choose a column from the data table of type text that has the user's identification. To facilitate filling in this column in the data table, it usually has a link to the T6 Planning users in the data table definition. With this, in the data form, we will have a selection box to choose the desired user.
- Sorting Column: Choose a column from the data table of type integer. This parameter, not mandatory, is only necessary if there is a need to use multiple responsibles in our tasks.
- Filters: If there is a need to filter the responsibles of the tasks contained in a data table, we can use filters to map a process parameter to a data table column. To use this functionality, the process must have a parameter of type "Responsible," and a parameter of type "Responsibles" is also necessary.
¶ 3.3.1 Transfer Assignees
Using assignee transfer, we can replace the assignee of a workflow task or instance. Follow these steps:
- In the T6 main menu, go to Workflow and select Transfer Assignees;
- A side panel opens with 3 steps: Properties, Instances, and Summary;
- In the Properties step, select the current assignee and the new assignee for the task you want to transfer;
- When you open the Current Assignee dropdown, T6 displays users who currently have workflow tasks assigned. Select the assignee you want to transfer from;
- In the New Assignee dropdown, T6 displays users who can receive the task. Select the new assignee;
- There is also an Update Assignee Tables switch button. It is disabled by default. If you want to update assignee tables automatically after the transfer is completed, enable this switch;
- After selecting the current assignee and the new assignee, click
 ;
- You will move to the Instances step, where tasks are listed in a hierarchical tree, allowing selection of all workflow tasks, full processes, or specific instances;
- In the list, next to each process name, there is a checkbox. Select the checkbox for the instances and/or processes you want to transfer;

- After selecting the instances and/or processes you want to transfer, click ;
- You will move to the Summary step, where T6 shows the actions to be executed, including the selected current assignee, new assignee, and selected instances for transfer;
- If you want to change any information before proceeding, click
 and make the necessary changes;
- If everything is correct, click

¶ 3.4 Email Templates
To facilitate email configuration, it is possible to create email templates in the process. After configuring the email template, we can associate it with predetermined events in the process or task.
- Start: By associating an email template with the start event, an email with the associated template will be sent every time a new instance is started.
- Stop: By associating an email template with the stop event, an email with the associated template will be sent every time an instance is stopped.
- End: By associating an email template with the end event, an email with the associated template will be sent every time an instance is finished.
- Start Task: By associating an email template with the start task event, an email with the associated template will be sent every time a task is started.
- Approve Task: By associating an email template with the approve task event, an email with the associated template will be sent every time a task is approved.
- Reject Task: By associating an email template with the reject task event, an email with the associated template will be sent every time a task is rejected.
- Task Deadline: By associating an email template with the task deadline event, an email with the associated template will be sent for each task that is not overdue and has time remaining below the configured value in the process when T6 Planning Services is executed with the "sendmaildeadline" option.
- Delayed Task: By associating an email template with the delayed task event, an email with the associated template will be sent for each overdue task every time T6 Planning Services is executed with the "sendmaildeadline" option.
¶ 3.5 Holidays
In the T6 main menu, under Workflow, we have the Holidays option.
This option has a single purpose: adding dates on which workflow tasks are paused. In other words, when a holiday occurs on a business day, that day is not counted in task deadlines.
When you click Holidays, a side panel opens where you can add a date that should not count as a business day for workflow task deadlines.
For example: A task has 4 days to be completed. If a holiday is added during this period, the completion date is extended to the next business day, because workflow task deadlines consider only business days.
¶ 3.6 Design
The definition of the activity flow in a process is done through a graphic designer. When creating a new process, the designer will create a Start activity and an End activity for the process.
Whenever an activity is selected by clicking the mouse's first button on the activity, the designer will display around the selected activity which other possible activities can branch off from the current activity. If no options are available, it means that the current activity cannot have any more activities branching from it.
To access the available actions for an activity, simply use the mouse's second button on the desired activity. A context menu will be provided with actions for the activity.
If a double-click is performed on the activity, the designer will execute the expected default action for that activity, usually the first available action from the context menu for the activity.
To move an activity, just select it and perform the drag-and-drop movement to the desired new position for the activity.
Some activities support resizing. To resize, simply select the activity and perform the drag-and-drop movement at the bottom right corner of the activity. Note that when the mouse is at the bottom right corner of the activity and the activity supports resizing, the mouse cursor will change to the resizing cursor.
¶ 3.6.1 Identifying Workflow Objects and Activities
The T6 Planning workflow follows BPM rules, where each object available in our tool represents an activity, as follows:
- Start: Used to identify the start of a process, sequence, or sub-process. Every flow must have only one Start. For this reason, it is not possible to insert or remove the Start from a flow.
- End: Used to identify the end of a process, sequence, or sub-process. Every flow must have only one End. For this reason, it is not possible to insert or remove the End from a flow.
- Subprocess: Allows the use of one process within another, provided both processes are compatible. In other words, in mapping the process to the subprocess, all parameters of the subprocess must have a corresponding parameter in the process, of the same type or equivalent.
- Sequence: Used to group activities within a process, allowing abstraction and simplification of a process.
- Conditional: Used to divert the flow of a process. Every conditional must have an expression to be validated. The result of this expression must be a boolean value. If the result is true, the instance will be diverted to the green connection. If the result is false, the instance will be diverted to the red connection.
Below is the expected syntax in a conditional expression:
[Comparative Block]
Where:
[Comparative Block] = [Comparative] or [Comparative] and [Logical Operator] and [Comparative Block]
[Comparative] = [Operand] and [Comparator] and [Operand]
[Operand] = Can be any function or a constant. For more information on functions, see the list of functions.
[Comparator] = "<=" or "=" or ">=" or "!="
[Logical Operator] = AND or OR - Divider: Used to create instances in the flow. A divider can have as many output connections as necessary. For each output connection of a divider, a new instance will be generated. If an expression is used in the divider, for each resulting value in the expression's loading function, a new instance will be generated for each output connection of the divider. The resulting value of the loading function will be filled in the parameter specified in the instance function in the new created instance.
Whenever an instance encounters a divider, new instances will be created in the flow, and the original instance will be moved to the junction corresponding to the divider with the waiting state. When the last instance created in the divider reaches the junction, the original instance will exit the waiting state and continue the flow with the executing state.
Below is the expected syntax in an expression of a divider:
[Instance Function] = [Loading Function]
[Instance Function] must be the Instance function. For more information on the Instance function, see the list of functions.
[Loading Function] must be a loading function. For more information on loading functions, see the list of functions. - Junction: Used to join two or more connections in a flow. Whenever there is a conditional or a divider in the flow, there must be a corresponding junction for it.
- Lane: Used to designate the responsible party for a task in the process flow. Each lane in the process must be associated with a lane in T6 Planning. Thus, the person responsible for a task in the flow will be defined by the users contained in the T6 Planning lane. In a process, we can have multiple lanes. There is the possibility of having two lanes in the flow pointing to the same T6 Planning lane.
- Task: Designates an activity that is not linked to the operation of the process flow but rather to the objective of the process itself. A task can be automatic or manual. If it is manual, it will have at least one person responsible for its execution.
Below are the possible types of tasks available:- Data Load: This type of task aims to execute data loads, whether it be a dimension load or a fact load. It requires the choice of a specific application. Being a manual execution task, it requires the definition of a responsible user.
- Automatic Data Load: Similar to Data Load, but this will occur automatically.
- Remote Data Load: Allows reading and writing data on remote servers through the Client gateway. For more information, see: Client Gateway.
- SQL Command: Allows the user to enter an SQL command to be executed by the task.
- Email: This type of task aims to send an email. It has no dependency on any application. Being an automatic execution task, it does not require the definition of a responsible user.
- Expression: This type of task aims to execute expressions. There is the possibility of inserting multiple expressions in the same task. To do this, simply put each expression on a different line. It has no dependency on any application. Being an automatic execution task, it does not require the definition of a responsible user.
Below is the expected syntax in an expression of a task:
[Storage Function] = [Function or Constant]
Where:
[Storage Function] must be a storage function. For more information on storage functions, see the list of functions.
[Function or Constant] can be any function or a constant. For more information on functions, see the list of functions. - Formula: This type of task aims to execute formulas. It requires the choice of a specific application. Being a manual execution task, it requires the definition of a responsible user.
- Automatic Formula: Similar to Formula, but this will occur automatically.
- Form: This type of task aims to open a form for information filling. There is the possibility of associating the process parameters with the form pages. Thus, when opening the form through the task, the pages will be selected according to the value of the parameter contained in the current instance. It requires the choice of a specific application. Being a manual execution task, it requires the definition of a responsible user.
- Data Form: This type of task aims to open a data form for information filling. There is the possibility of associating the process parameters with the data form pages. Thus, when opening the data form through the task, the pages will be selected according to the value of the parameter contained in the current instance. It requires the choice of a specific application. Being a manual execution task, it requires the definition of a responsible user.
- Hyperlink: This type of task aims to open a hyperlink. It has no dependency on any application. Being a manual execution task, it requires the definition of a responsible user.
- Automatic Hyperlink: Similar to Hyperlink, but this will occur automatically.
- Data Link: This type of task aims to execute data links. It requires the choice of a specific application. Being a manual execution task, it requires the definition of a responsible user.
- Publish: It will publish the Cube of the selected application in the task. It is the same action as going to the "Modeling" menu -> "Publish".
- Reload Members: It will reload the members of the selected dimension in the task (according to the selected applications as well) that are in the database. It is the same action as going to the "Modeling" -> "Model Structure" -> "Members" screen and in the screen's "Tools" menu, "Reload Members" action.
- Report: This type of task aims to view a report. It requires the choice of a specific application. Being a manual execution task, it requires the definition of a responsible user.
- Automatic Routine: This type of task aims to execute a SQL Server job automatically. It has no dependency on any application. Being an automatic execution task, it does not require the definition of a responsible user.
- Manual Routine: This type of task aims to execute a SQL Server job manually. It has no dependency on any application. Being a manual execution task, it requires the definition of a responsible user.
- Scenario Types: Allows changing the scenario types (whether the scenario is closed, planned, or realized) of the application. It is the same action as going to the "Modeling" menu -> "Scenario Types".
- Artificial Intelligence: Available from version 12.4 (new editor only). Sends a prompt to T6GPT, receives the response and stores it in an instance parameter. Requires the T6GPT integration to be configured and active in the tenant. Being an automatic execution task, it does not require the definition of a responsible user. For more details, see section 10-11 — Artificial Intelligence Task.
- Microsoft Teams: Sends a card to a team channel or to a user's personal chat in Microsoft Teams (notification, approval or entry collection), with a title, description and link filled in by workflow expressions. It is an automatic task: the card is sent and the workflow moves on, without waiting for the answer in Teams. Only shown when the integration is enabled in the environment. For the setup and the precautions for this task, see Microsoft Teams.
¶ 3.7 Functions
The T6 Planning Workflow BPM allows the insertion of some functions with specific purposes within the process, as described below:
¶ 3.7.1 CreateDataTableRow
The CreateDataTableRow function is used to create a record in a data table.
PARAMETERS:
- Data Table: Name of the data table.
- Column and Value: Optional multivalued parameter used to define the values of the columns of the new record in the data table.
EXAMPLE: Instance(Monthly Billing Consumption) = CreateDataTableRow([Monthly Billing Consumption], [Consumption Unit] = Instance(Unit), [Month] = Instance(Month))
In this example of an expression of a task of the expression type, a new record in the Monthly Billing Consumption data table is created, where the value of the Consumption Unit column will be filled with the parameter of the instance named Unit, as well as the value of the Month column of the record will be filled with the parameter of the instance named Month.
¶ 3.7.2 DataLoadParameter
The DataLoadParameter function is used to manipulate the data load parameters of a specific application, and the function can be used to load or save a value of a data load parameter. This function is considered a storage function.
PARAMETERS:
- Parameter: Data load parameter composed of the application name and the data load parameter name.
EXAMPLE: Instance(Email) = DataLoadParameter([Quality].[Content])
This example of an expression deals with a task of the expression type. The value of the Content data load parameter of the Quality application will be assigned to the Email parameter of the current instance.
¶ 3.7.3 DataTableCell
The DataTableCell function is used to manipulate values of a record in a data table. It can be used to load or save a value from a record in a data table. This function is considered a storage function.
Parameters:
- Cell: Identification of a data table cell. Composed of the data table name, row identification, and column name.
Example: Instance(UEmail) = DataTableCell([Users].[Instance(ID)].[Email])
This expression example deals with an expression-type task. The value of the Email column from the Users data table, in the record identified by the ID parameter, will be assigned to the UEmail parameter of the current instance.
¶ 3.7.4 DataTableRowLookup
The DataTableRowLookup function is used to retrieve the identification of a record in a data table.
Parameters:
- Row: Identification of a record in a data table. Composed of the data table name, column name, and an expected value in the column.
Example: Instance(ID) = DataTableRowLookup[Users].[Name].[Instance(Current)]
This expression example deals with an expression-type task. The identification of the record in the Users data table that has the value in the Name column equal to the value of the Current parameter will be assigned to the ID parameter of the current instance.
¶ 3.7.5 GetDate
This function retrieves the current server date value.
Example: Instance(Data) = GetDate()
This expression example deals with an expression-type task. The server date will be assigned to the Data parameter of the current instance.
¶ 3.7.6 Instance
The Instance function is used to manipulate instance parameter values. It can be used to retrieve or save a value from an instance parameter. This function is considered a storage function.
Parameters:
- Parameter: Name of the process parameter.
Example: Instance(Action) = "Approved"
This expression example deals with an expression-type task. The constant "Approved" will be assigned to the Action parameter of the instance.
¶ 3.7.7 InstanceCode
Returns the code of the current instance.
Parameters: None
Example: Instance (Code) = InstanceCode()
¶ 3.7.8 InstanceName
Returns the name of the current instance.
Parameters: None
Example: Instance (Name) = InstanceName()
¶ 3.7.9 LoadDataTableRows
The LoadDataTableRows function is used to load records from a data table, and they can be filtered or not. This function is considered a loading function.
Parameters:
- Data Table: Name of the data table to have the records loaded.
- Filter: Optional multivalued parameter used to filter the records to be loaded. If more than one filter is defined, they will intersect the results. If consecutive filters where the left operand is equal are defined, they will unite the results.
Below is the expected syntax in a filter parameter:
[Operand] [Comparator] [Operand]
Where:
[Operand] = [Column] or [Constant] or [Instance] or [Expression]
[Column] =Name of a data table column. The column name should be enclosed in square brackets.
[Constant] =Value of a constant. The constant value should be enclosed in double quotes.
[Instance] =Instance function. For more information on using the Instance function, refer to the function details in the function list.
[Expression] =An SQL expression. The expression should be enclosed in curly braces.
[Comparator] = "<=" or "=" or ">=" or "!=" - Column: Optional parameter that should be used whenever you want to return a column other than the identification column of the data table.
Example: Instance(Activity) = LoadDataTableRows([Activities])
In this example of an expression task, the identifications of the records in the Activities data table will be assigned to the Activity parameters of the instances created by the task.
¶ 3.7.10 LoadMembers
The LoadMembers function is used to load members from a dimension, and they can be filtered or not. This function is considered a loading function.
Parameters:
- Dimension: Name of the data table to have the records loaded. Composed of the application name and dimension.
- Filter: Optional multivalued parameter used to filter the members to be loaded. If more than one filter is defined, they will intersect the results. If consecutive filters where the left operand is equal are defined, they will unite the results.
Below is the expected syntax in a filter parameter:
[Operand] [Comparator] [Operand]
Where:
[Operand] = [Column] or [Constant] or [Instance] or [Expression]
[Operand] = [Property] or [Constant] or [Instance]
[Property] =Name of a dimension property. The property name should be enclosed in square brackets.
[Constant] =Value of a constant. The constant value should be enclosed in double quotes.
[Instance] =Instance function. For more information on using the Instance function, refer to the function details in the function list.
[Comparator] = "<=" or "=" or ">=" or "!="
Example: Instance(Member) = LoadMembers([Planning].[Entity])
In this example of an expression task, the identifications of the members in the Entity dimension of the Planning application will be assigned to the Member parameters of the instances created by the task.
¶ 3.7.11 MemberProperty
Returns the name or value of a member property.
Parameters:
- Dimension: Name of the member's dimension. Composed of the application name and dimension.
- Identifier: Textual identifier (ID or UniqueID) of the member or value of an instance parameter.
- Property: Desired property name. If this parameter is not filled, the function will return the name of the member.
Examples:
Member([Application].[Dimension], "5")Member([Application].[Dimension], "[Account].[Account].[&5]")Member([Application].[Dimension], "[Account].[Account].[&5]", "Property")
¶ 3.7.12 ProcessDescription
Returns the description of the process.
Parameters: None
¶ 3.7.13 ProcessName
Returns the name of the process.
Parameters: None
¶ 3.7.14 RemoveDataTableRow
The RemoveDataTableRow function is used to remove records from a data table.
Parameters:
- Data Table: Name of the data table.
- Column and Value: Optional multivalued parameter used to define the values of filters for the removed columns.
Example: Instance(Units) = RemoveDataTableRow([Consumption Unit], [Contract] = Instance(Contract));
In this example of an expression task, the records in the Consumption Unit data table are removed, where the removal filter is the Contract column having the value of the Contract instance parameter. In this example, the Units instance parameter will receive the number of removed records.
¶ 3.7.15 Responsible
Returns the name and email of the person responsible for the task.
Parameters:
- Position: You can search for the 'Previous,' 'Current,' or 'Next' responsible. Use 'Previous,' 'Current,' or 'Next.'
Example: Responsible(Current)
¶ 3.7.16 ResponsibleEmail
Returns the email of the person responsible for the task.
Parameters:
- Position: You can search for the 'Previous,' 'Current,' or 'Next' responsible. Use 'Previous,' 'Current,' or 'Next.'
¶ 3.7.17 ResponsibleName
Returns the name of the person responsible for the task.
Parameters:
- Position: You can search for the 'Previous,' 'Current,' or 'Next' responsible. Use 'Previous,' 'Current,' or 'Next.'
¶ 3.7.18 Sum
The Sum function is used to sum the values contained in a multivalued parameter.
Parameters:
- Parameter: Name of the process parameter.
Example: Instance(Value) = Sum(Values)
In this example of an expression task, the sum of the values contained in the Values parameter will be assigned to the Value parameter of the instance.
¶ 3.7.19 TaskDescription
Returns the description of the current task.
Parameters: None
¶ 3.7.20 TaskName
Returns the name of the current task.
Parameters: None
¶ 4. Lanes
¶ 4.1 Overview
Lanes are used to organize and categorize activities according to their function or role.
A lane can have a collection of users or even a collection of user groups. The users contained in the lane, directly or indirectly, will have the function or role performed by the lane.
Lanes are independent of applications and models. Thus, the same lane can be used in various distinct processes.
Each lane belonging to a process has a one-to-one relationship to the lane.
¶ 5. Triggers
¶ 5.1 Overview
Triggers are T6 Planning mechanisms for creating new instances of a process. Triggers can be executed manually, automatically, or through T6 Planning Services.
When a trigger is fired, a new instance is created in the process predefined in the trigger's creation. The new instance is created at the start of the process and executed by the workflow execution engine until it encounters a manual task or reaches the end of the process.
¶ 5.2 Trigger Types
Triggers can be fired manually, automatically, or through T6 Planning Services.
- Manual: Every trigger can be manually fired. To do this, simply execute a trigger from the trigger list and fill in the necessary parameters.
- Automatic: A trigger can be configured to be automatically fired. To do this, in the trigger definition, it is necessary to configure a data table to be observed, where we must inform in which events the trigger should be fired.
For an automatic trigger to work, the process must have a parameter of type Data Table pointing to the same process the trigger is observing. This parameter will be filled in at the time of instance creation with the identification of the row that triggered the event. - T6 Planning Services: There is the possibility to configure a trigger to be executed automatically in T6 Planning Services. Whenever T6 Planning Services is executed with the StartInstance option, all triggers marked to be executed in T6 Planning Services will be fired. If necessary, it is possible to execute a trigger punctually through T6 Planning Services.
¶ 5.2.1 Trigger Firing Events
The available events for trigger firing are:
- Insertion: Every new row inserted into the data table will create a new process instance. The instance will be created after the insertion of the new row into the data table.
- Update: Every row updated in the data table will create a new process instance. The instance will be created after the update of the row in the data table.
- Removal: Every row removed from the data table will create a new process instance. The instance will be created before the removal of the row from the data table.
¶ 6. Execution
¶ 6.1 Overview
To execute a process, an instance must be initiated and parameterized. In addition, the definition of those responsible for the process activities must be made.
¶ 6.2 Instance
When a trigger is executed, manually or automatically, a new instance will be created. This initialized instance will have its parameter values filled with the values found in the trigger that originated the instance.
The new instance created will traverse the flow until reaching the end. During the flow, the instance may require manual action from a user. When this happens, the instance will wait for the interactivity of the user responsible for the current activity.
When manual interactivity is required, the user must perform an action in the activity.
The available actions are:
- Approve: This action approves the current activity and sends the instance to the next available manual activity. If there is more than one responsible in the activity, the instance will remain in the same activity and assign the next responsible if it exists.
- Reject: This action rejects the current activity and returns the instance to the previous responsible or the previous manual activity. To perform this action, the user must have specific permission, and the flow must be at a point where the action is valid.
- Stop: This action cancels the current instance. Once an instance is canceled, it can no longer be executed. To perform this action, the user must have specific permission.
- Pause: This action pauses all instances, preventing the process from continuing its flow. The same function that allows the user to stop an instance will also allow pausing and/or resuming an instance of a process.
- Resume: This action acts on a paused instance, resuming the flow execution to the state before it was paused.
- Pinch: Allows pinching (picking up) an instance and throwing it to another point in the flow. Crude example: The process is in "Task 5" of the flow, the user can pinch it and make the instance go back to "Task 1".
- Assign: This action assigns the responsible for the current instance to the user. By assigning the action to him, no other user can take action on the instance. This action is only available in activities with mixed responsibility.
- Unassign: This action unassigns the responsible for the current instance, allowing another user to assign the current instance. This action is only available in activities with mixed responsibility.
¶ 6.3 Responsibility
The responsibility of a manual activity can be defined in various ways, as described below.
¶ 6.3.1 Lane
When an activity is within a lane and the process does not have any responsible parameter type, the responsibility of the activity is visible to all users belonging to the lane.
¶ 6.3.2 Responsible Parameter
When an activity is not within a lane and the process has a responsible parameter type, the responsibility of the activity is assigned to the user defined in the responsible parameter.
¶ 6.3.3 Mixed
When an activity is within a lane and the process has a responsible parameter type, the responsibility of the activity will be visible to all users belonging to the lane until no user assigns the activity to himself. If a user assigns the instance to himself, only the assigned user will see the activity.
¶ 6.4 Dynamic Responsibles
An activity is considered to have dynamic responsibles when the process to which it belongs is configured to dynamically load responsibles from a data table. In this situation, whenever the instance enters a manual activity, the responsibles for the activity will be loaded from the data table and stored in the parameter of type Responsibles. The first responsible in the responsibles list will be stored in the Responsible type parameter.
¶ 7. Security
¶ 7.1 Overview
This topic covers role and function configurations of users responsible for process tasks.
¶ 7.2 Process Type Roles
A process type role allows the user to access cube information. When a user's roles are requested by the application, for each instance assigned to the user, a role containing the member type parameter information relevant to the application in question is created.
¶ 7.3 Functions
New functions have been made available to make access to new functionalities more flexible for users. Below are the new available functions:
¶ 7.3.1 Manage Process Structure
Users with this function have permission to create, edit, and remove processes. Available only for Manager users.
¶ 7.3.2 Manage Trigger Structure
Users with this function have permission to create, edit, and remove triggers. Available only for Manager users.
¶ 7.3.3 Manage Lane Structure
Users with this function have permission to create, edit, and remove lanes. Available only for Manager users.
¶ 7.3.4 Stop Instance
Users with this function have permission to stop a running instance. Available only for Manager users.
¶ 7.3.5 Pause Instance
The same function that allows the user to stop an instance will also allow pausing an instance of a process.
¶ 7.3.6 Resume Instance
The same function that allows the user to stop an instance will also allow resuming an instance of a process.
¶ 7.3.7 Pinch Instance
Users with this function have permission to pinch instances. Available only for Manager users.
¶ 7.3.8 Publish Process
Users with this function have permission to publish processes. Available only for Manager users.
¶ 7.3.9 Reject Instance
Users with this function have permission to reject a running instance. The option will only be available if the item from the previous process to the current task is a manual task. Available only for Planner users.
¶ 7.3.10 View Instance
Users with this function have permission to view instances. Available only for Planner users.
¶ 7.3.11 View Trigger
Users with this function have permission to execute triggers. Available only for Planner users.
¶ 7.3.12 View Process
Users with this function have permission to view processes. Available only for Manager users.
¶ 8. Examples
¶ 8.1 Overview
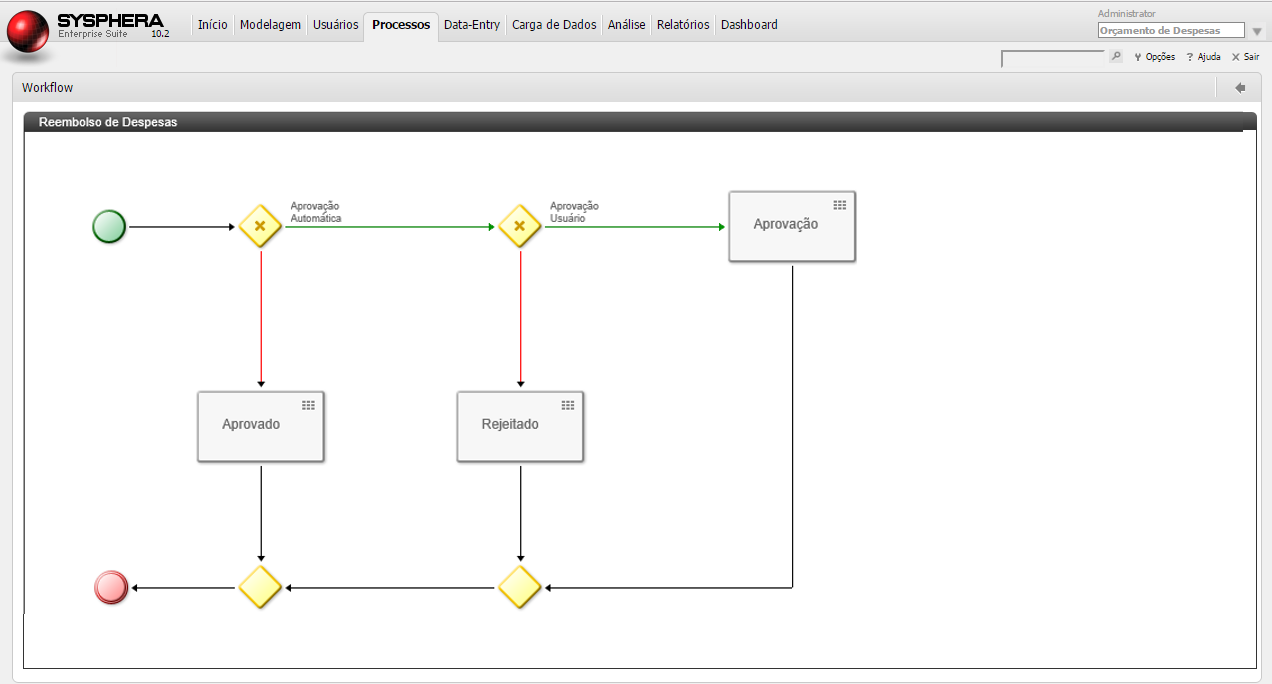
Below is an example of a process created with the new BPM workflow available in T6 Planning.
¶ 8.2 Expense Reimbursement
A user registers an expense reimbursement in a data form. If the reimbursement amount is less than R$500.00, the reimbursement is automatically approved. If the reimbursement amount is greater than R$500.00 and less than R$10,000.00, the reimbursement requires manual approval from a user participating in the reimbursement lane. If it is greater than R$10,000.00, the reimbursement is automatically rejected.
¶ 9. Workflow Image
¶ 9.1 Overview
The Workflow Image is an object type in T6 Planning that enables images to be embedded inline in email notifications sent by workflow tasks. By referencing a Workflow Image via its Content ID (CID), a workflow task can include company logos, diagrams, or any custom image directly in the body of automated email messages.
Note: For email notifications to function, SMTP parameters must be properly configured in T6 Planning. See 3.4. Email Templates for related email configuration.
¶ 9.2 Prerequisites
¶ SMTP Configuration
Before using email notifications with embedded images, verify that the following SMTP parameters are configured in Parameters:
| Parameter | Description |
|---|---|
| SMTP server | Hostname or address of the SMTP server (e.g., smtp.office365.com) |
| SMTP server user | Email address used to send messages |
| SMTP server password | Password for the sender's email account |
| SMTP server port | SMTP port (typically 587 for STARTTLS) |
| Enable SMTP SSL | Toggle to enable SSL/TLS encryption |
| Proxy Domain | Domain for proxy authentication, if applicable |
| Proxy Server | Proxy server address, if applicable |
| Proxy User / Proxy Password | Proxy credentials, if applicable |
¶ Explorer Folder Structure
A typical Workflow Image setup in the Explorer contains the following objects in the same folder:
- A Workflow Image — holds the image to be embedded in emails
- A Workflow Process — the process containing the email task
- A Workflow Starter — the trigger that initiates the process
¶ 9.3 Setting Up a Workflow Image
¶ Step 1: Create the Workflow Image Object
- In the Explorer, navigate to the folder where your workflow objects reside.
- Click New Item and in Process select Workflow Image.
- Upload or assign the desired image to the Workflow Image object.

Important: When saving a Workflow Image object, ensure that the object name contains only valid characters (do not use spaces, hyphens, or special characters).
¶ Step 2: Copy the Content ID (CID)
Each Workflow Image object has a unique Content ID (CID) used to reference it in HTML email bodies.
- Open the Workflow Image object in the Explorer.
- In the ribbon, click in Edit to open the object properties panel.
- Click the Copy button to copy the CID to the clipboard.

Note: The CID is the internal identifier used by the MIME email standard to link an HTML
<img>tag to its corresponding image attachment.
¶ Step 3: Create a Workflow Process with an Email Task
- Open (or create) a Workflow Process in the Explorer.
- In the process designer, create a Task activity.
- In the task wizard, on the 1. Properties tab, set the Type to Email.
- Navigate to the 2. Object tab and configure:
- To: recipient email address(es);
- CC: carbon copy address(es), if needed;
- Subject: email subject line;
- Body: the HTML content of the email.
¶ Step 4: Write the HTML Email Body
The email Body field must contain HTML for the image to be embedded inline. Use the <img src="cid:..."> tag, replacing ... with the CID copied from the Workflow Image object.
Minimal HTML template:
<html>
<head>
  <meta http-equiv="Content-Type" content="text/html; charset=utf-8">
</head>
<body>
  <div>
    <img src="cid:IMAGE_CID">
  </div>
</body>
</html>
Replace IMAGE_CID with the CID copied from the Workflow Image object.
Important: The Body field must contain valid HTML. If only plain text is entered (without HTML tags), the image will not be embedded — only a plain-text message will be delivered.
Save and publish the process after configuring the email task and return to the Explorer.
¶ Step 5: Create and Run the Workflow Starter
- In the Explorer, create a Workflow Starter linked to the process.
- Run the trigger to start the process.
- Within seconds, the configured recipients will receive an email with the image embedded in the body.
¶ 9.4 How It Works
The Workflow Image feature uses the MIME multipart email format, which is the standard for rich-content emails:
- The email is composed with an HTML body containing
<img src="cid:[content-id]">. - The referenced Workflow Image is serialized as a Base64-encoded part within the MIME message.
- That MIME part is assigned a Content-ID that matches the
cid:value in the HTML. - The recipient's email client matches the
cid:reference to the attached image and renders it inline in the message body.

This mechanism embeds the image inside the email itself, rather than linking to an external URL, ensuring the image is always visible regardless of the client's external image loading settings.
¶ 10. New Workflow Editor BPM
The new BPM Workflow editor is a significant evolution over the previous editor, bringing a series of improvements and new features to facilitate the creation, editing, and visualization of workflow processes. This new editor was developed based on user feedback and aims to resolve the main difficulties encountered in the previous version, providing a more fluid and efficient experience.
¶ 10.1 Multi-Selection
The new editor allows selecting multiple objects simultaneously:
- Drag selection: Click and drag to create a selection area and capture multiple items.
- Click selection: Hold the Ctrl key and click on several objects to select them individually.
- Group movement: Move all selected objects together, maintaining their relative positions.
- Batch editing: Perform operations on multiple objects at once.
This feature replaces the previous limitation of selecting only one object at a time, significantly increasing productivity when working with complex workflows.
¶ 10.2 Object Cloning
The cloning functionality allows quick duplication of tasks and objects:
- Clone button: After selecting one or more objects, click the Clone button to duplicate them, maintaining their connections and properties.
- Multiple cloning: Clone several objects at once while maintaining their relationships.
- Quick connection: Select multiple cloned objects and quickly connect them to each other by clicking the Connect button to create connections between them.
This is especially useful when you need to create repetitive flows or add multiple similar tasks to the process.
¶ 10.3 Automatic Alignment
The editor offers alignment tools to visually organize the workflow:
- Arrange/Align button: Select multiple objects and click to automatically align them.
- Smart alignment: Objects are organized in a clean and professional manner, eliminating the need for manual adjustment.

→

This feature solves one of the most common problems reported by users: the difficulty of keeping workflows visually organized.
¶ 10.4 Edit and View Modes
The new editor clearly separates edit and view modes:
- Distinct tabs: When you open a workflow for editing, it opens directly in the Edit tab.
- Quick toggle: Click between the Start and Edit tabs to switch between editing and viewing without leaving the screen.
- Real-time view: See the workflow in execution while keeping the edit tab available.

→

¶ 10.5 Cancel Button
The cancellation feature allows reverting changes:
- Undo changes: Click the Cancel button to return to the last saved state of the workflow.
Previously, it was necessary to exit the screen and return to undo changes.
¶ 10.6 Validation Tab
The validation tab appears when trying to publish a process:
- Pre-publication validation: Identifies all problems before publishing the workflow.
- Error list: Shows a complete list of all problems found, including:
- Tasks without names;
- Tasks with unknown types;
- Cyclic references;
- Invalid expressions;
- Misconfigured objects;
- Error navigation: Click on an error in the list to select and highlight the problematic object.
- Guided resolution: Fix all problems before being able to publish.

This feature eliminates the previous problem where errors only appeared after publication, forcing users to manually search for which task or expression was causing the problem.
¶ 10.7 Enhanced Editing
General improvements in object editing:
- Double-click: Double-click on an object to open its properties.
- Correct icons: Task icons are displayed correctly based on the configured type.
- Visual feedback: Better visual indication of the selected object and its state.
¶ 10.8 Real-Time Instance Visualization
The new editor offers advanced features for viewing running instances:
- History: Access previous instances through the history tab.
- Visual tracking: See visually where each instance is in the process flow.
- Automatic update: The visualization is automatically updated when an instance changes state.
- Execution time: Displays the current and previous execution time of each task.
- Instance view: Filter to show only a specific instance and track its flow.
- Instance name: If the instance has a configured name, it is displayed; otherwise, it shows the task name and instance code.
This feature is particularly useful for real-time monitoring, even allowing the display of workflow status on monitors within departments.
¶ 10.9 Compatibility
The new editor is fully compatible with existing workflows:
- No migration required: Does not require table migration or data changes.
- Bidirectional compatibility: You can toggle between the old and new editor if necessary.
Although it is possible to disable the new editor if there are problems, it is recommended to keep it enabled.
¶ 10.10 Disable Elements
Available from version 12.4. Allows individually disabling tasks and other elements in a Workflow flow without having to delete them. Disabled elements are skipped during execution, as if they did not exist, but remain configured for later reactivation.
¶ How to use
- Open the Workflow in the editor.
- Select the element you want to disable (or multiple with Ctrl + click, or area selection).
- Click the Enable/Disable button in the top toolbar.
- The element will display a strikethrough on its name and a visual status change — indicating it is disabled.
- Save and publish the cube normally.

→

During execution, when a disabled element is reached, the flow completely ignores it and moves to the next one.
¶ What can be disabled
| Element | Can disable? |
|---|---|
| Task | ✅ |
| Subprocess | ✅ |
| Sequence | ✅ |
| Conditional | ❌ |
Conditionals cannot be disabled because they involve flow branching that must always be evaluated.
¶ Main use case
Useful during Workflow testing: instead of duplicating the flow, removing slow tasks, saving, testing and then restoring — simply temporarily disable the unnecessary elements for the test.
Remember to reactivate the elements after testing before publishing to production. A disabled element does not execute any logic (expressions, formulas, data table writes, etc.).
¶ 10.11 Artificial Intelligence Task
Available from version 12.4. A new task type in Workflow that allows sending a prompt to T6GPT within the flow, receiving the response and storing it in an instance parameter for use in subsequent steps.
¶ Prerequisites
- The T6GPT integration must be configured and active for the client's tenant.
- Usage consumes the client's API tokens (cost per request — to be handled by the sales/finance team).
Prompts and data sent to T6GPT travel to an external service. Ensure the client's data sharing policies allow sending the information used in prompts.
¶ Example: Sentiment Analysis
Context: A Data Form collects user comments. For each saved comment, the Workflow is triggered, analyzes the sentiment and saves the result back to the data table.
¶ Configuration fields
| Field | Description |
|---|---|
| Prompt | Text with the instruction for the model. Supports instance variables via {{instance.parameterName}}. |
| Possible values | Guidance for the model on expected response values (e.g., 1 = Neutral, 2 = Positive, 3 = Negative). |
| Return | Complementary format instruction (e.g., Return only the integer value, without any additional text). |
| Output parameter | Instance parameter where the task result will be stored. |
Workflow structure:
Trigger: When saving a record in the data table
  └─ Task 1 (Expression): Loads the comment from the record into the instance.comment parameter
  └─ Task 2 (Artificial Intelligence): Analyzes sentiment
       Prompt: "Analyze the sentiment of the following comment and return only an integer that
                represents the sentiment. {{instance.comment}}
                Possible values: 1 = Neutral, 2 = Positive, 3 = Negative.
                Return only the integer value (1, 2 or 3), without any additional text."
       Output: instance.sentiment
  └─ Task 3 (Expression): Saves instance.sentiment back to the data table
Result: Each record will have a "Sentiment" field automatically filled with 1 (Neutral), 2 (Positive) or 3 (Negative), mappable to descriptions via lookup in another data table.


→

¶ 11. Process Viewer
¶ 11.1 Overview
Available from version 12.5. The Workflow > Process Viewer screen lets users monitor and act on workflow instances in a simplified view organized by hierarchy, without having to look at the BPM process diagram. It answers three questions: where is each member in the process, who is responsible now, and who is next?
With the new viewer enabled, the Process Viewer becomes a native T6 Planning screen, replacing the previous embedded page. The main benefits are:
- Speed: The screen loads much faster. About 1,000 instances load in roughly 0.1 seconds, compared to about 1.6 seconds in the previous screen.
- Actions on the same screen: Instances can be approved, rejected, assigned, sent back to a previous step, paused, stopped and resumed directly from the list.
- Paused and stopped instances are listed: They were not displayed in the previous screen, which made it impossible to resume a paused instance from it.
¶ 11.2 Enabling the New Viewer
The new screen is controlled by the Workflow Viewer New preview feature, which is disabled by default:
- Access the T6 main menu.
- Expand the Settings section.
- Select the Preview option.
- Enable the Workflow Viewer New switch.
- Open Workflow > Process Viewer.
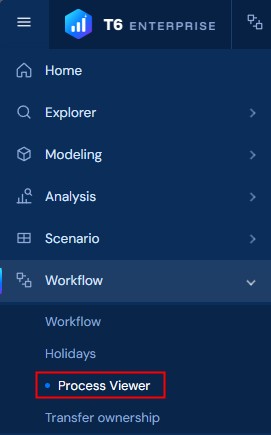
The preview feature applies to the entire environment, not just the current user. The menu entry and the links to the Process Viewer switch to the new screen immediately. To return to the previous screen, simply disable the Workflow Viewer New preview feature. An already open tab keeps working until it is closed. See Preview for more information about preview features.
¶ 11.3 Prerequisites and Permissions
The Process Viewer does not require a new permission. It uses the existing workflow functions:
| Function | What it allows in the Process Viewer |
|---|---|
| View Instance | Viewing the instances. Without it, the screen displays the message "You don't have permission to view process instances." |
| Stop Instance | Stop, Pause and Resume instances. |
| Pinch Instance | Go back to this step. |
| Reject Instance | Reject the current step. |
| Transfer ownership permission | Transfer ownership of instances. See 11.6. |
The available actions also follow the rules described in 6.2 Instance.
¶ 11.4 Screen Layout
The screen is split into a ribbon at the top, a filter bar, the status bar, the member tree on the left and the instance list on the right.
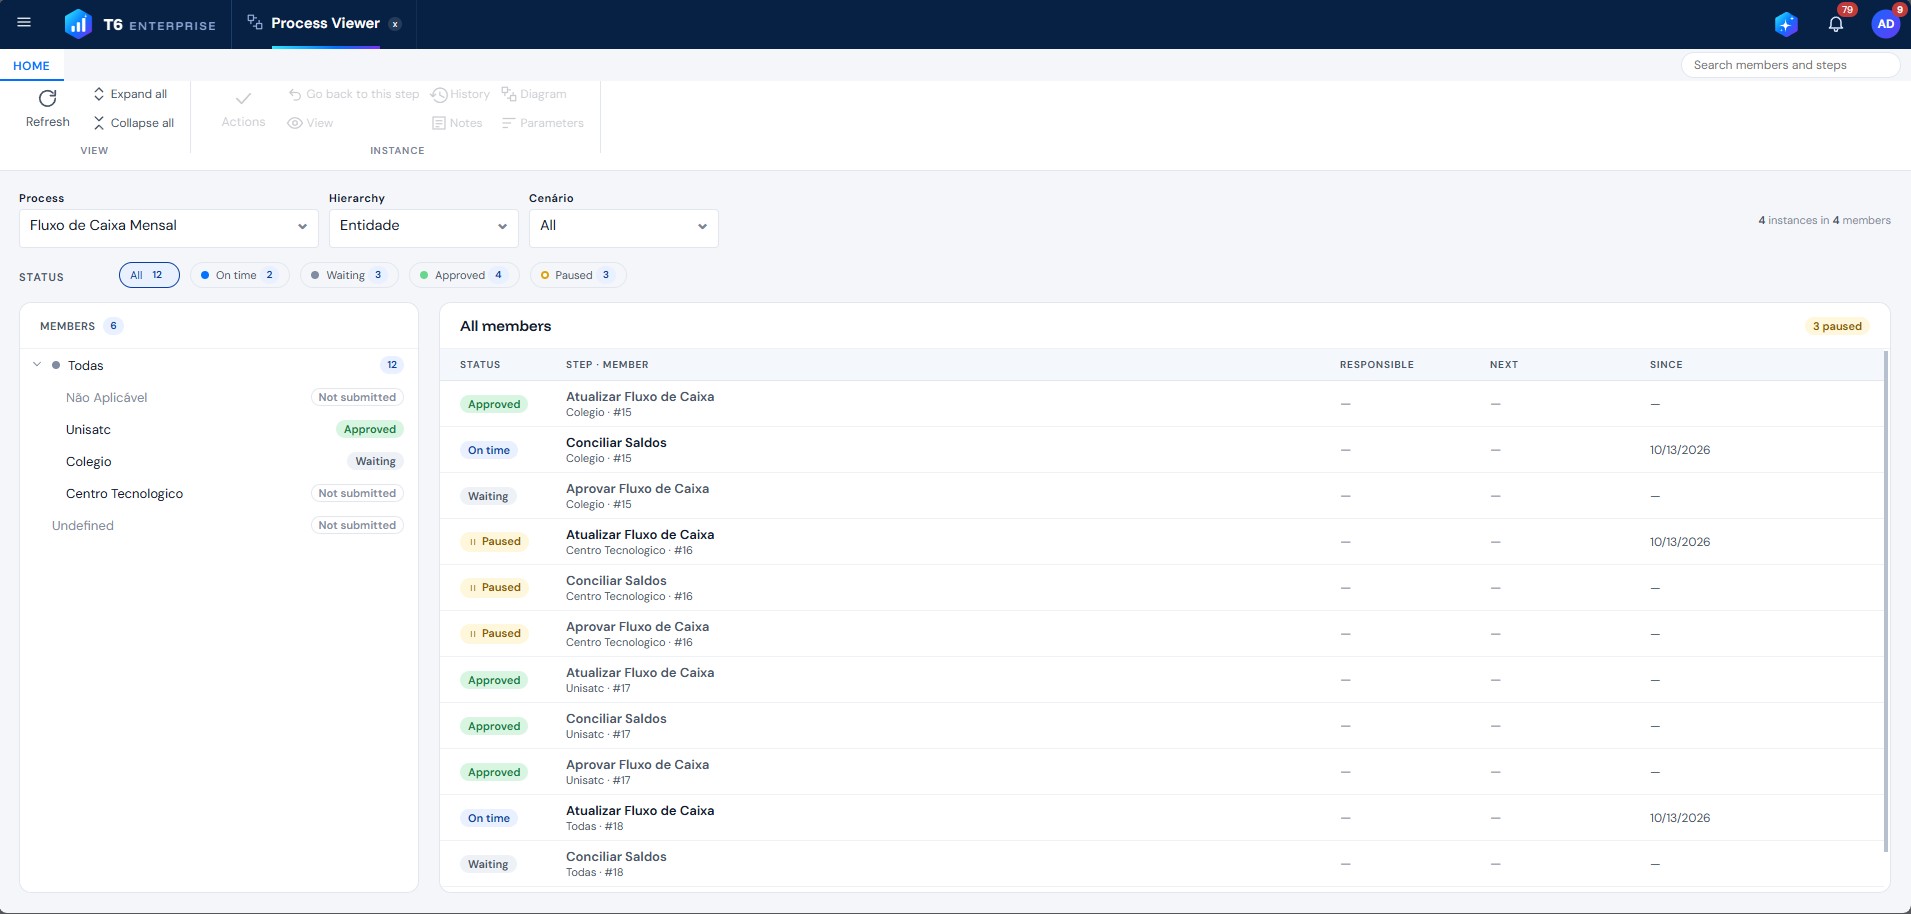
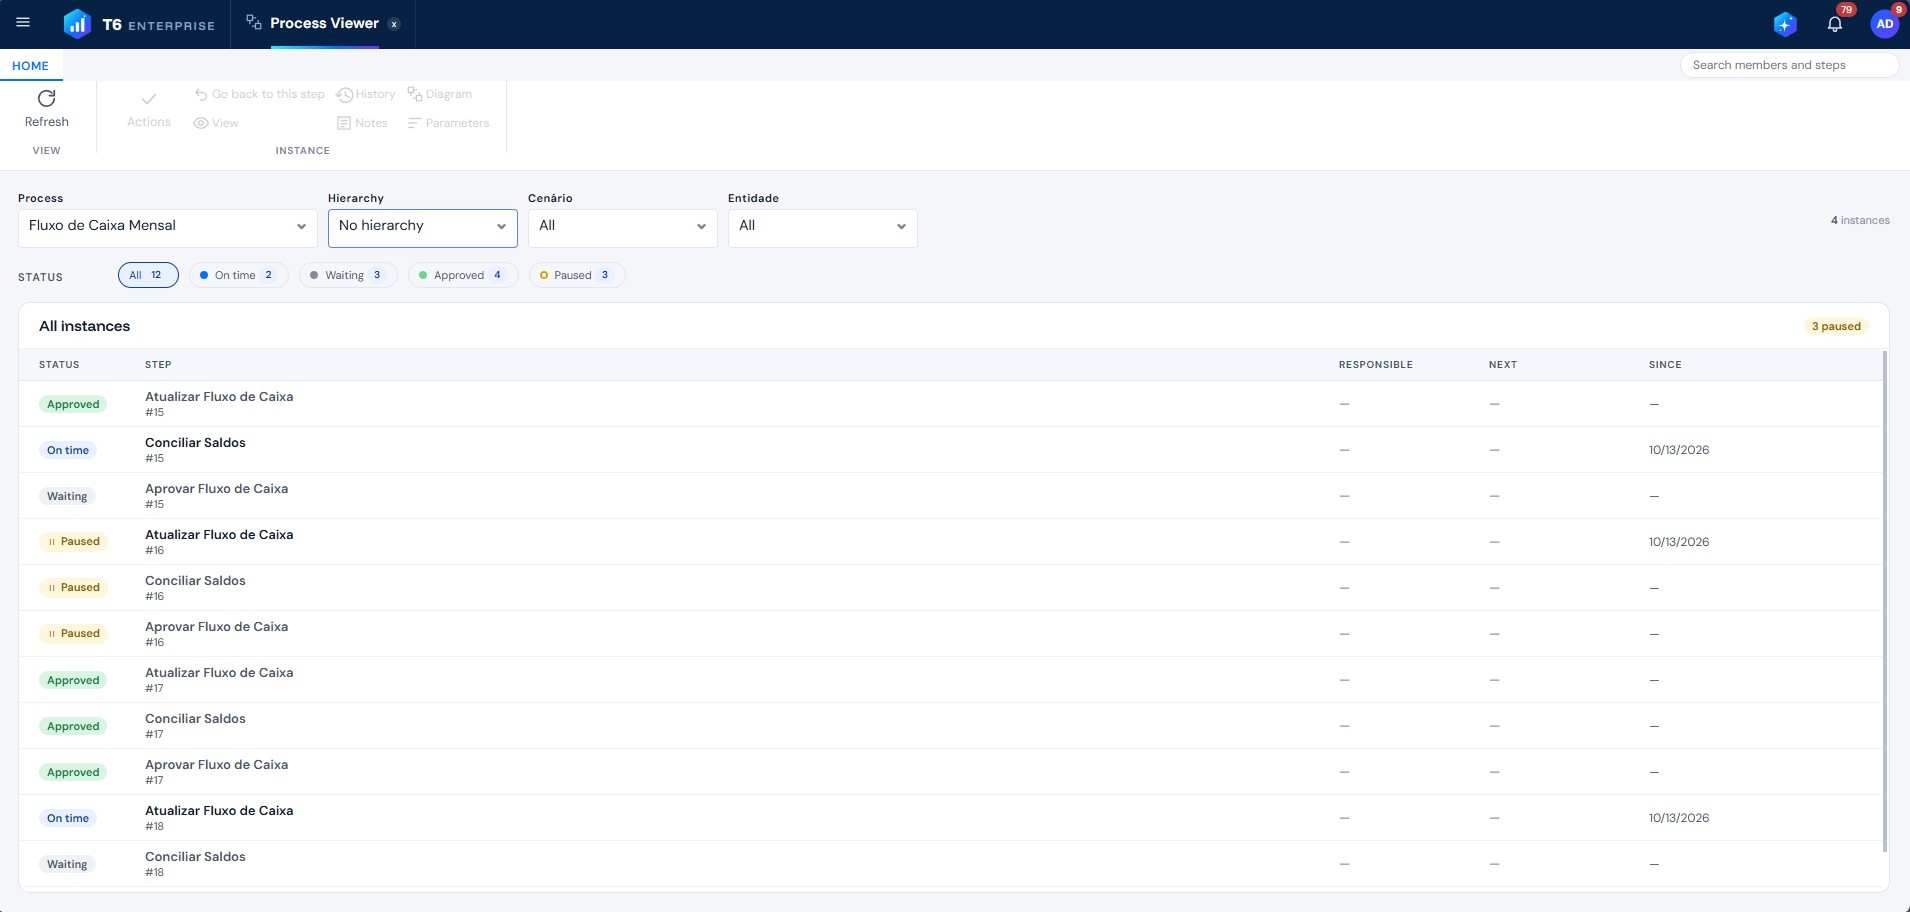
¶ 11.4.1 Process
The Process field lists every process that has instances, in alphabetical order. The first process is selected when the screen opens.
When the same process has more than one version with instances, the versions are grouped under the process name and each version is identified as Version N:
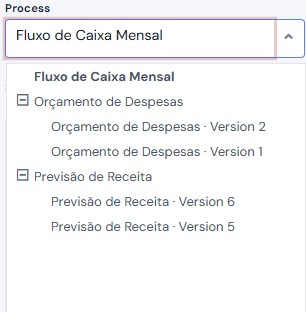
- Select the group to see the instances of all versions together.
- Select a specific version to see only its instances.
The name displayed is the process name, not the trigger name, since a process can have more than one trigger.
¶ 11.4.2 Hierarchy
The Hierarchy field defines how the member tree on the left is built. The available options are the member-type parameters of the process (for example, Entity or Scenario). By default, the parameter on the Entity dimension is selected; if there is none, the first member parameter is used.
- The tree respects the user's member security on the dimension.
- Each parent member shows the sum of the instances of its children. Selecting a member lists the instances of the member and all its descendants.
- Members without instances are shown with the label Not submitted.
- Instances whose parameter has no value are grouped under Undefined.
When No hierarchy is selected, or when the process has no member parameter, the member tree is hidden, all instances are displayed in a single list called All instances, and every member parameter becomes a filter.
¶ 11.4.3 Filters
The other parameters of the process are automatically available as filters, with one filter per parameter of type member, true/false, responsible or date. Every filter starts with the All option.
- Member: Lists the members that have instances. The Undefined option is displayed when there are instances without a value for the parameter, and is always available to Administrator and Manager users.
- Responsible: Lists only the users who are responsible for the instances, not every user in the responsibles data table.
- Date: Instead of a calendar, the filter lists only the dates that exist in the instances, in chronological order.
Changing any filter reloads the tree and the list.
¶ 11.4.4 Status
The Status bar works as a quick filter. Each status has a counter with the number of rows in that state, and clicking a status shows only those rows. The tree keeps only the branches that contain matching rows.

| Status | Meaning |
|---|---|
| On time | Current step within its deadline. |
| Due soon | Current step close to its deadline. |
| Overdue | Current step past its deadline. |
| Waiting | Future step, not reached yet. |
| Approved | Step already completed. |
| Paused | Paused instance. |
| Stopped | Stopped instance. |
| Error | Instance with an execution error. |
Only the statuses that have at least one row are displayed, along with the All option. The deadlines follow the process and task configuration.
When the instance is paused, stopped or in error, all of its rows show the instance status instead of the step status.
¶ 11.4.5 Member Tree and Instance List
- Left side (Members): The member tree. Each parent member shows its worst status (for example, if any descendant is overdue, the parent is shown as overdue), and each member shows its own status. Hovering over a member shows the current and next responsibles when they are the same for all of its instances.
- Right side: One row for each manual step of each instance, with the columns:
- Status: Status of the row (see 11.4.4);
- Step · Member: Step name, member and instance number. When the step has several approvers, the approval position is displayed (for example, "1 of 3");
- Responsible: Current responsible for the step;
- Next: Next responsibles;
- Since: Date of the step.
Automatic steps are not listed. Stopped instances are listed at the end, separated by a divider. Finished instances are listed only when their history contains an approval or a rejection.
The total number of instances and members is displayed in the upper right corner (for example, "52 instances in 13 members"). If a text is truncated, hover over it to see the full text.
The screen updates automatically whenever the instances of the process change, including when another user acts on them.
¶ 11.4.6 Ribbon

| Button | Description |
|---|---|
| Refresh | Reloads the instances. |
| Expand all / Collapse all | Expands or collapses all levels of the member tree. Available only when a hierarchy is selected. |
| Actions | Opens the actions panel of the selected row. See 11.5.1. |
| Go back to this step | Returns the instance to the selected step. See 11.5.2. |
| View | Opens the task of the selected row. See 11.5.3. |
| History | Shows the instance history. See 11.5.4. |
| Notes | Shows and adds notes to the instance. See 11.5.5. |
| Diagram | Shows the process diagram with the instance path. See 11.5.6. |
| Parameters | Shows all parameter values of the instance. See 11.5.7. |
| Transfer ownership | Transfers the instances of one user to another. See 11.6. |
| Take ownership | Takes the instances of a colleague the user is allowed to cover. See 11.6. |
The Search members and steps field, in the upper right corner of the ribbon, filters the tree by member name and the list by step, instance, member or responsible name. The search ignores uppercase, lowercase and accents. Press Esc to clear it.
The Instance buttons are also available as icons at the end of each row when you hover over or select it. The Ownership group is displayed only when the user can use at least one of its buttons.

¶ 11.5 Row Actions
All actions apply to the row selected in the list. After any action, the tree, the list and the status counters are updated automatically. If the action fails (for example, because another user changed the instance in the meantime), the error is displayed and the screen is refreshed.
¶ 11.5.1 Actions
The Actions panel shows a summary of the instance (process, step, status, responsible and next responsibles). Select the action, optionally fill in a Note and an Attachment, and click the confirmation button.
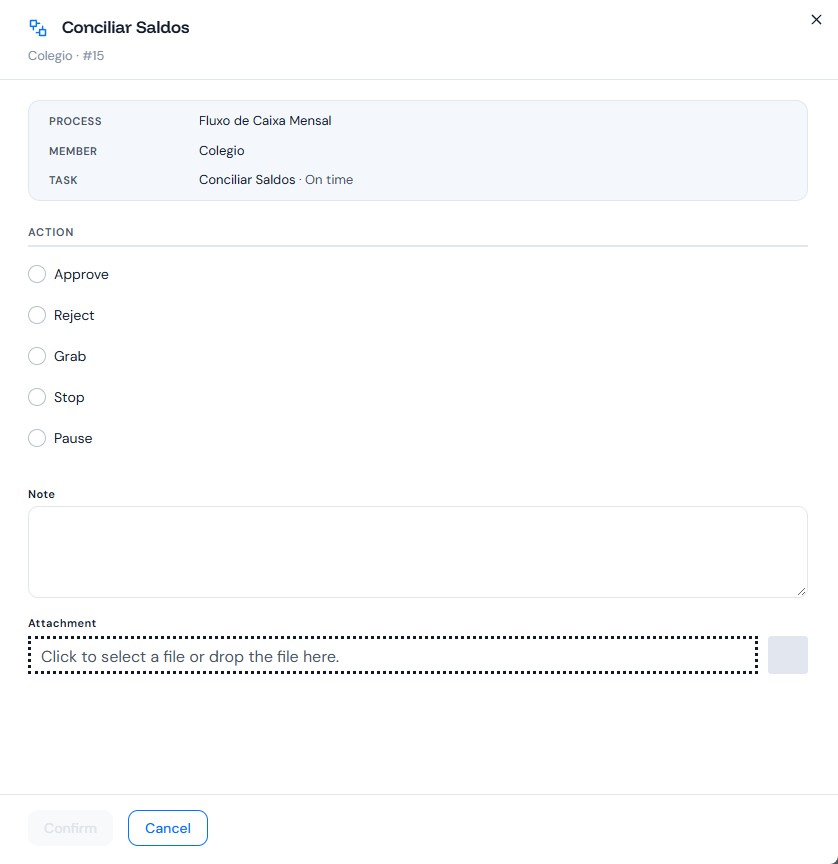
- Current step: Approve, Reject, Assign and Unassign, according to the rules of the instance and the user's permissions. The note is required to reject when the process is configured to require it.
- Other rows (past or future steps): Only the instance actions are offered: Stop (unless the instance is already stopped), Pause (when it is running or waiting) and Resume (when it is paused).
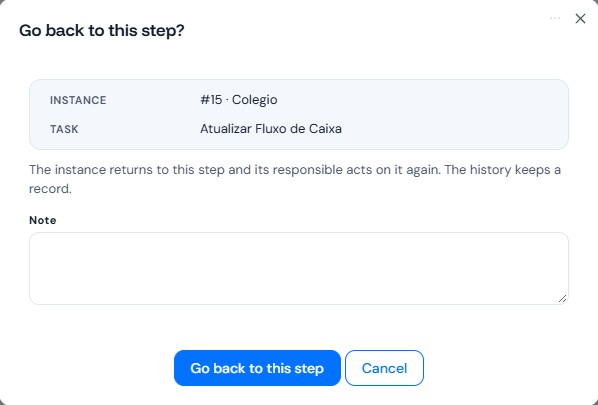
¶ 11.5.2 Go Back to This Step
Available on rows of completed steps when:
- the user has the Pinch Instance function;
- the instance is running, waiting or in error;
- the current step of the instance allows this action.
A confirmation window shows the step, the responsible and an optional Note. When confirmed, the instance returns to that step, its responsible acts on it again and the history keeps the record.
¶ 11.5.3 View
View (or double-clicking the row) opens the task of that row for the instance, whether it is the current, a past or a future step, in the same way as when the task is opened from My Tasks. For example, if the task is a data form, the form opens with the instance context.
When the row is a past or future step, the task opens for consultation only, without the Workflow actions group in the ribbon. To act on the instance, use the current step row.
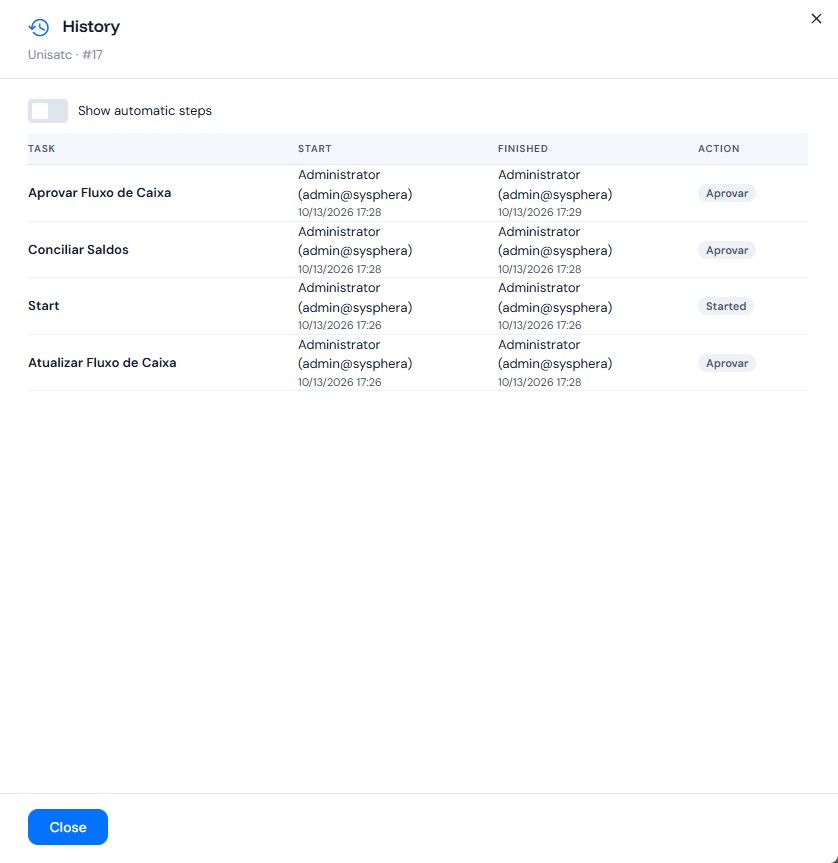
¶ 11.5.4 History
Shows the steps of the instance with the columns Task, Started, Finished and Action. The Show automatic steps switch also displays the automatic steps. When the process shares history, the history of the parent instances is included.
¶ 11.5.5 Notes
Lists the notes of the instance and allows adding new ones with an optional Attachment.
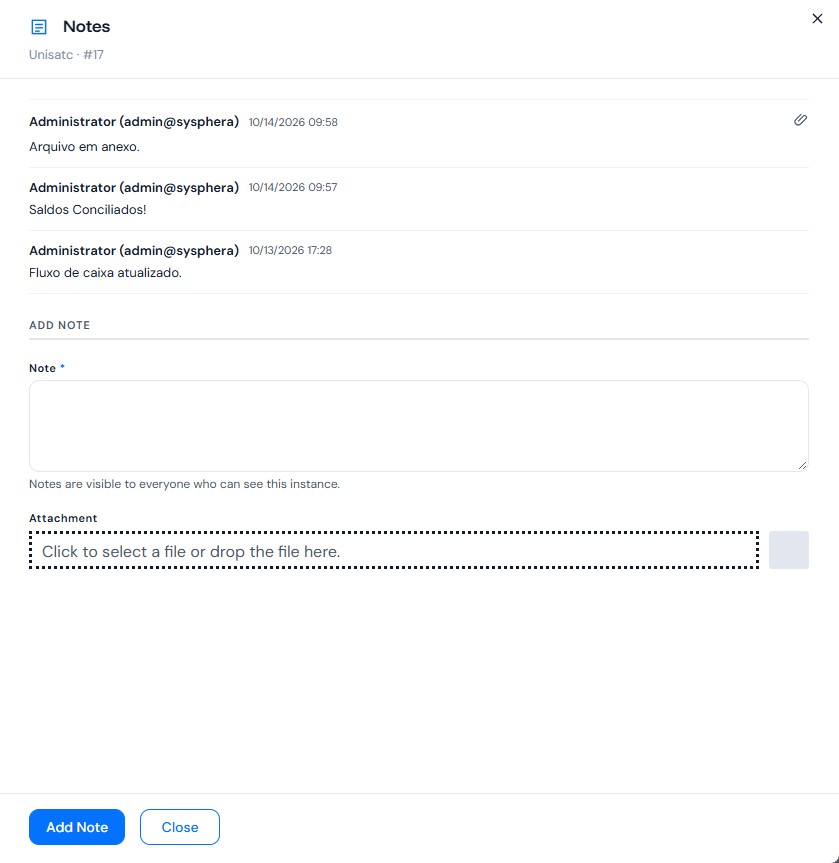
- Opening a note marks it as read.
- Notes are visible to everyone who can see the instance.
- When the process shares notes, the inherited notes are also listed.
- Files larger than the configured maximum size are refused.
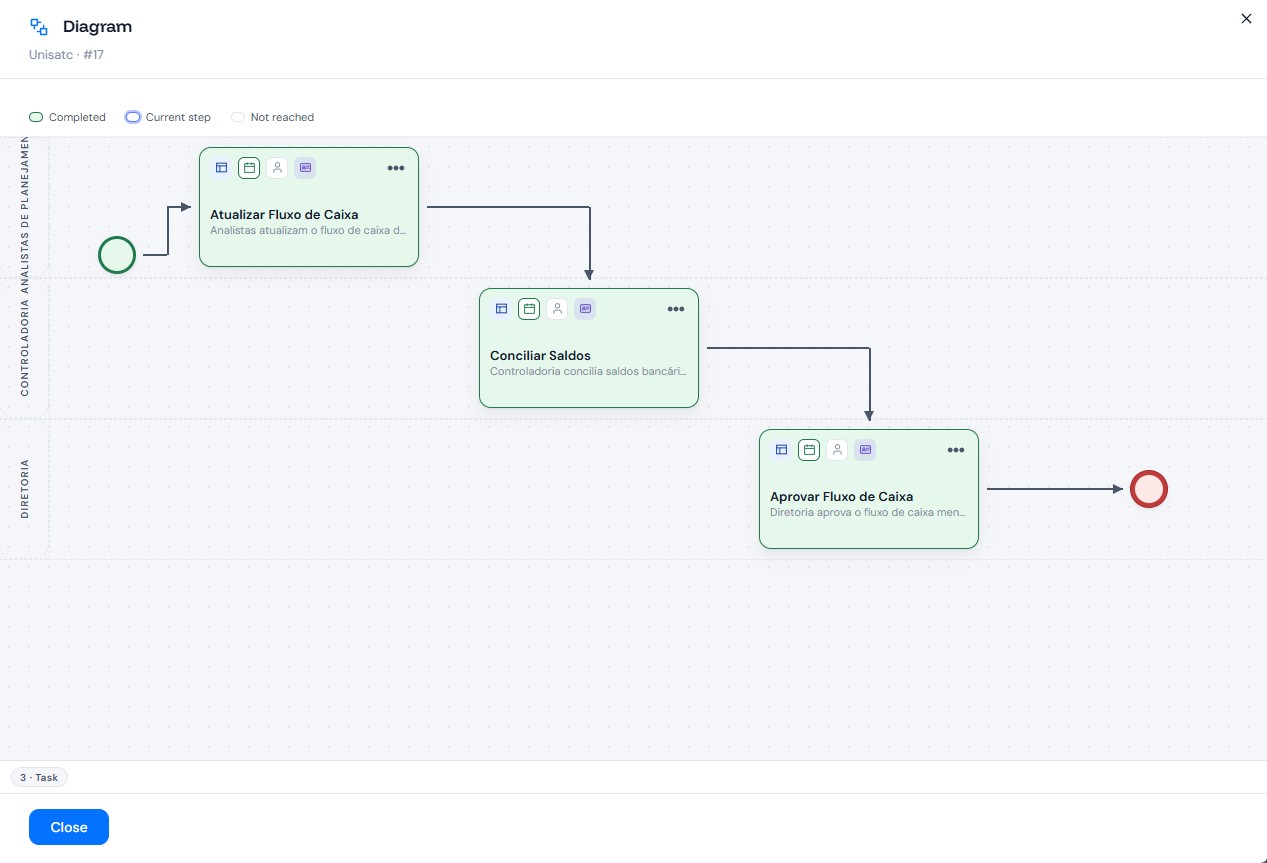
¶ 11.5.6 Diagram
Shows the process diagram with the path of the instance. The legend identifies the Current step, the Completed steps and the steps Not reached.
¶ 11.5.7 Parameters
Shows all parameter values of the instance. Click the funnel icon next to a value (Filter the viewer by this value) to apply it to the screen:
- for the hierarchy parameter, the member is selected in the tree;
- for the other parameters, the value is applied to the corresponding filter.
¶ 11.6 Ownership
The Ownership group of the ribbon is available only when the process has both the responsibles data table and the transfer ownership data table configured.
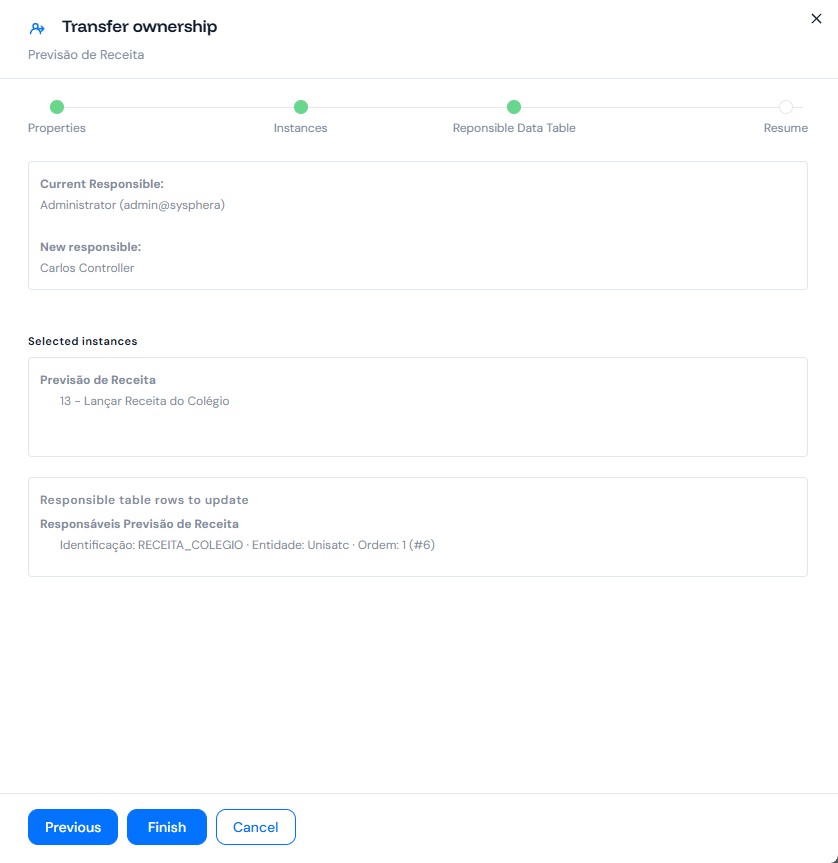
- Transfer ownership: Available to users with the transfer permission. Opens the transfer wizard already filtered by the selected process, to move the instances of one user to another.
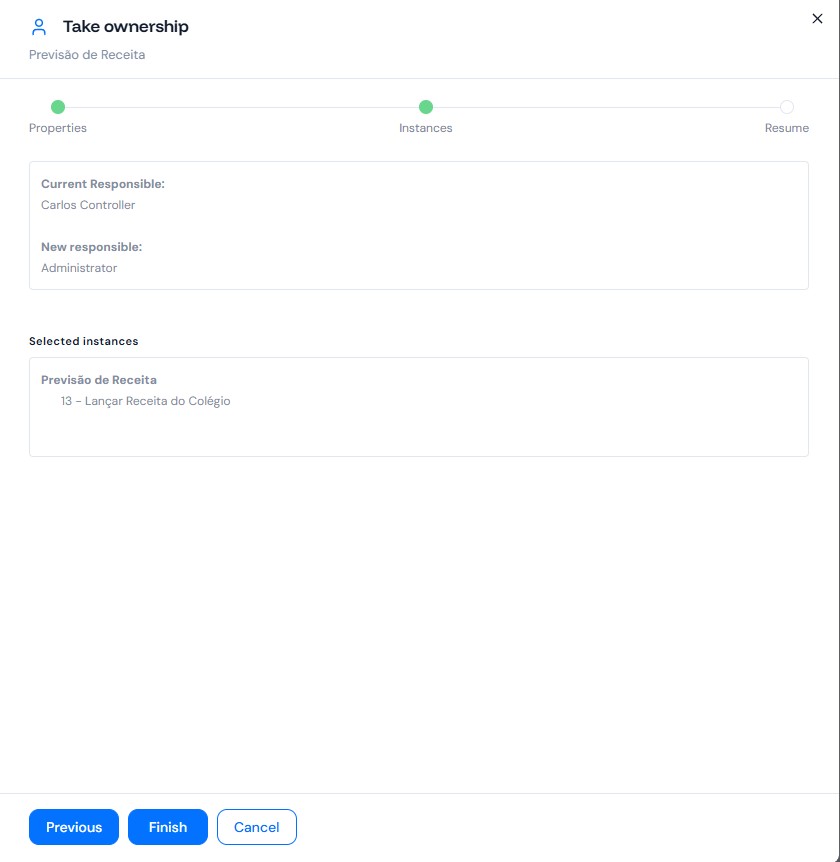
- Take ownership: Available to users who are allowed to cover at least one colleague, that is, when the transfer table has a row naming the user as the substitute.
- The source list contains only the colleagues the user may cover.
- The destination is always the user themselves and cannot be changed.
- The instances become the user's responsibility.
The server checks the permissions again when the action is executed. Requests for colleagues the user may not cover are refused and nothing is changed.
¶ 11.7 Who Sees What
- Administrator and Manager: See all instances, within the member security.
- Other users: See only the rows of the instances where they are the current or next responsible, and only the members that contain these rows.
The same rules apply to View, History, Notes and attachments. A user who belongs to the role of the current step can also open the instance. It is not possible to open an instance the user is not allowed to see by entering its code directly. Removing the hierarchy (No hierarchy) does not display any additional instances.
¶ 11.8 Messages
| Message | Cause |
|---|---|
| No process has active instances to show. | No process has instances. |
| You are not the current or next responsible for any step of this process. | The user is not an Administrator or Manager and has no instance to act on in the selected process. |
| No instance matches the current filters. | The filters, status or search hide all instances. |
| You don't have permission to view process instances. | The user does not have the View Instance function. |
| The instance can no longer go back to this step. | The instance changed after the screen was loaded. |
| You are not allowed to take the instances of this user. | Take ownership attempted for a colleague the user may not cover. |
¶ 12. Q&A
Frequently Asked Questions
1. How do I enable the Workflow runtime in T6?
To enable the workflow runtime in T6, simply activate the preview feature: Workflow Runtime New.
- Access the T6 main menu.
- Expand the Settings section.
- Select the Preview option.
- Enable the Workflow Runtime New switch.
2. What is a process and an instance in Workflow?
In Workflow, process and instance are different concepts:
A process is the definition of an activity flow.
An instance is a running execution of that process.
Multiple instances can run simultaneously for the same process.
3. When is a Workflow process validated?
In T6 Workflow processes, consistency validation happens only when publishing the process, not when saving it.
4. How does Workflow process version control work?
In T6 Workflow, every time a process is saved, a new version is created, while previous versions remain in history for future reference.
5. What parameter types are available in Workflow processes?
The following parameter types are available in T6 Workflow processes:
Action;
File;
Boolean;
Date;
Decimal;
Integer;
Member;
Name;
Assignees;
Assignee;
Data Table;
Text.
6. What are internal parameters in Workflow?
Internal parameters in T6 Workflow are parameters not visible in the list when running a starter, used for internal process behavior. They must always be parameters that accept null values.
7. How do I transfer assignees in Workflow?
To transfer assignees from running instances in T6 Workflow, follow these steps:
- Access the T6 main menu.
- Expand the Workflow section.
- Select the Transfer Assignees option.
- Follow the wizard steps to select assignees, instances, and confirm the action.
Properties (select assignees).
Instances (choose processes/instances).
Summary (confirm actions).
8. Which elements can I use in Workflow process design?
The elements available for use in Workflow process design are:
Start;
End;
Subprocess;
Sequence;
Conditional;
Splitter;
Join;
Lane;
Task (with several types such as Data Load, Email, Expression, Formula, Form, etc.).
9. How does a Conditional work in Workflow processes?
A conditional in a Workflow process evaluates a boolean expression. If true, it follows the green connection; if false, it follows the red connection.
10. What does a Splitter do in Workflow processes?
A splitter in Workflow processes creates multiple instances in the flow. For each outgoing connection, it creates a new instance. The original instance waits at the corresponding join.
11. What types of starters exist for Workflow?
The starter types available in T6 Workflow are:
Manual (run by the user).
Automatic (triggered by events in data tables).
T6 Planning Services (run automatically by the service).
12. Which events can trigger automatic Workflow starters?
The events that can trigger automatic starters in T6 Workflow are:
Insert;
Update;
Delete rows in data tables.
13. Which actions can I execute on a Workflow process instance?
The actions that can be executed on Workflow process instances are:
Approve;
Reject;
Stop;
Pause;
Resume;
Pin;
Assign;
Unassign.
14. How does mixed responsibility work in Workflow?
In Workflow processes, when an activity is in a lane and the process has an assignee parameter, everyone in the lane can view the activity until someone assigns it to themselves.
15. How do I activate the new Workflow editor in version 12.3?
To activate the new Workflow editor, follow these steps:
- Access the T6 main menu.
- Expand the Settings section.
- Select the Preview option.
- Enable the Workflow Process New switch.
The new editor is fully compatible with existing workflows and does not require table migration.
16. What's the difference between "Workflow Runtime New" and "Workflow Process New"?
These are two different preview features:
- Workflow Runtime New (version 12.2): Runtime that executes workflows with compiled code inside T6, improving execution performance.
- Workflow Process New (version 12.3): New visual editor with usability improvements, multi-selection, advanced validation, and other features.
It is recommended to enable both features to take advantage of both the optimized runtime and the enhanced editor.
17. How do I select multiple objects in the new Workflow editor?
The new editor offers two forms of multi-selection:
- Drag selection: Click and drag to create a selection area and capture multiple items.
- Click selection: Hold the Ctrl key and click on several objects to select them individually.
After selecting, you can move all objects together or perform batch operations.
18. How do I clone tasks in the new Workflow editor?
To clone tasks in the new editor:
- Select one or more tasks you want to duplicate.
- Click the Clone button in the toolbar.
- The tasks will be duplicated while maintaining their properties and connections.
You can clone multiple objects at once and connect them quickly using the Connect button.
19. How do I automatically align objects in the new Workflow editor?
To automatically align objects:
- Select the objects you want to align.
- Click the Arrange/Align button in the toolbar.
- The objects will be automatically organized in a clean and professional manner.
This feature eliminates the need for pixel-by-pixel manual adjustment, keeping workflows visually organized.
20. What is the Validation tab in the new editor and how does it work?
The Validation tab is one of the most significant improvements in the new editor. It appears when you try to publish a process and identifies all problems before publication:
- Tasks without names
- Tasks with unknown types
- Cyclic references
- Invalid expressions
- Misconfigured objects
Clicking on an error in the list selects and highlights the problematic object, enabling guided correction of all problems before publishing.
21. How do I cancel changes in the new Workflow editor?
The new editor has a Cancel button that allows you to revert changes:
- Click the Cancel button to return to the last saved state of the workflow.
- If there are unsaved changes, the system asks whether you want to save or cancel.
- This prevents accidental loss of work.
Previously, you had to exit the screen and return to undo changes.
22. How do I switch between edit and view modes in the new editor?
The new editor clearly separates edit and view modes through tabs:
- Edit tab: Allows you to modify the process and its tasks;
- Start tab: Allows you to view and execute process instances.
You can click between tabs to switch quickly without leaving the screen, making it easy to monitor running workflows while editing.
23. How do I view instances in real-time in the new editor?
The new editor offers real-time instance visualization:
- Access the Start tab of the process.
- See visually where each instance is in the flow.
- The visualization is automatically updated when an instance changes state.
- The current and previous execution time of each task is displayed.
- You can filter to show only a specific instance and track its flow.
This feature is useful for real-time monitoring and can even be displayed on departmental monitors.
24. Is the new editor compatible with existing workflows?
Yes, the new editor is fully compatible with existing workflows:
- No migration required: Does not require table migration or data changes;
- Bidirectional compatibility: You can toggle between the old and new editor if necessary;
- Recommendation: Although it is possible to disable the new editor if there are problems, it is recommended to keep it enabled to take advantage of the improvements.
25. What features were released in the new editor in version 12.4?
The following features were released in version 12.4 of PowerPlanning for the new Workflow editor:
- Disable Elements: Option to temporarily disable tasks, subprocesses, and sequences for testing, making the flow skip them without executing them. See the Disable Elements section.
- Artificial Intelligence Task: New task type that sends a prompt to T6GPT and stores the response in an instance parameter. See the Artificial Intelligence Task section.
26. Why can't I publish my workflow in the new editor?
If you cannot publish your workflow, check the Validation tab that appears automatically when you try to publish:
- The tab shows all errors and problems found.
- Click on each error to navigate to the problematic object.
- Fix all listed problems.
- Try publishing again after resolving all errors.
Common errors include: tasks without names, tasks without defined types, invalid expressions, and cyclic references in the flow.
27. How do I quickly connect multiple tasks in the new editor?
To quickly connect multiple tasks:
- Select the objects you want to connect (source and targets).
- Click the Connect button in the toolbar.
- The connections will be automatically created between the selected objects.
This feature saves time when creating complex flows with multiple parallel connections.
28. How do I disable an element in the new Workflow editor?
To disable an element (task, subprocess, or sequence) in the new editor:
- Open the Workflow in the editor.
- Select the element you want to disable. For multiple elements, use Ctrl + click or area selection.
- Click the Enable/Disable button in the top toolbar.
- The element will display a visual change, indicating it is disabled.
- Save and publish the cube.
During execution, the flow completely ignores the disabled elements and moves to the next one.
29. Which elements can be disabled in Workflow?
In Workflow (v12.4), the elements that can be disabled are:
- Task.
- Subprocess.
- Sequence.
30. What is the Artificial Intelligence Task in Workflow?
The Artificial Intelligence Task is a new task type available from version 12.4 of PowerPlanning (new editor only). It allows:
- Sending a prompt to T6GPT;
- Receiving the model's response;
- Storing the result in an instance parameter for use in the subsequent steps of the flow.
31. What are the prerequisites for using the Artificial Intelligence Task?
To use the Artificial Intelligence Task in Workflow, you need:
- Version 12.4 or higher of PowerPlanning;
- Using the new Workflow editor (preview feature Workflow Process New enabled);
- Having the T6GPT integration configured and active for the tenant;
- The client's tenant must have API tokens available (each request consumes tokens — check the costs with the commercial team).