¶ 1. Introduction
Follow the instructions in this guide to install T6 Enterprise™, the platform for Tech6 products: T6 Planning, T6 Consolidation, T6 IFRS, T6 HR, and T6 Performance.
This installation guide is intended for system administrators and technical consultants.
¶ 2. Prerequisites for Installation
¶ 2.1 OVERVIEW
The installation of T6 Enterprise requires that certain software be properly installed and configured, as described in this chapter.
¶ 2.2 SOFTWARE
Some software is required for the correct installation of T6 Enterprise, as detailed below.
Microsoft Windows Server – one of the following options:
- Microsoft Windows Server 2012 R2 (Standard or higher).
- Microsoft Windows Server 2016 (Standard or higher).
- Microsoft Windows Server 2019 (Standard or higher).
Microsoft SQL Server – one of the following options:
-
Microsoft SQL Server 2012 SP4 (Standard or Enterprise with Service Pack 4 or higher).
-
Microsoft SQL Server 2014 (Standard or higher).
-
Microsoft SQL Server 2016 (Standard or higher).
-
Microsoft SQL Server 2017 (Standard or higher).
-
Microsoft SQL Server 2019 (Standard or higher).
-
Microsoft SQL Server 2022 (Standard or higher).
-
Internet Information Services (IIS) version 8 or higher.
It is required to install “IIS 6 Management Compatibility.” For more details and tips on IIS, refer to the manual: IIS Setup Tips. -
.NET Core 8.0 Runtime & Hosting Bundle for Windows (v8.0.0): Download .Net Core 8.0
-
Microsoft .Net Framework 4.8 or higher: Download .NET Framework 4.8
-
Report Viewer 2012: Download Report Viewer 2012
¶ 2.3 CONFIGURATIONS
The installation of T6 Enterprise also requires the prior configuration of some components, as described below.
¶ 2.3.1 Windows Server
- Windows User Account: You can run T6 Enterprise using a new Windows user account. You must create and configure this account, ensuring that the new user is a member of the following groups: Administrators and IIS_WPG.
- Server Name: During the installation of T6 Enterprise, use the server name instead of localhost.
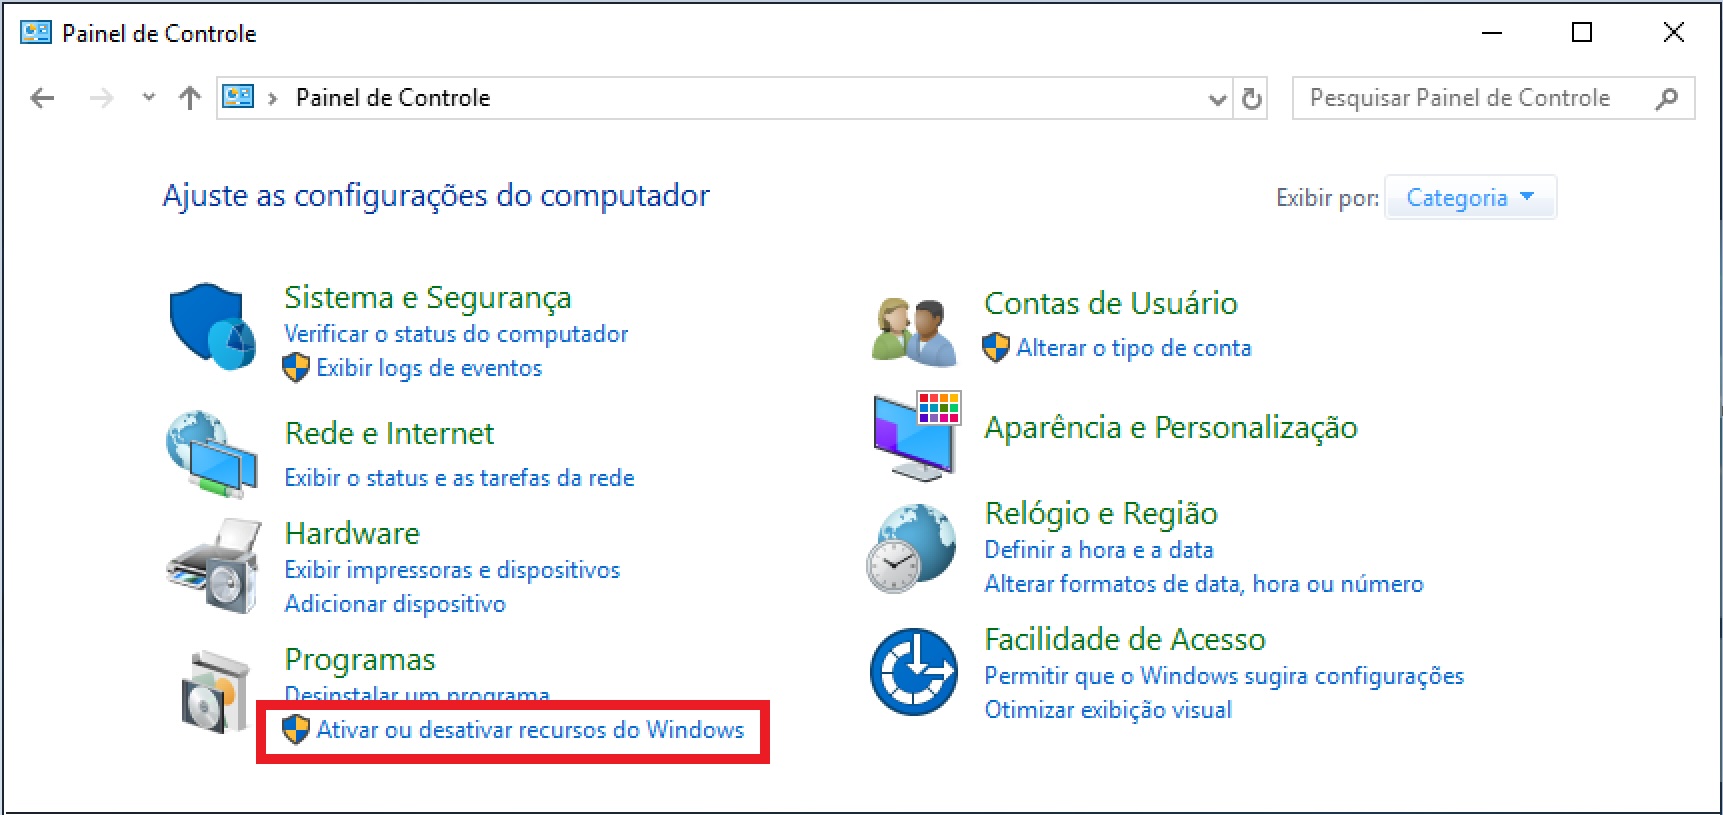
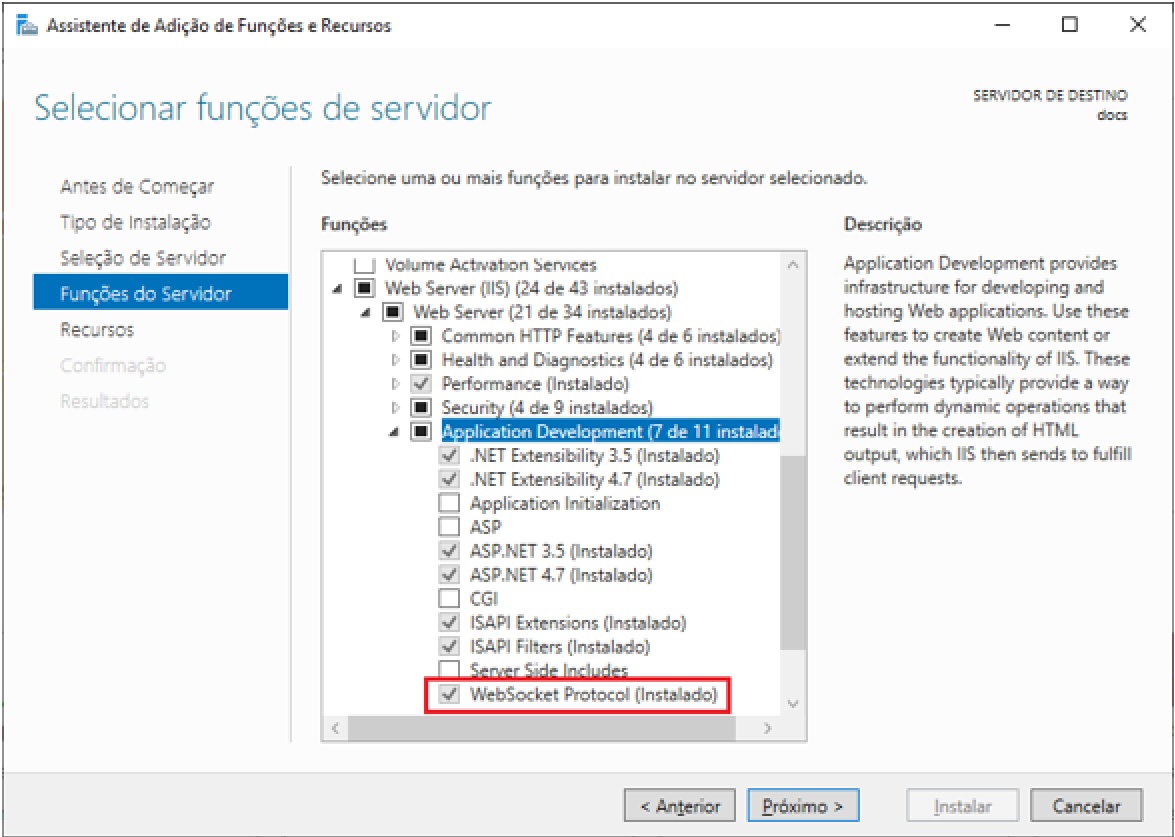
- WebSocket Protocol: The installation of the WebSocket feature is required on the Windows server that will host the T6 Enterprise application.
- To install it, first access the Control Panel. Then click on Turn Windows features on or off.
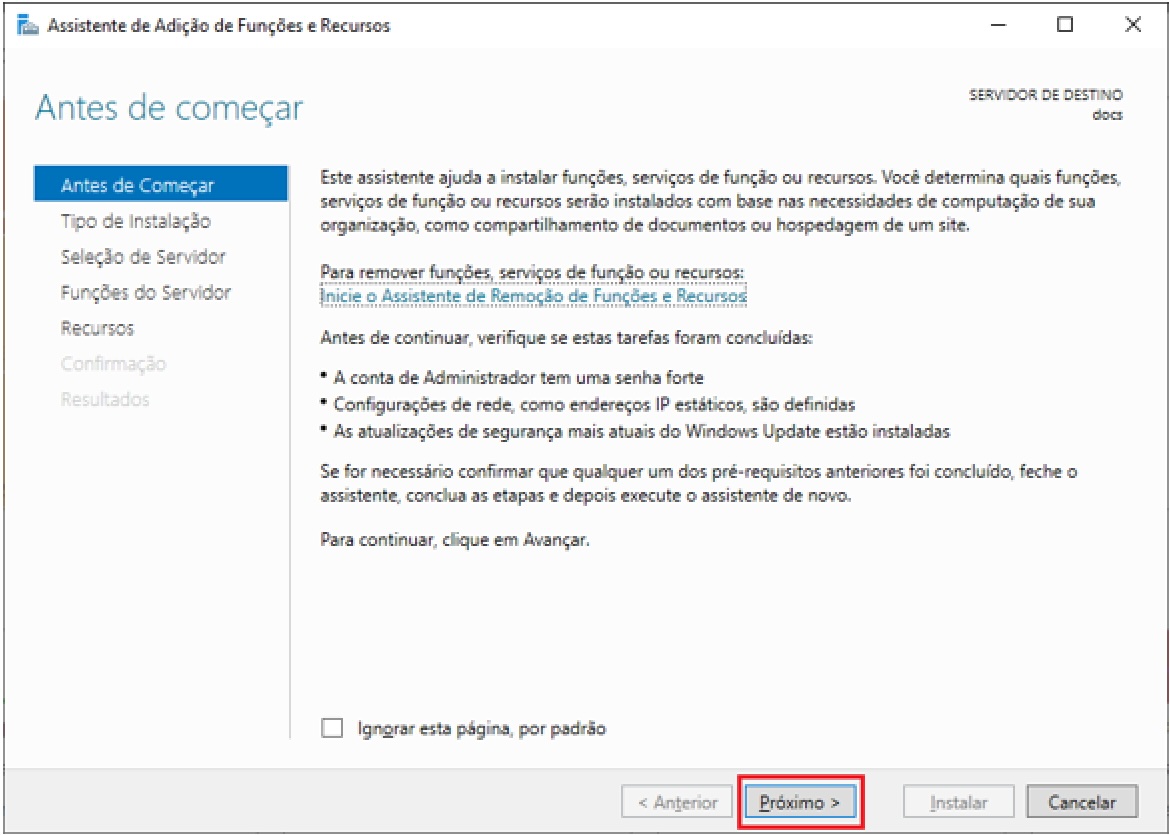
The next screen will display the initial step of the Add Roles and Features Wizard. Click Next to continue.
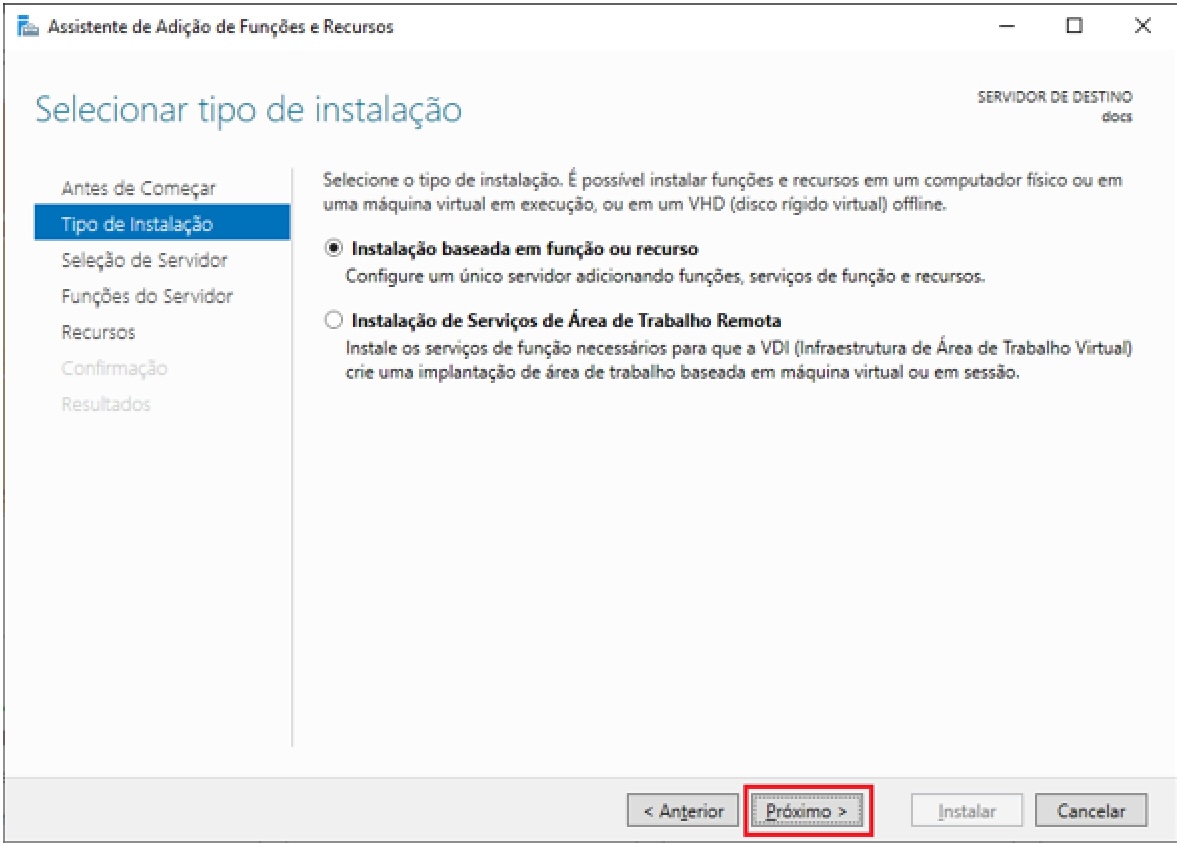
On the next screen, select Role-based or feature-based installation. Click Next to continue.
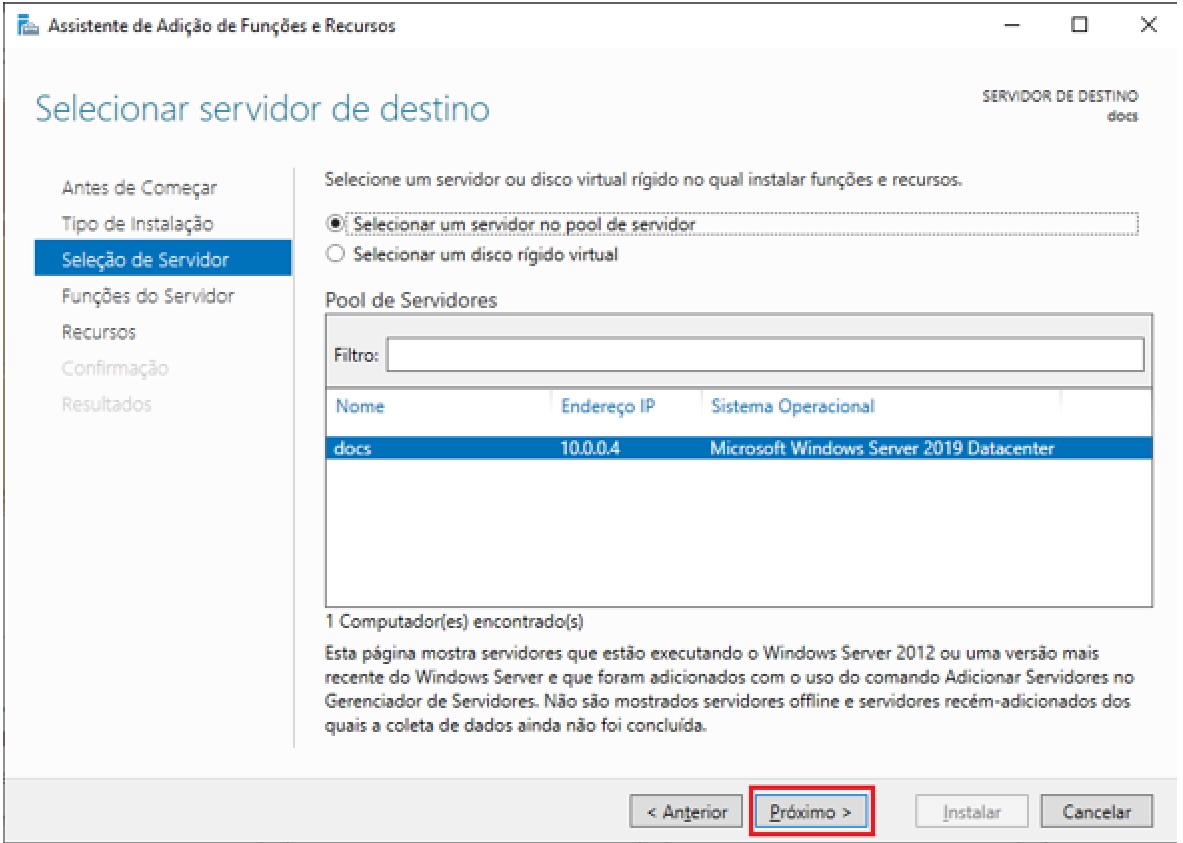
On the next screen, select the destination server. Click Next to continue.
On this screen, verify whether the WebSocket Protocol option is installed or not.
If it is already installed, you can cancel this wizard. Otherwise, click Next to proceed and follow the Windows instructions to complete the installation.
¶ 2.3.2 SQL Server
-
SQL Server Installation Options: The proper functioning of T6 Enterprise depends on certain SQL Server options, listed below.
- Database Services
- Integration Services (only if used for ETL)
- Workstation Components and Development Tools
-
Required Configurations: The services listed above must be executed from Local System or Network Service.
- The SQL service must be running.
- The TCP protocol must be enabled in SQL Server Network Configuration and SQL Native Client Configuration.
-
New Database: A new database must be created and configured before starting the installation of T6 Enterprise. During the installation process, the necessary tables and data will be automatically created by the installer. To create a new database, follow the steps below.
- Open SQL Server Management Studio.
- Connect to the Database Engine where you want to create the database for T6 Enterprise.
- Once connected, right-click on the Database folder in Object Explorer and select the New Database option.
Note
The database COLLATION must be set to Latin1_General_CI_AI.
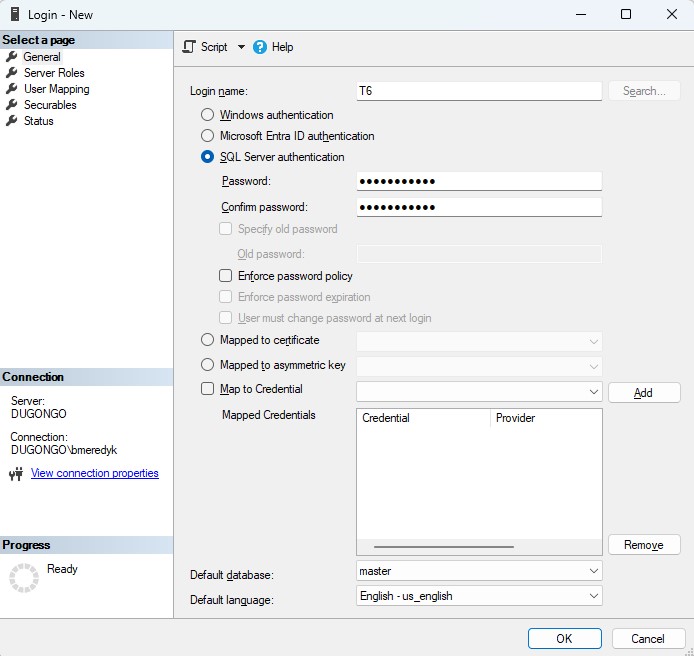
- Creating the T6 Enterprise User: It is recommended to create a new user to connect and manage the application database. Ensure that this new T6 user has the attributes described below and that the default language is set to English.
- Authentication type: SQL Server Authentication or Windows Authentication, depending on how you want to connect.
- If you use the SQL Server Authentication option, set and confirm a password. Passwords must be configured to meet security policies, meaning complex passwords.
- On the General page, under Default Database, select the new T6 Enterprise database created for this purpose.
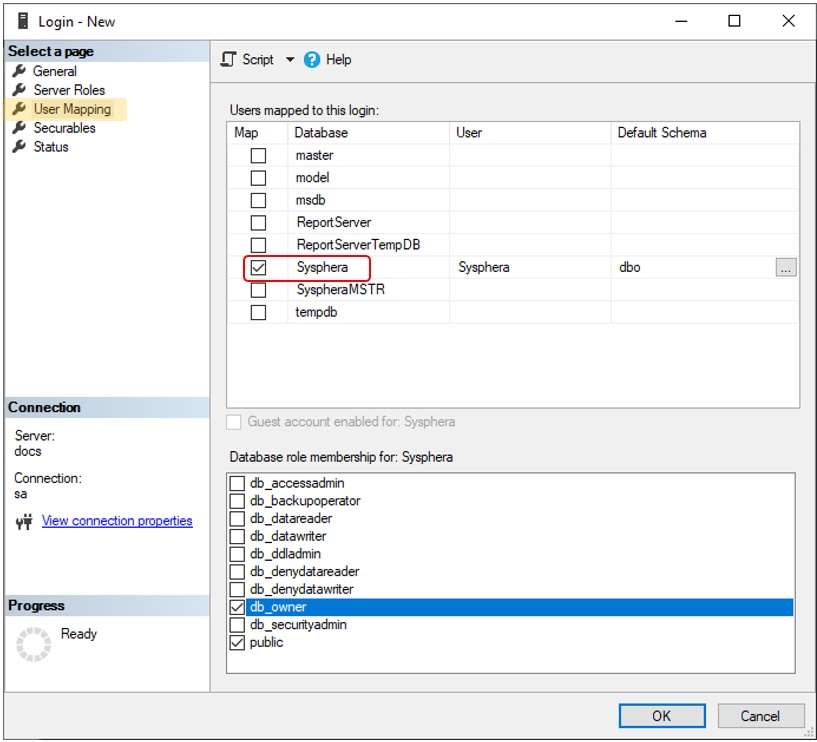
- On the User Mapping page, under Users Mapped to This Login, check the Map checkbox corresponding to the new T6 Enterprise database created in the previous step. Under Database Role Membership, select the db_owner option. The public option should already be checked by default.
- On the Status page, under Settings, ensure that the Permission to Connect to Database Engine option is set to Grant, and the Login option is set to Enabled.

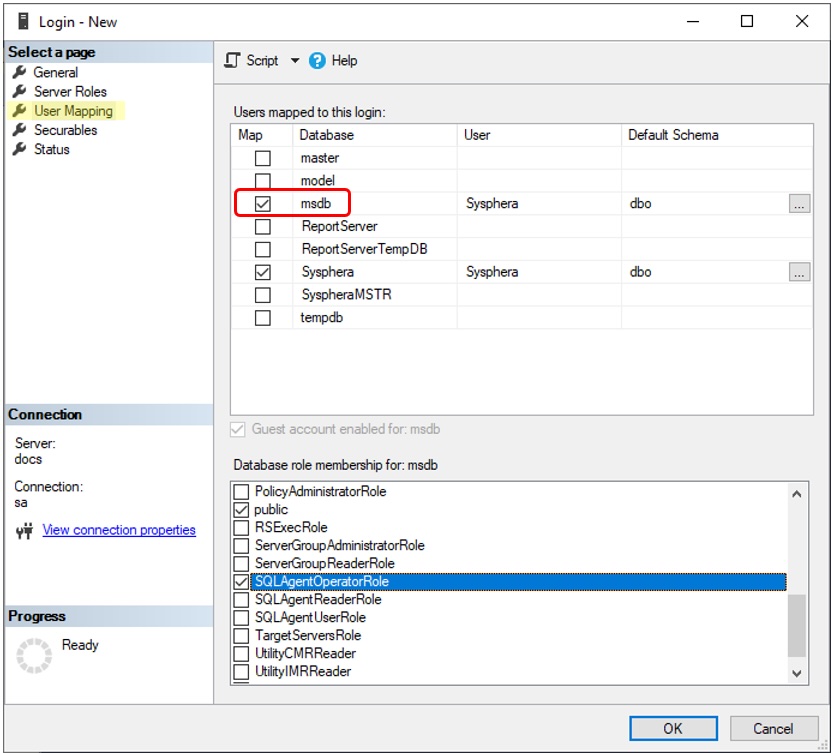
- If you choose to run SQL Server Jobs through T6 Enterprise Workflow tasks, you must assign specific roles to the T6 Enterprise user in SQL Server, as described below.
- On the User Mapping page, under Users Mapped to This Login, check the Map checkbox for the msdb database.
- Under Database Role Membership, select Public and SQLAgentUserRole. In the msdb.dbo.sysjobs table, SELECT access must be granted using the command USE msdb GRANT SELECT ON msdb.dbo.sysjobs TO userName.
- If filtering these Jobs is necessary, T6 Enterprise provides a parameter indicating a Database View responsible for filtering specific Jobs. To configure the View, follow the instructions below.
- Access the T6 Enterprise menu ->Modeling ->Other ->Parameters. Enter the value of the databasejobsview parameter with the name of the View to be used. This View must contain the fields jobid, jobname, and jobdescription.
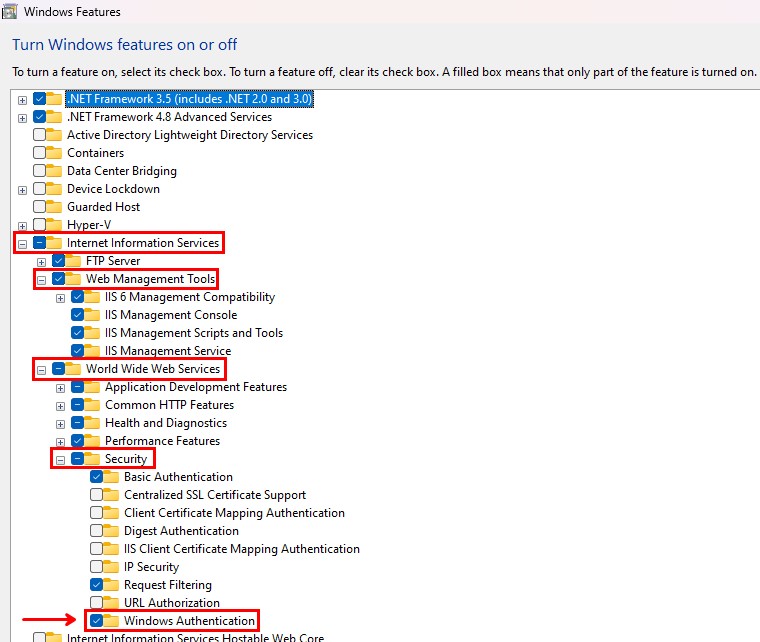
If you select the Windows Authentication option, the credentials used will be the same as those used to log in to Windows. However, we need to enable the
Windows Authenticationcomponent in IIS.
To enable the component, press the Windows key and search for "Turn Windows features on or off".
After opening it, locate Internet Information Services and enable the Windows Authentication component.
¶ 2.3.3 Web Server (IIS)
- Required Role Services: Certain role services are necessary for using T6 Enterprise in Internet Information Services (IIS), as shown in the list below.
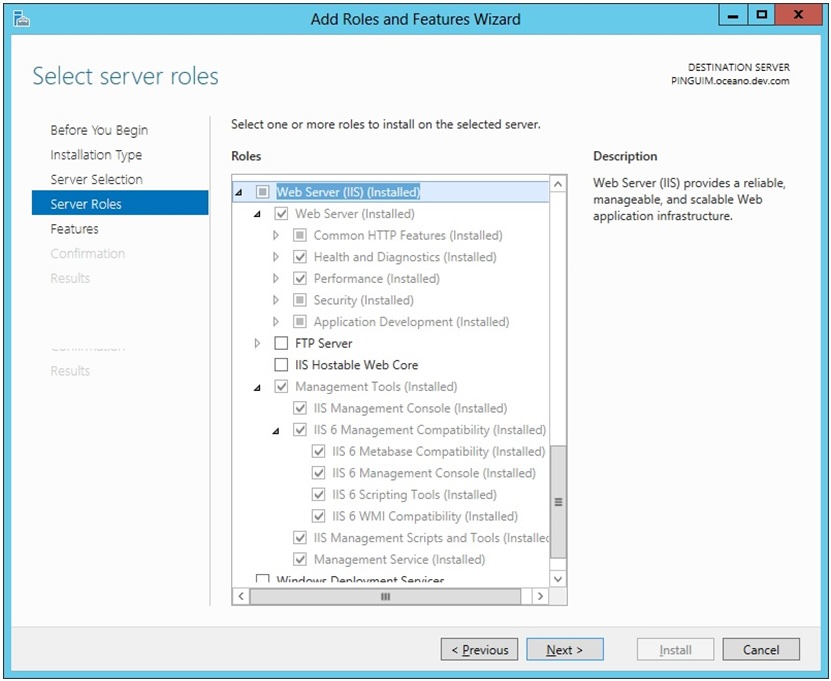
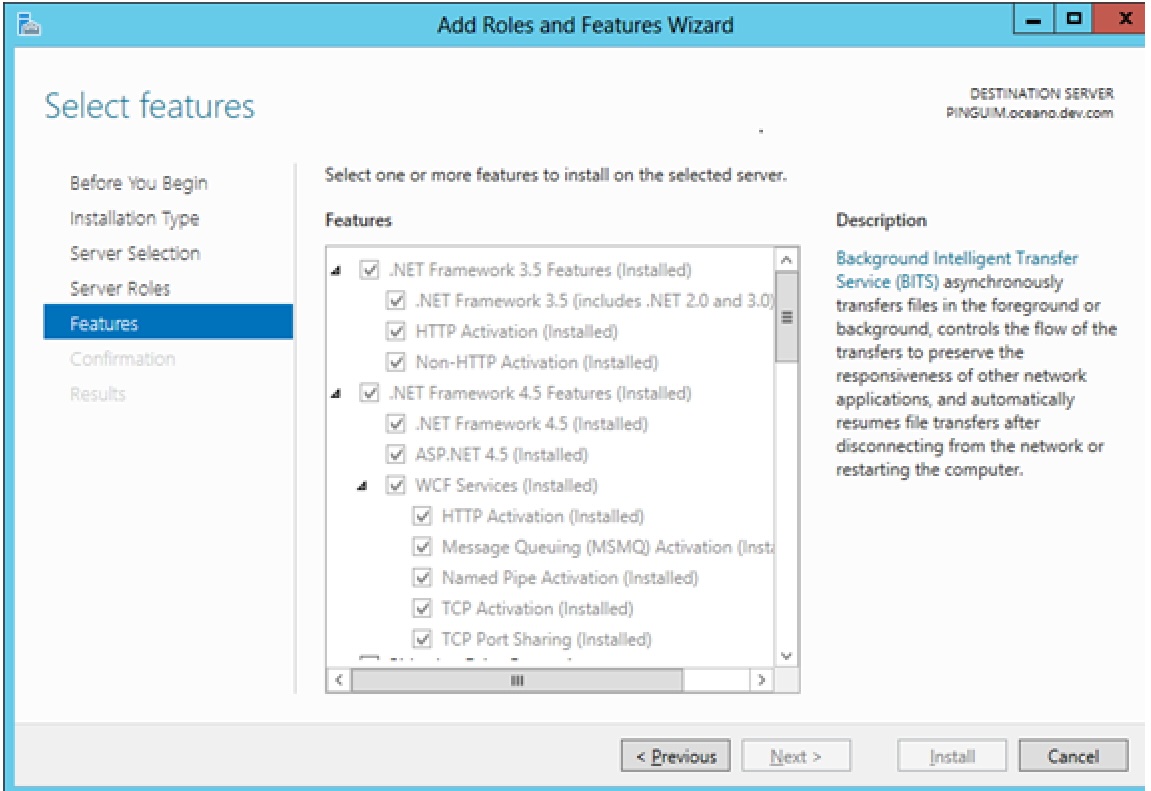
In the next step, ensure that all options for the .NET Framework v3.5 and v4.5 are selected.
¶ 3. T6 Enterprise Installation Guide
¶ 3.1 Overview
This manual aims to provide a step-by-step guide on how to use the installer for the new
T6 Enterprise product.
¶ 3.2 EXECUTABLE
To obtain an executable of T6 Enterprise, simply open the following URL in your browser, and the executable will be downloaded:
Download Installer
¶ 4. T6 Enterprise Installation
- After downloading the installer, run it by double-clicking on the icon:
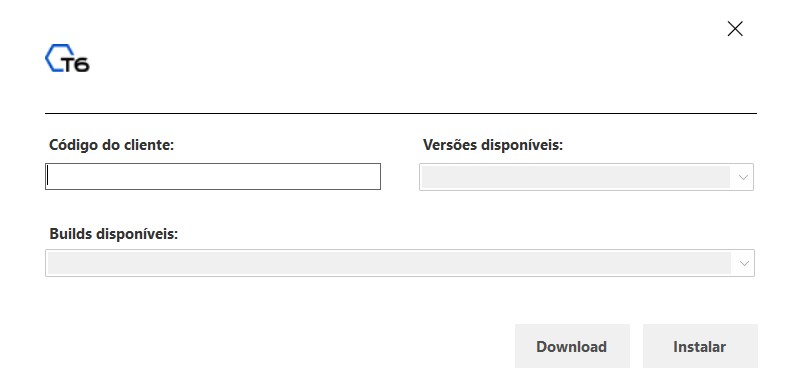
- Customer Code: In this field, you must enter a valid customer code provided by the sales representative.
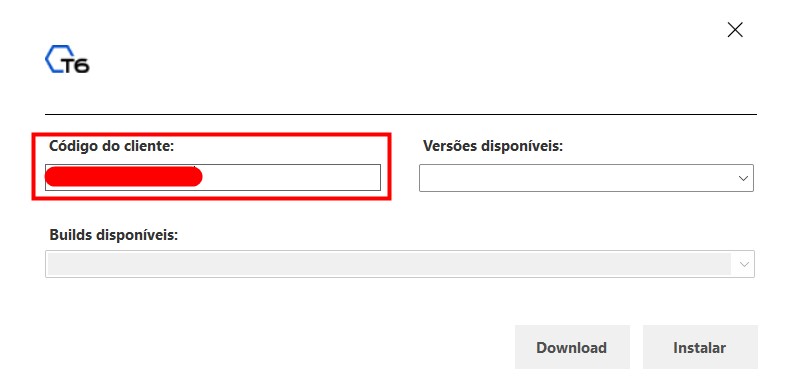
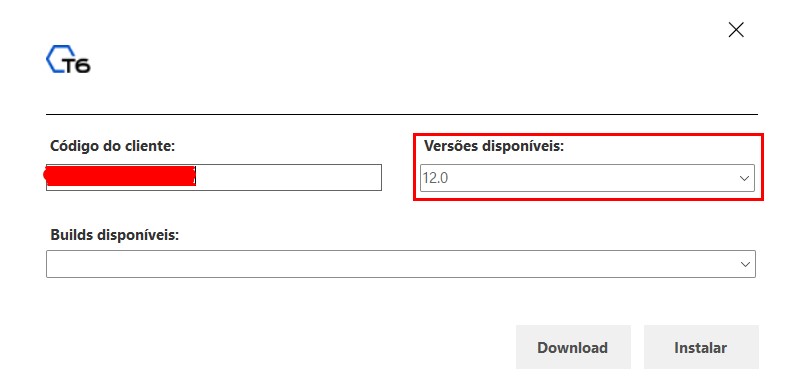
- Available Versions: This field will be activated after entering a valid customer code and will allow you to choose between the product versions. Note that only the versions for which the customer has usage permissions will be displayed.
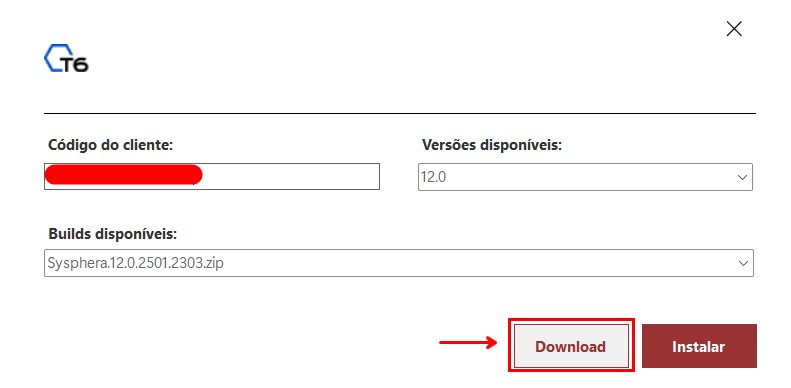
- Available Builds: In the Available Builds field, you can choose the desired version, keeping in mind that the versions displayed will depend on the product version selected in the Available Versions field.

- Download Button: After defining the three fields above, two buttons will be enabled, one of which is the Download button. This button will download the T6 Planning installer file to your device, allowing you to run it whenever you wish.
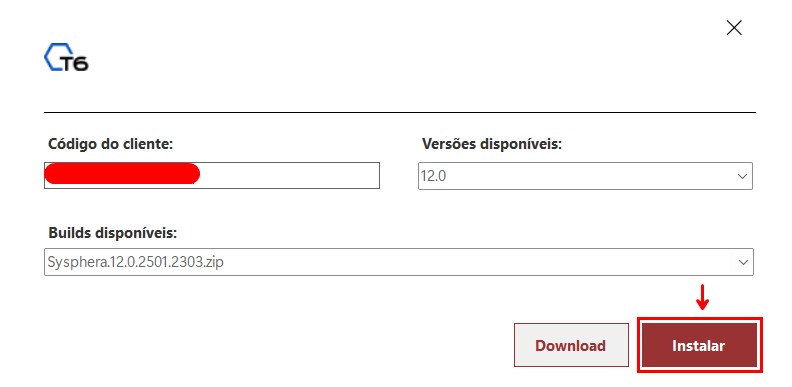
- Install Button: Unlike the Download button, the Install button will not download the file to your device but will proceed directly with the product installation.
Starting from the next topic, we will explain how to install the product, including the necessary prerequisites and how to perform a system update.
¶ 5. T6 Enterprise System Installation Manual
¶ 5.1 Overview
This manual aims to provide instructions on how to install T6 Enterprise, including configurations, requirements, and version updates, from the perspective of the new T6 Enterprise installer.
¶ 6. T6 Enterprise Installation
¶ 6.1 Overview
In this chapter, we will cover the installation of T6 Enterprise, from the moment of extracting the installer to the actual installation process, up to the installation testing phase.
¶ 6.2 Extracting the Installer
Extract the contents of the T6 Enterprise 12.0_xxxxxxx.zip file into a folder of your choice. A folder named T6 Enterprise will be automatically created. Open this folder and locate the Installer.exe file. Double-click on it to run the T6 Enterprise installer.
¶ 6.3 Running a T6 Enterprise Installation
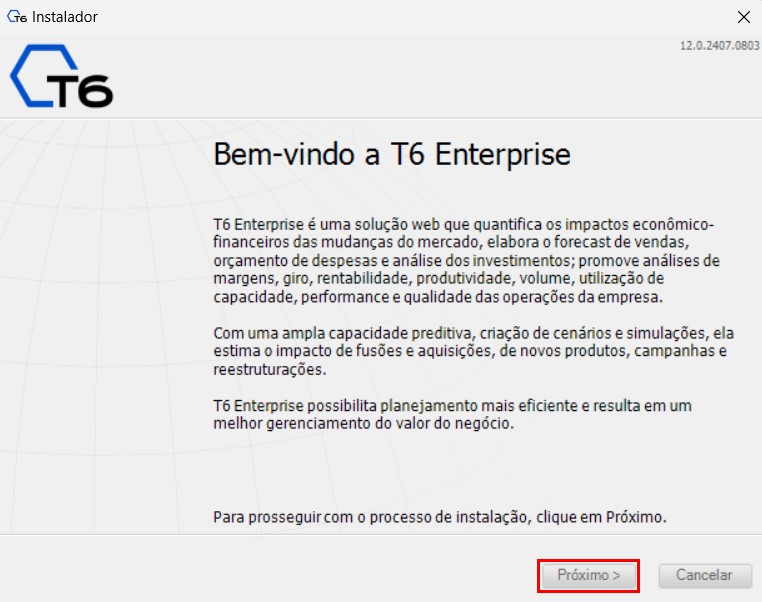
Before starting the T6 Enterprise installation, it is important to note that it can only be performed by a user with Administrator access to the operating system. The T6 Enterprise installer supports three installation languages: Portuguese, English, and Spanish. The installation language will be automatically determined by the installer based on the user's operating system language.
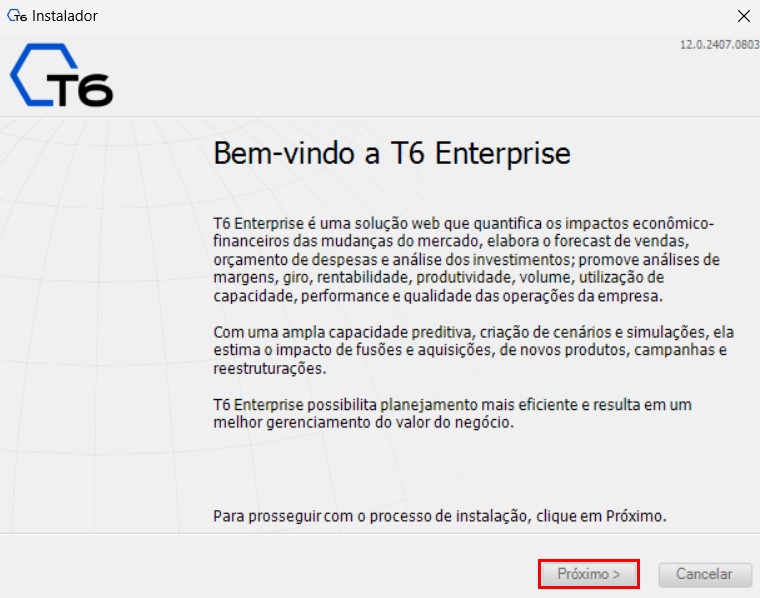
When you run the installer, you will see a brief description of T6 Enterprise on the initial screen. To proceed with the installation, click the Next button.

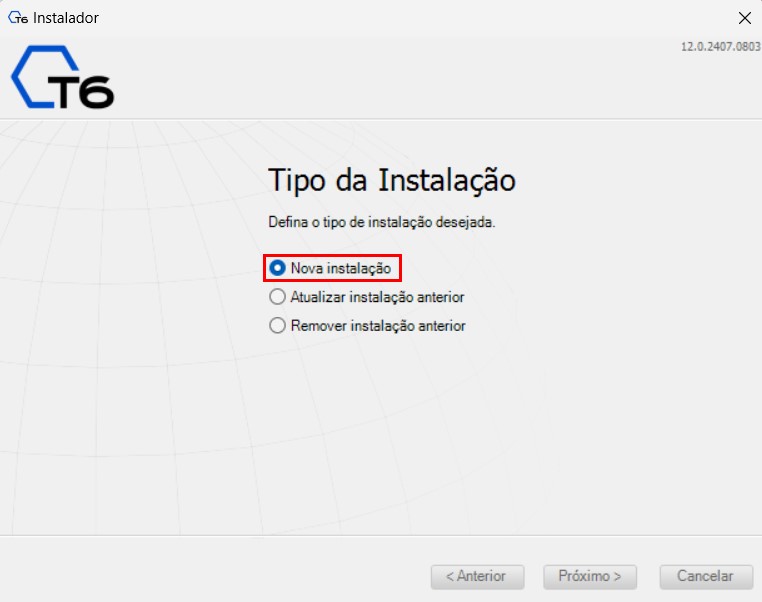
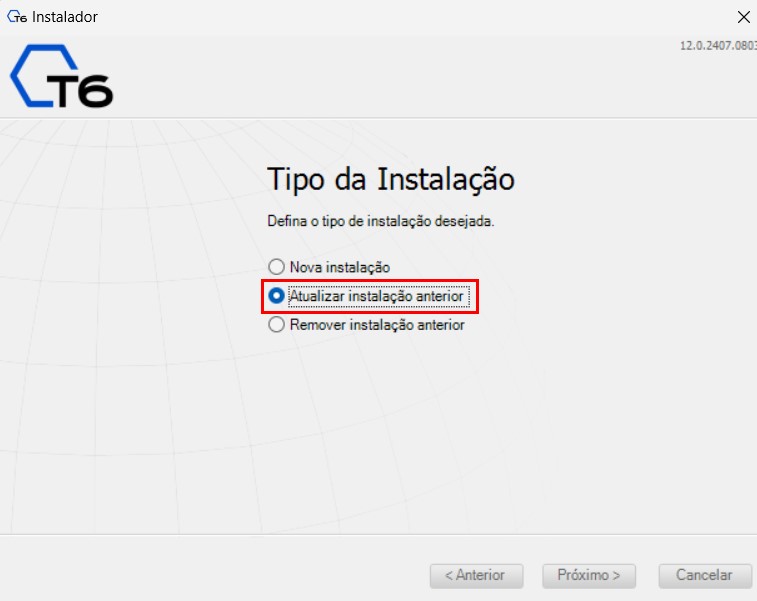
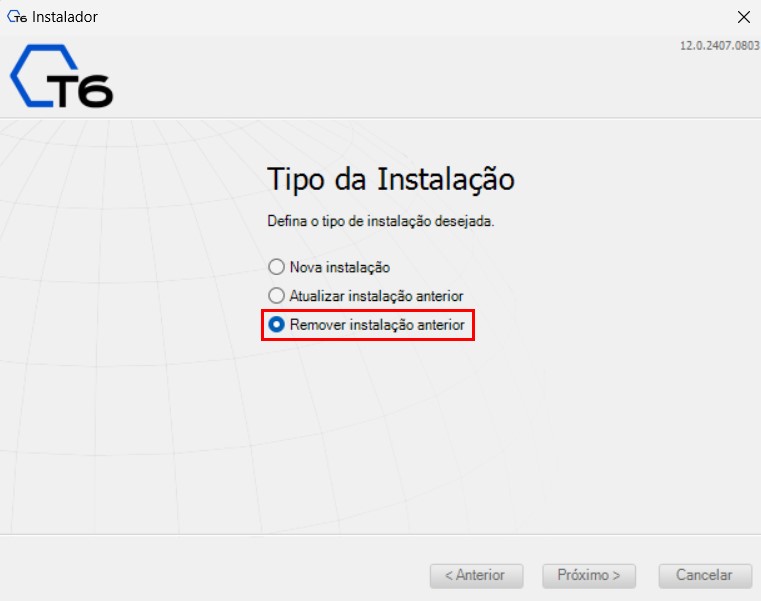
This screen will display the available Installation Types: New Installation, Update Previous Installation, and Remove Previous Installation. Select the desired installation type and proceed to the next screen.
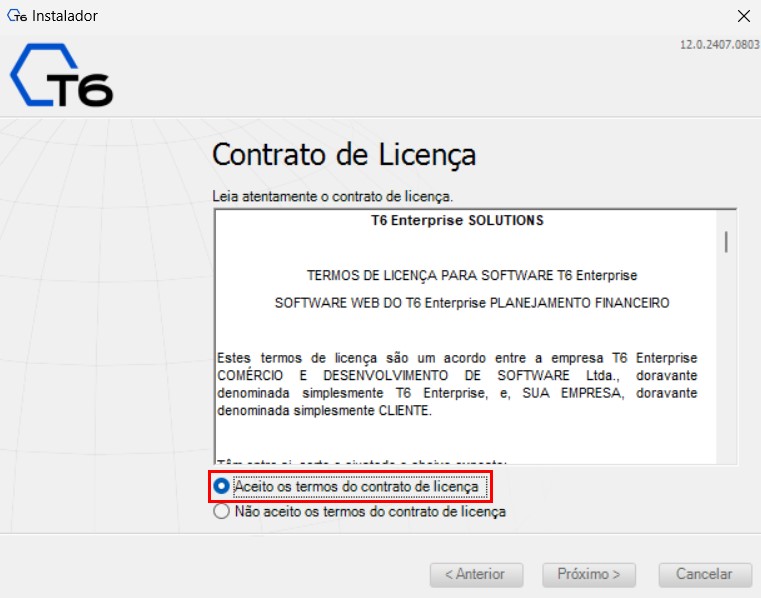
The next screen will display the License Agreement. Read the license terms carefully, and if you disagree, click Cancel and exit the installer. If you agree with the terms, proceed to the next screen.

On the Customer Information screen, you will need to enter a valid License File or the Customer Code to proceed with the installation.
To obtain the license, access the license manager, available within T6 Enterprise, and download the license file for the respective version to be installed. Save it in the T6 Enterprise installation folder.
To obtain the Customer Code, contact the sales department and request the code. This code will automatically retrieve your licenses without the need to search or download them from the support site.
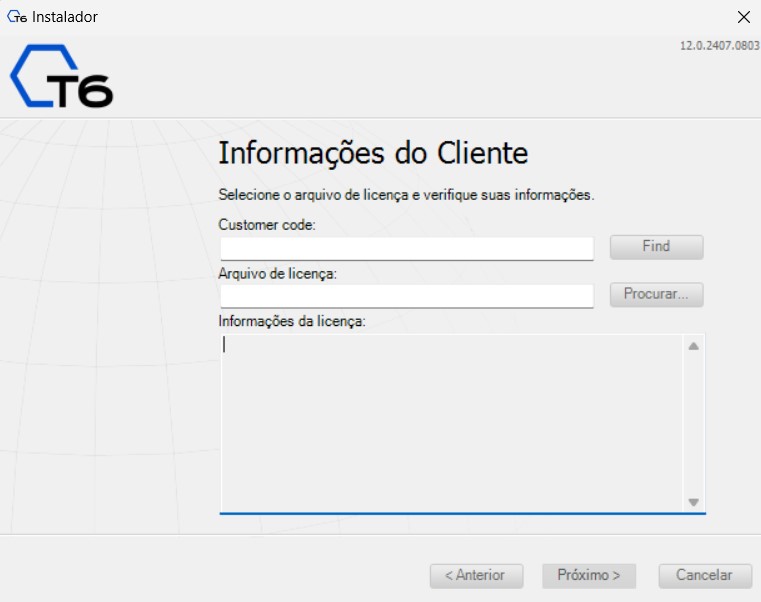
Click the Browse button, locate the license.xml file, or enter the Customer Code. Then proceed to the next screen. If the file or code entered is invalid, the installer will prevent the process from continuing. If you have any questions, contact the sales representative.
Important
If there is a previous T6 Enterprise installation, the License File field will display the license automatically.
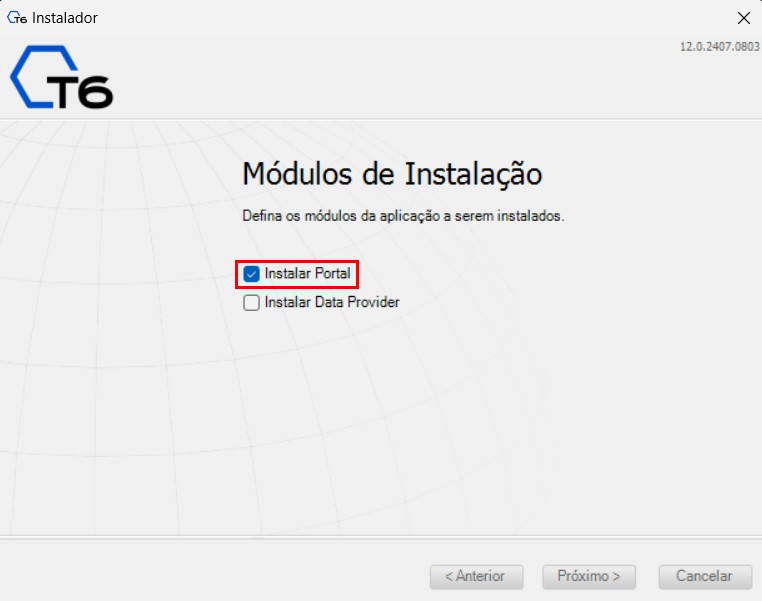
On the Installation Modules screen, you will define whether the module to be installed is only the T6 Enterprise Portal (standalone), with Data Provider, or Integration with Microstrategy. It is important to note that the T6 Enterprise installer allows the selection and installation of multiple modules simultaneously.
For more details, refer to the manual regarding T6 Enterprise integration with Microstrategy.
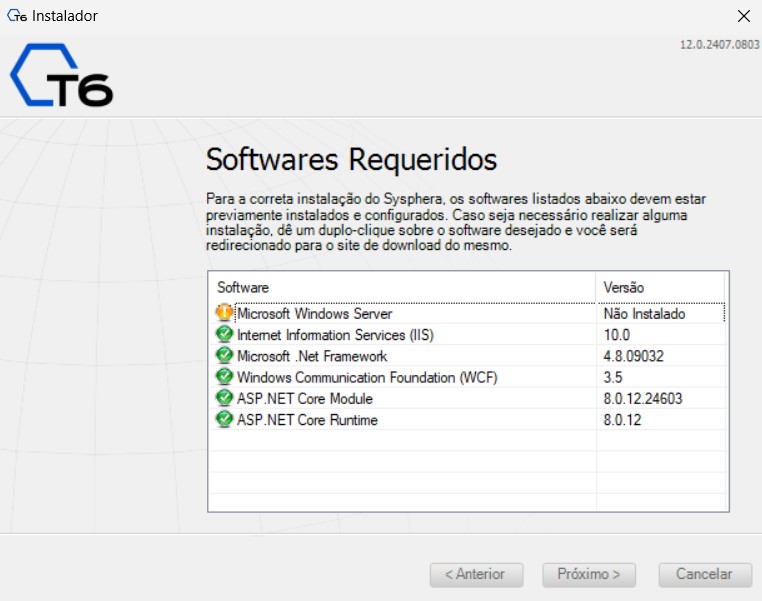
The next screen will display the installation prerequisites based on the modules selected in the previous screen. The installer will inform you if there are any optional requirements to be installed. If any mandatory prerequisites are not installed, the installer will notify you and prevent the installation of T6 Enterprise until all prerequisites are properly installed.
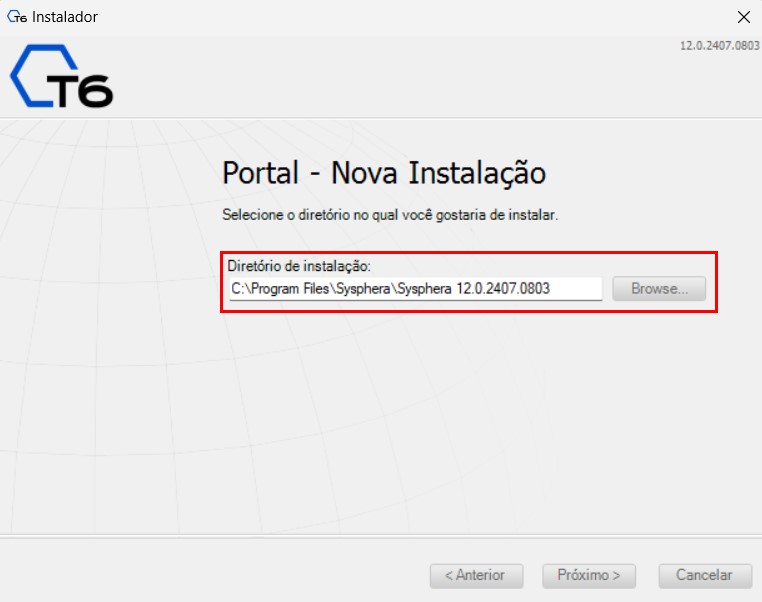
On the next screen, select the directory where the Portal will be installed and proceed to the next screen.
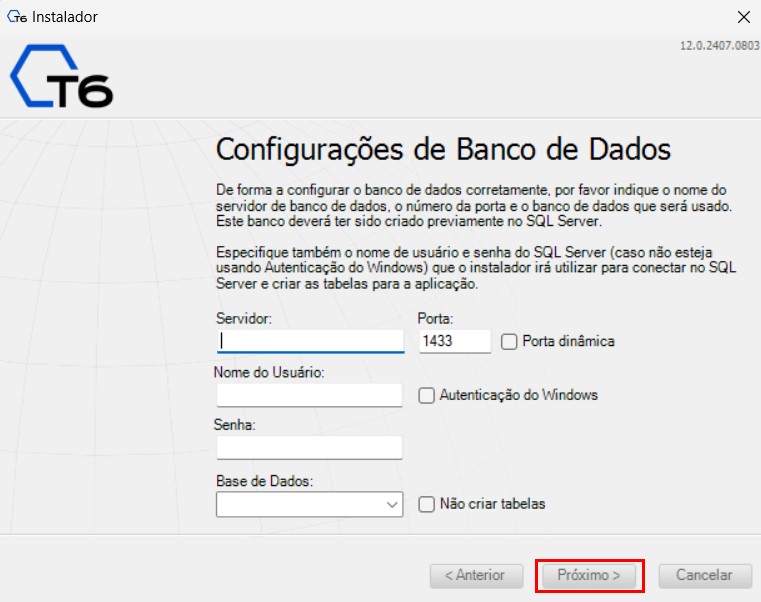
On the next screen, you will need to provide the database configuration settings:
- In the Server field, enter the SQL server name (do not use localhost).
- In the Port field, the default port to be entered should be 1433. If the port has been configured to a different value on your SQL Server, fill in the Port field with this value. If you are unsure of the port, you can use the Dynamic Port option, provided that the SQL Server Browser is running on the SQL Server.
- In the Username field, enter the new T6 Enterprise user, which is the SQL login created for this purpose.
- In the Password field, enter the password you defined for the new T6 Enterprise user, which is the SQL Server login created for this purpose.
- If you have chosen SQL authentication, the Windows Authentication checkbox should remain unchecked. If you choose to check it, the Username and Password fields will be disabled, and you will provide them later on the Service Configuration screen.
- In the Database field, select the T6 Enterprise database created for this installation.
- The Do Not Create Tables checkbox should not be checked when performing a new installation. This option can only be used when updating an installation, where an existing T6 Enterprise database that is already correctly configured with all necessary tables can be used.
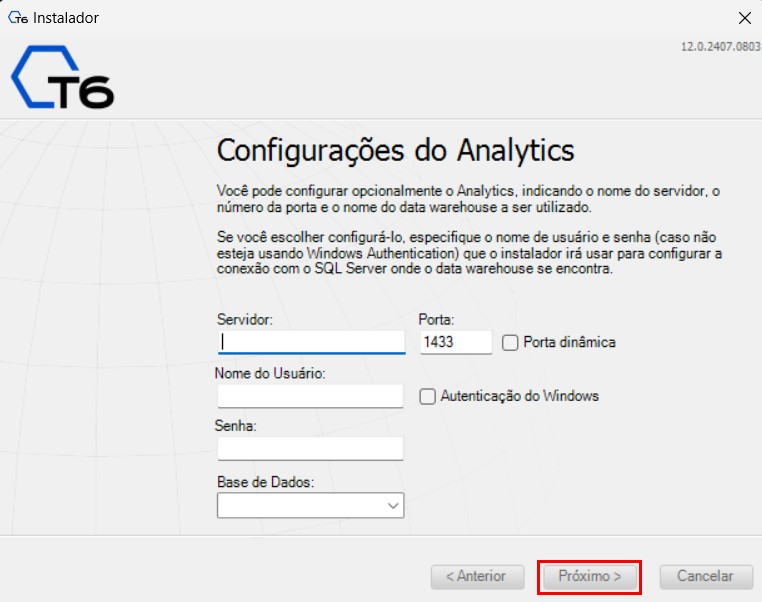
The next screen refers to the T6 Enterprise Analytics configuration, and its completion is optional:
- In the Server field, enter the SQL server name (do not use localhost).
- In the Port field, the default port to be entered should be 1433. If the port has been configured to a different value on your SQL Server, fill in the Port field with this value. If you are unsure of the port, you can use the Dynamic Port option, provided that the SQL Server Browser is running on the SQL Server.
- In the Username field, enter the new T6 Enterprise user, which is the SQL login created for this purpose.
- In the Password field, enter the password you defined for the new T6 Enterprise user, which is the SQL Server login created for this purpose.
- If you have chosen SQL authentication, the Windows Authentication checkbox should remain unchecked. If you choose to check it, the Username and Password fields will be disabled, and you will provide them later on the Service Configuration screen.
- In the Database field, select the T6 Enterprise database created for this installation.
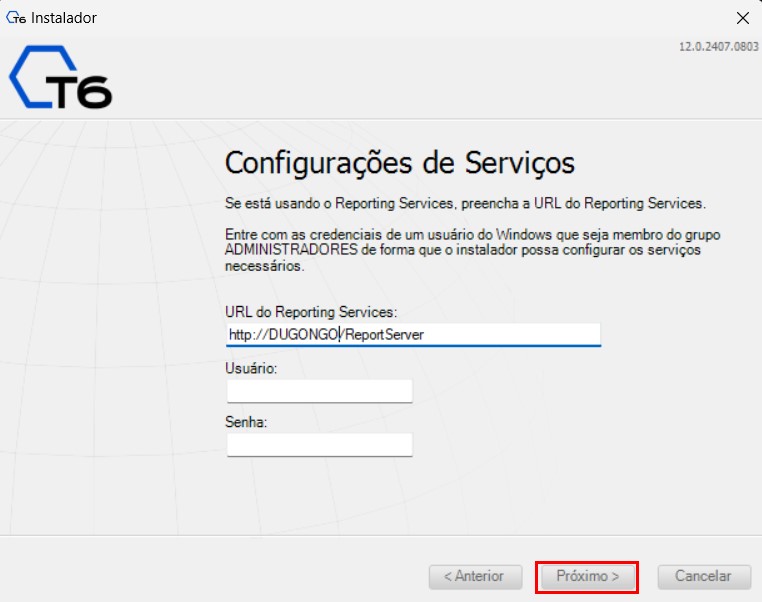
On the next screen, you will need to provide the Service Configuration details:
- In the Reporting Services URL field, enter the Report Server URL.
- In the Username field, enter the SQL or Windows user login, depending on the authentication method selected in the previous screens. This user will be responsible for running the T6 Enterprise Application Pool.
- In the Password field, enter the password for the specified user.
On the Application Portal screen, enter the name of the UX portal and the Portal name to be created in IIS, which will be used in the URL to run the T6 Enterprise application. If the Internet Information Services (IIS) has more than one site configured, the T6 Enterprise installer will show the Select IIS Site option, allowing you to choose the site where the portal will be installed.
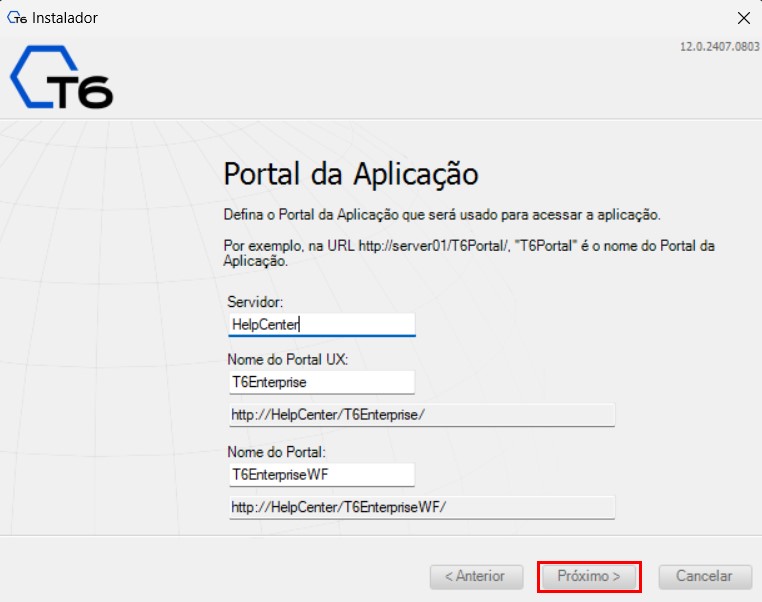
Important
If a portal with the same name already exists, you will not be able to proceed with the installation. In this case, use another name for the UX Portal creation.
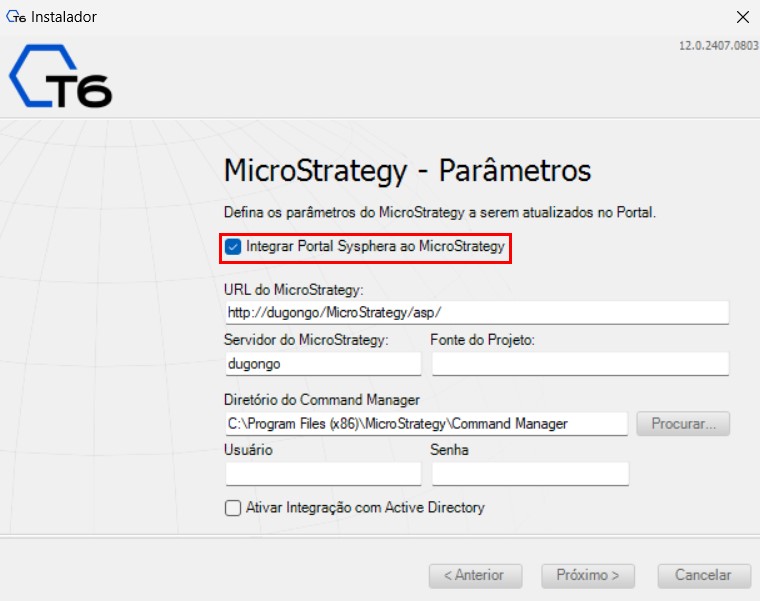
The next screen deals with the MicroStrategy parameters.
If the installation is integrated with MicroStrategy, check the Integrate T6 Enterprise Portal with MicroStrategy checkbox and enter the MicroStrategy parameters in the respective fields. For more details, refer to the manual regarding T6 Enterprise integration with MicroStrategy.
If the installation is not integrated with MicroStrategy, simply leave the checkbox unchecked and proceed to the next screen.
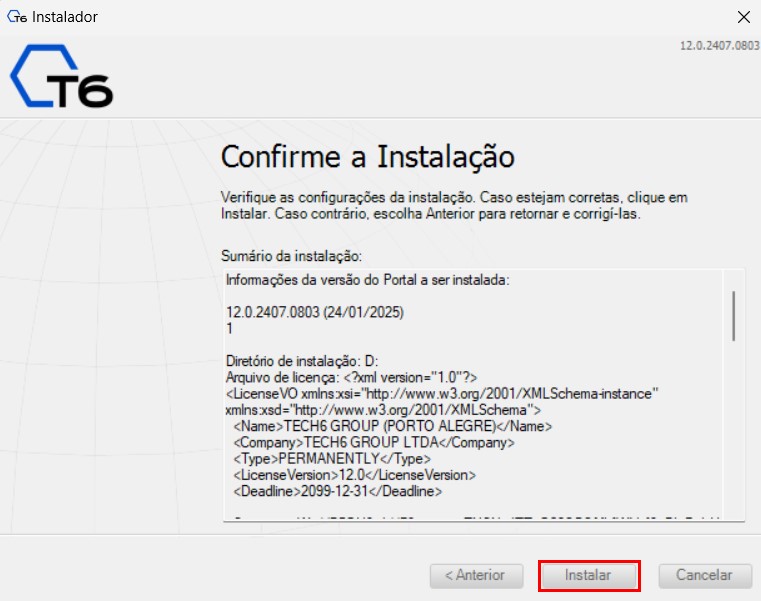
On the Confirm Installation screen, review the installation summary. If everything is correct, click Install. If you need to modify any parameters, click Back.
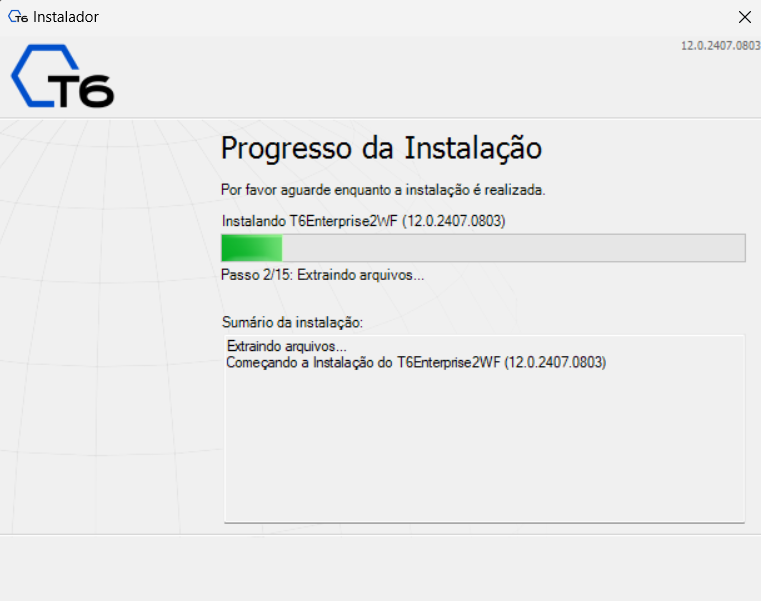
On the Installation Progress screen, you will be able to monitor the entire installation process.
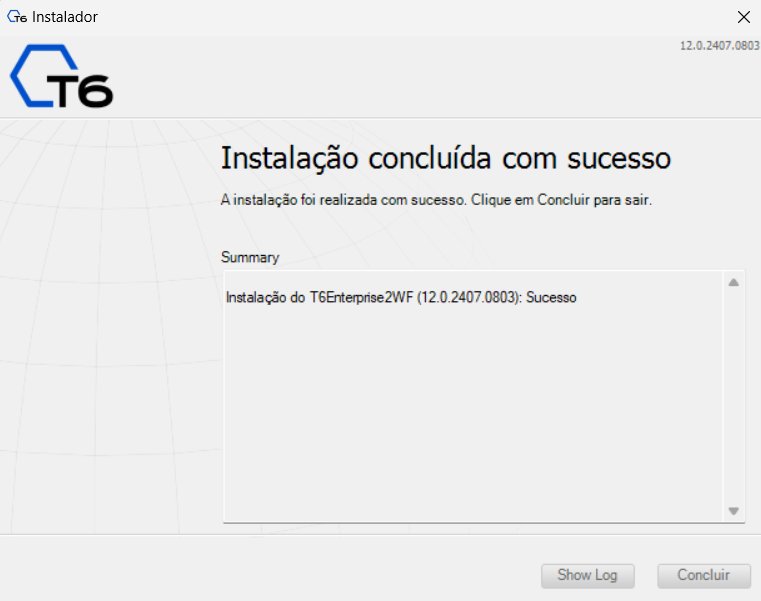
On the final screen, the summary will display the installation details. Click Finish to close the installer.
Note
If you encounter any errors, refer to the Troubleshooting chapter in this manual.
¶ 6.4 Testing the Installation
When accessing the Windows Start Menu, you will find the shortcut to the newly installed T6 Enterprise application. Clicking on the shortcut will open the T6 Enterprise access portal. If the access portal is not displayed, refer to the Troubleshooting chapter in this manual.
Note
The browser used must support JavaScript.
¶ 6.4.1 Performing the First Access
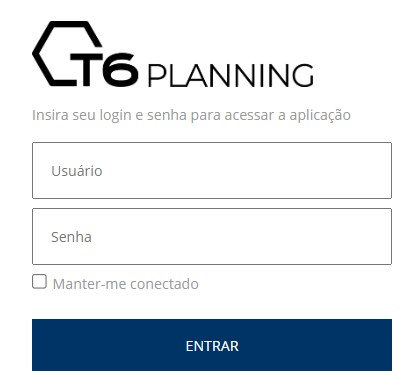
To perform your first access, open the T6 Enterprise access portal, enter the username (admin) and password (password), and click Login.
¶ 6.4.2 Creating the First Application
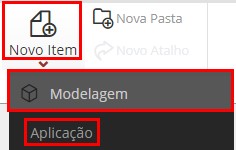
When accessing T6 Enterprise for the first time, you should click on the side menu and go to Explorer > Navigator. After that, in the top menu of the screen, there will be an option called "New Item". Clicking on it will display a dropdown of options. You should select the Modeling option and then Application.
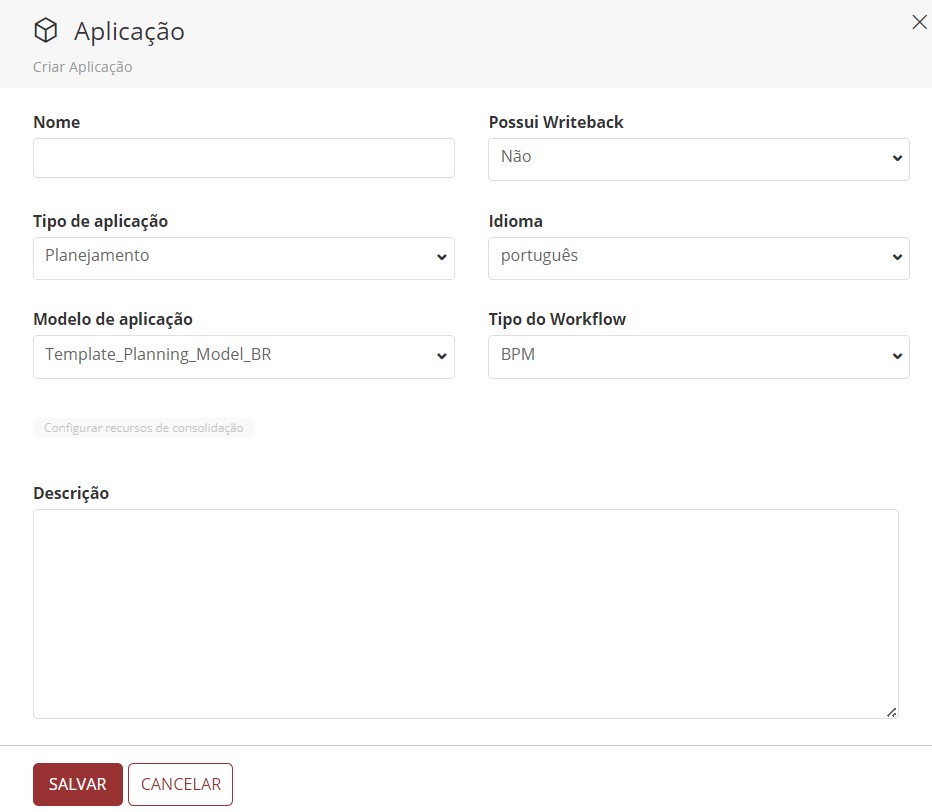
Finally, create your application by entering the desired name and clicking Save.
¶ 7. Update of T6 Enterprise
¶ 7.1 Overview
In this chapter, we will discuss updating an already installed version of T6 Enterprise.
¶ 7.2 Portal Backup
Whenever an update is performed, the T6 Enterprise installer automatically creates a backup of the Portal for security purposes. A folder is created by the installer in the same directory where T6 Enterprise was initially installed.
The following example shows the naming convention used to uniquely identify a backup directory created during the update process of a T6 Enterprise installation:

The red part identifies the name of the original Portal that was updated.
The blue part shows the version number of the original T6 Enterprise Portal that was installed.
The orange part is the unique identifier number of the original installation for this version.
If there is a need to revert the T6 Enterprise Portal to its previous state after the update process, simply rename the backup directory with the name used before the update and then restart the Application Pool in IIS.
Note: Before starting the portal update, it is always ideal to back up the database first. If the update encounters issues, you will not lose your data.
To update to version 12.0, check if you are using the latest build of version 11.11, as this will prevent possible database errors.
¶ 7.3 Unpacking the Installer
Unzip the contents of the T6Enterprise12.0_xxxx.xxxx.zip file to a folder of your choice. A folder called T6 Enterprise will be automatically created. Open this folder and locate the Installer.exe file. Double-click it to begin the T6 Enterprise update.
¶ 7.4 Running the T6 Enterprise Update
Before starting the T6 Enterprise update, it is important to note that it can only be performed by a user with Administrator access to the operating system.
The T6 Enterprise installer has three installation languages: Portuguese, English, and Spanish. The language used by the installer will be automatically defined based on the user's operating system language.
When running the installer, you will see a brief description of T6 Enterprise on the initial screen. To proceed with the update, click the Next button.
The next screen will display the available Installation Types. Select the option Update Previous Installation and proceed to the next screen.
The next screen will display the License Agreement. Read the terms carefully and proceed to the next screen.
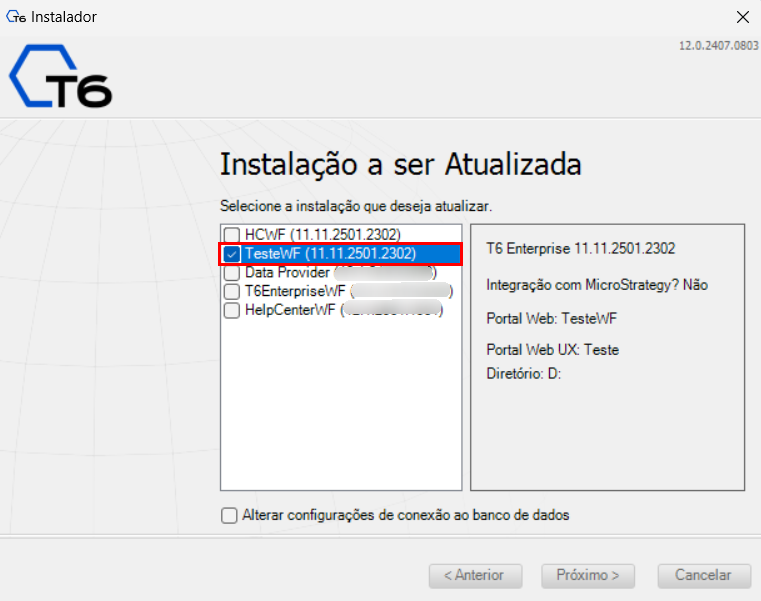
On the Installation screen, a list of T6 Enterprise products installed on the computer will be displayed, along with a summary of each installation. Select one or more installations to be updated.
If you only want to change the database connection settings for an already performed installation, check the Change Database Connection Settings checkbox.
Note
If you wish to change the database connection settings and also update the T6 Enterprise portal, in this case, you need to run the installer twice: once to change the database configuration as described above and again to actually update the portal.
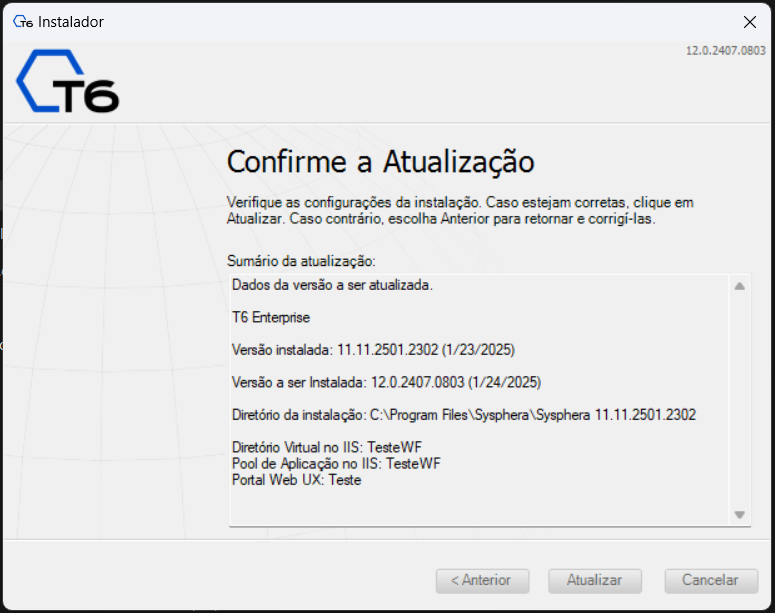
On the Confirm Update screen, review the update summary and click Update.
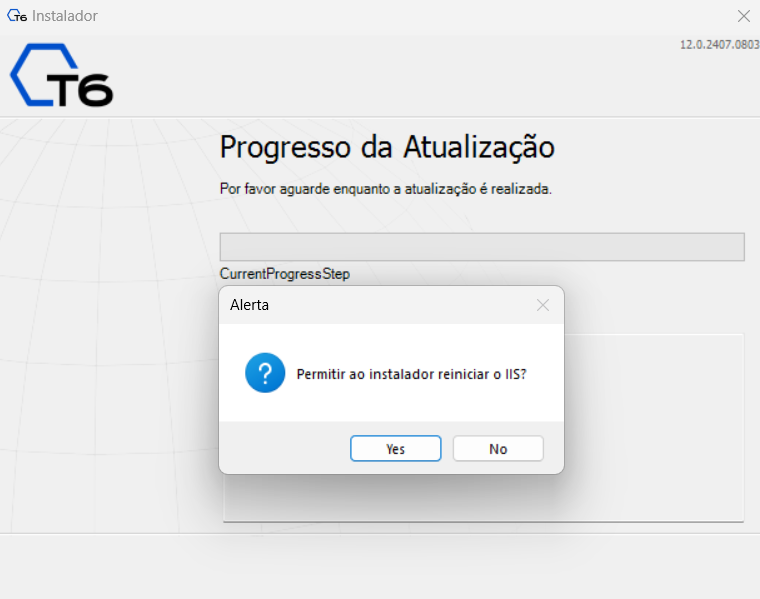
On the next screen, the installer will issue an alert requesting permission to restart IIS. Click Yes to continue with the update.
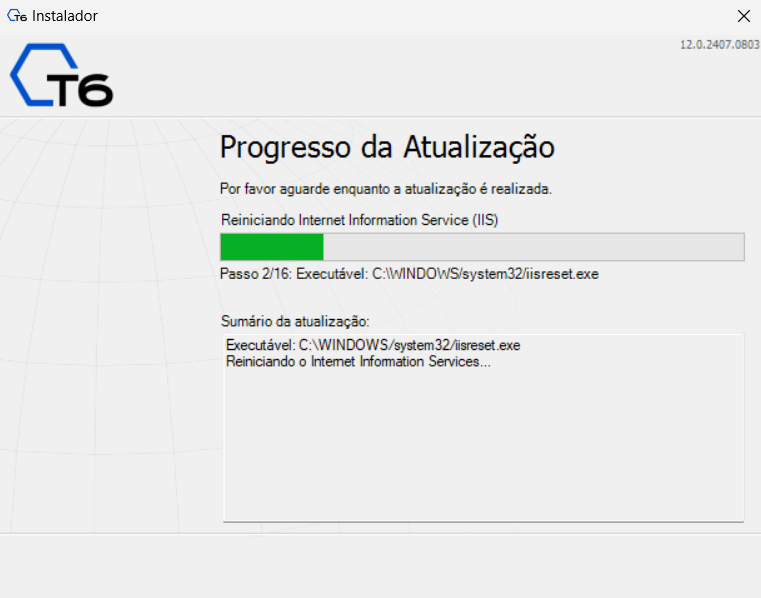
On the Update Progress screen, you can track the progress of the update.
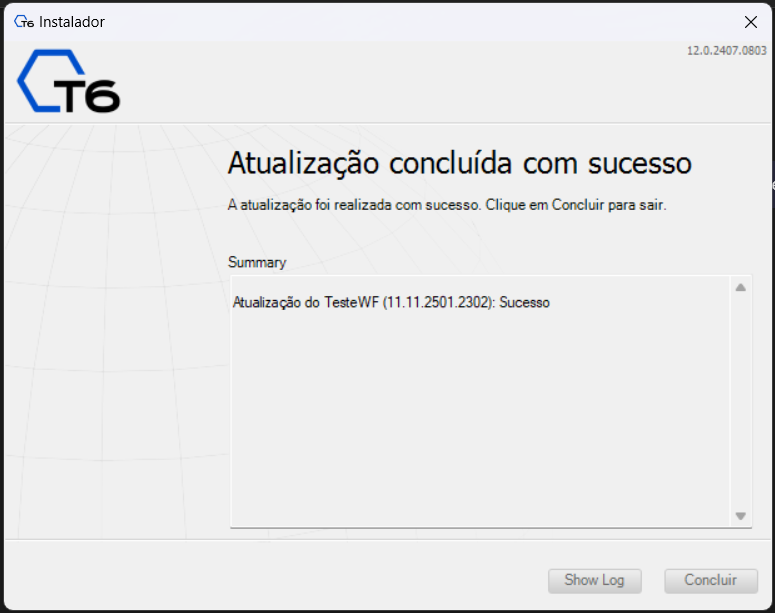
On the final screen, the summary will display the information related to the update. Click Finish to close the installer.
If you encounter an error, refer to the Troubleshooting chapter in this manual.
¶ 7.5 Running a Manual Update
A manual update is recommended if it is necessary to restore a database with a lower build version than the one installed in the portal.
This often happens in environments with both a Production server and a Staging server. In such environments, before the update is performed on the Production server, T6 Enterprise tests are conducted on the Staging server's database.
In this scenario, it is common to back up the Production server's database and restore it on the Staging server, so the staging portal will have a higher build than the database.
After completing this restoration procedure, the portal may stop working, as there are often structural changes in the database between builds. These changes must be applied to the restored database so that the T6 Enterprise solution functions correctly.
To restore the database with a lower build version and then perform the manual update of the portal, follow these steps:
- Restore the desired database.
- Access the following URL: http://<T6_Enterprise_server>/WebForm/Update.aspx to perform the update automatically. Be aware that this update can only be performed when both databases are on the same T6 Enterprise version.
¶ 8. T6 Enterprise License Update
¶ 8.1 Overview
This chapter shows how to update the T6 Enterprise License via the system interface using the Customer Code.
¶ 8.2 Updating the Customer Code Within the System
To obtain the Customer code, simply request it from our sales department, which will provide the specific Customer Code for each client. Once you have the Code, access your environment and go to Side Menu > Settings > Parameters.
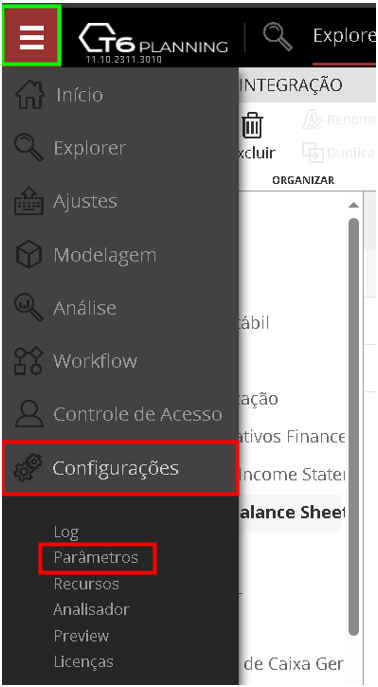
Next, go to the integration option and look for the parameter called Customer Code, and finally, fill in the field with your code.
If you performed the product installation with the Customer Code, this configuration will not be necessary, as the system will automatically fill in this parameter when using the code during installation.
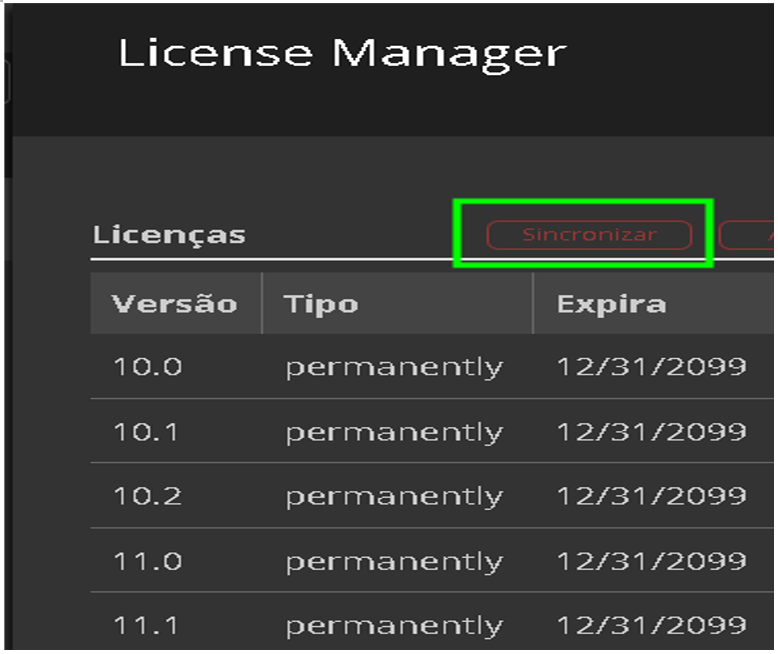
¶ 8.3 License Synchronization
After filling in the parameter with the Customer Code, go back to Side Menu > Settings > Licenses and then click on the "Synchronize" option in the top-right corner. After that, the system will bring the available license for the version you are accessing, in case yours is about to expire and has been renewed.
¶ 9. Uninstalling T6 Enterprise
¶ 9.1 Overview
This chapter shows how to uninstall T6 Enterprise, which is done through the installer.
¶ 9.2 Extracting the Installer
Extract the contents of the T6Enterprise12.0_xxxxxxx.zip file into a folder of your choice, where a folder called T6 Enterprise will be automatically created. Open this folder and locate the Installer.exe file. Double-click it to run the installer.
¶ 9.3 Uninstalling T6 Enterprise
Before running the T6 Enterprise installer, it is important to note that uninstallation can only be performed by a user with Administrator access to the operating system. The T6 Enterprise installer has three display languages: Portuguese, English, and Spanish. The language used by the installer will be set automatically, based on the user's operating system language.
When you run the installer, you will see a brief description of T6 Enterprise on the initial screen. To proceed with the uninstallation, click the Next button.
The next screen will display the available installation types. Select the option Remove Previous Installation and proceed to the next screen.
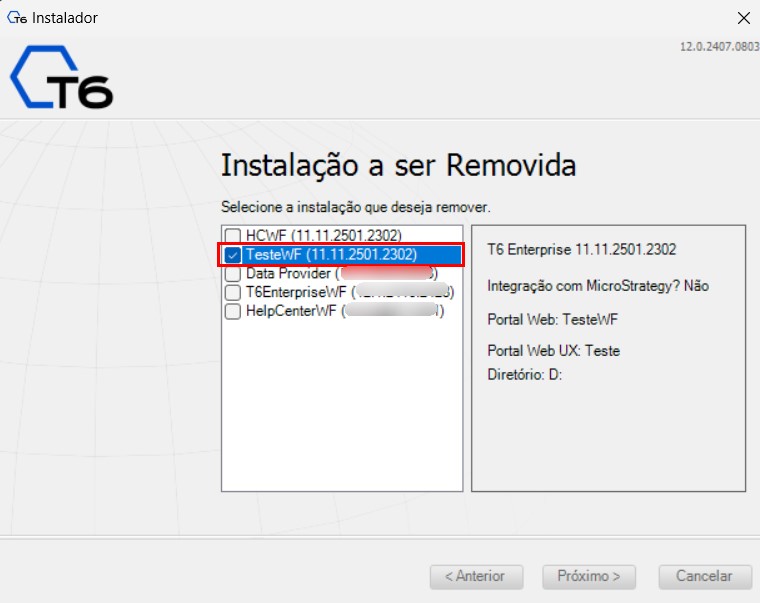
Select the installation you want to remove and click Next.
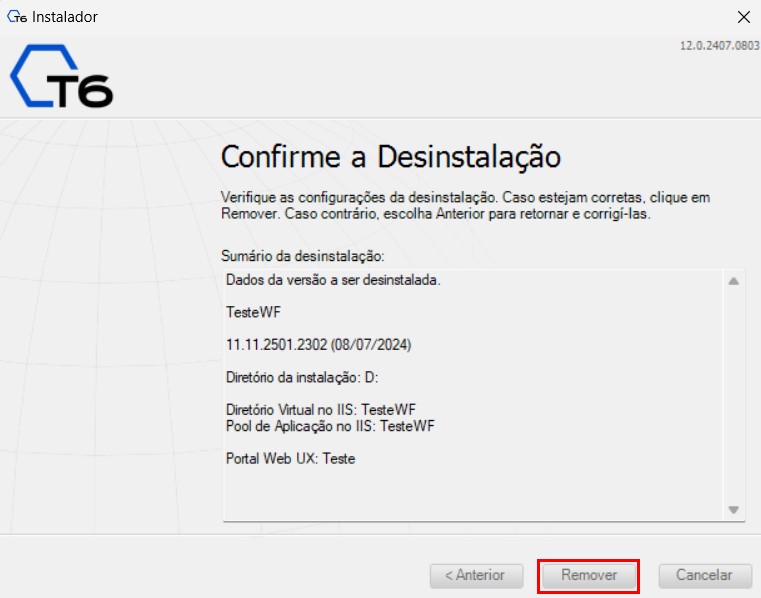
On the Confirm Uninstallation screen, check the items to be uninstalled and click Remove.
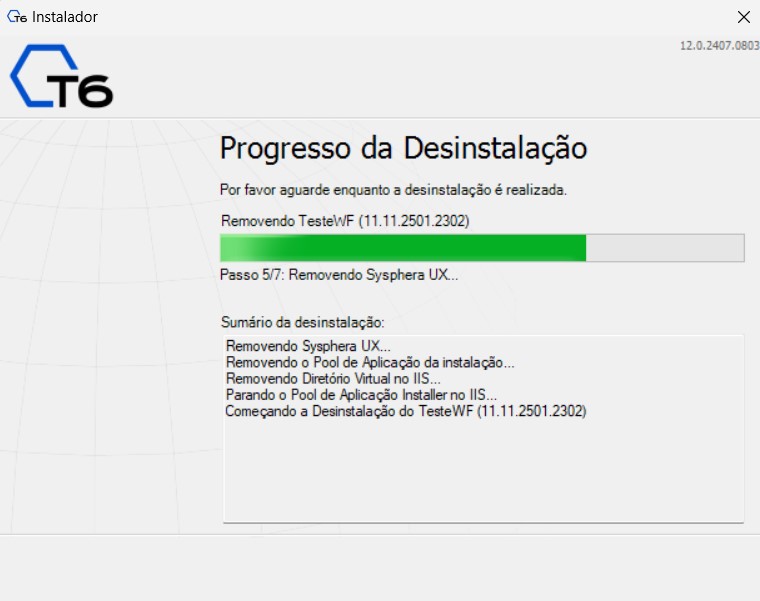
On the Uninstallation Progress screen, you will see the progress of the uninstallation.
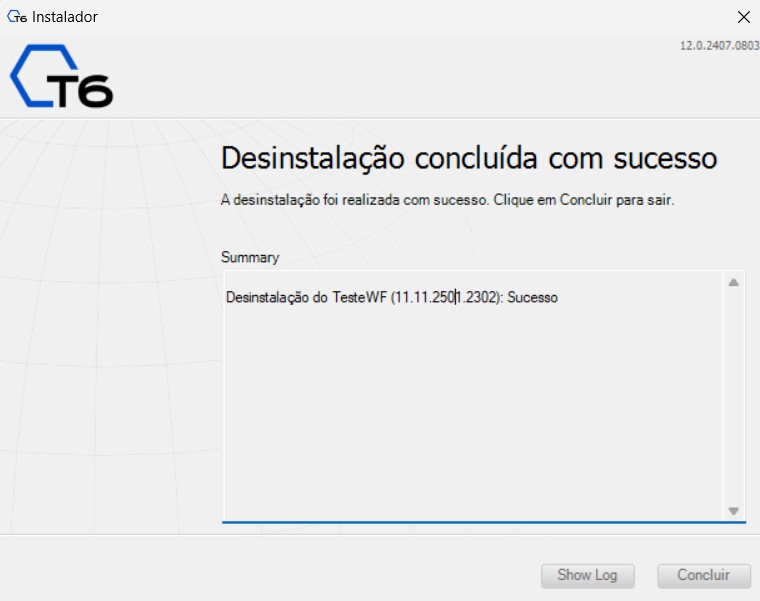
On the final screen, the summary will indicate that the uninstallation was successful. Click Finish to close the installer.
¶ 10 Troubleshooting
¶ 10.1 Overview
This chapter is focused on troubleshooting potential issues during the installation or update of T6 Enterprise.
¶ 10.2 Installation
In this section, we will outline some errors that may occasionally occur during the installation of T6 Enterprise, along with their respective solutions.
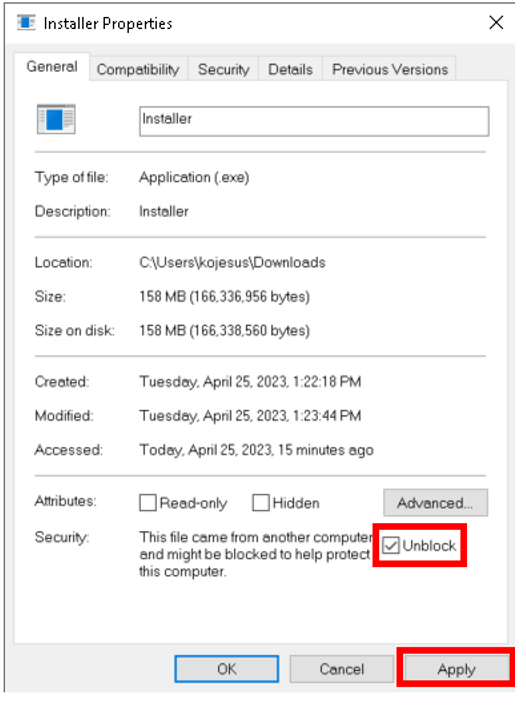
¶ 10.2.1 Error Executing the T6 Enterprise Installer
When trying to execute the T6 installer, Windows Defender may block the execution of the .exe file.
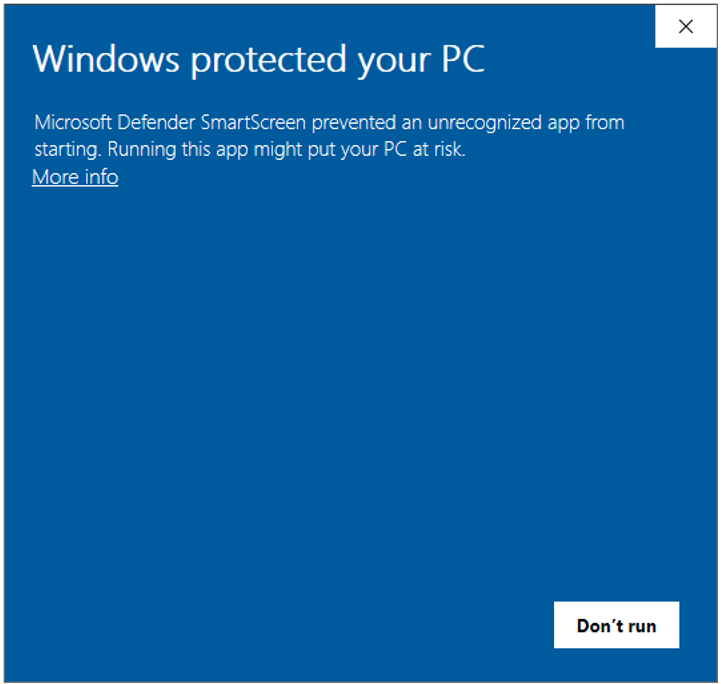
To work around the issue, simply navigate to the file location, right-click, and access the file properties.
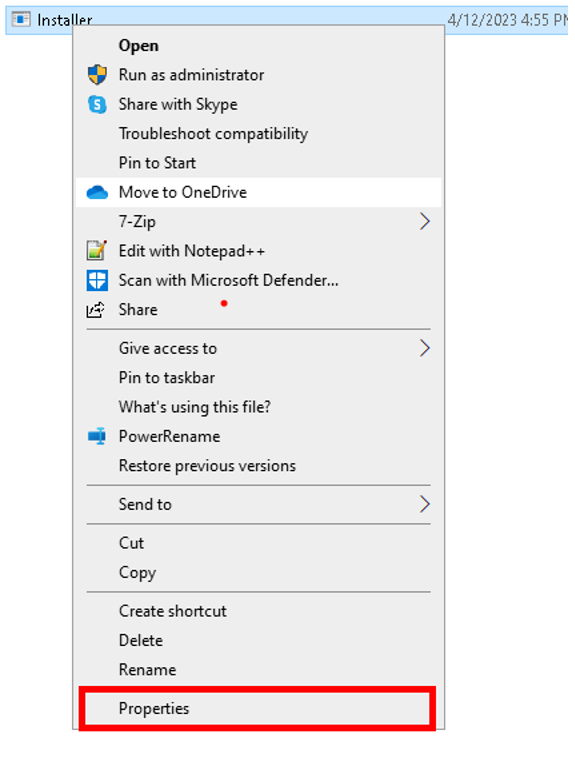
In the properties screen, go to the bottom and select the 'Unblock' option, apply the change, and run the installer again.
¶ 10.2.2 Create Default Permission Denied in Database 'databasename'
This error occurs when the user created within SQL Server for the installation of T6 Enterprise does not have permission to create the application tables in T6 Enterprise. To solve this problem, follow the steps below:
- Open Microsoft SQL Server Management Studio and find the user under Object Explorer -> Security -> Logins -> .
- Right-click the user name and select Properties.
- In the Login Properties window, select the User Mapping page, and in the information for the database created for T6 Enterprise installation, make sure the user is marked as db_owner in the Database Role Memberships list.
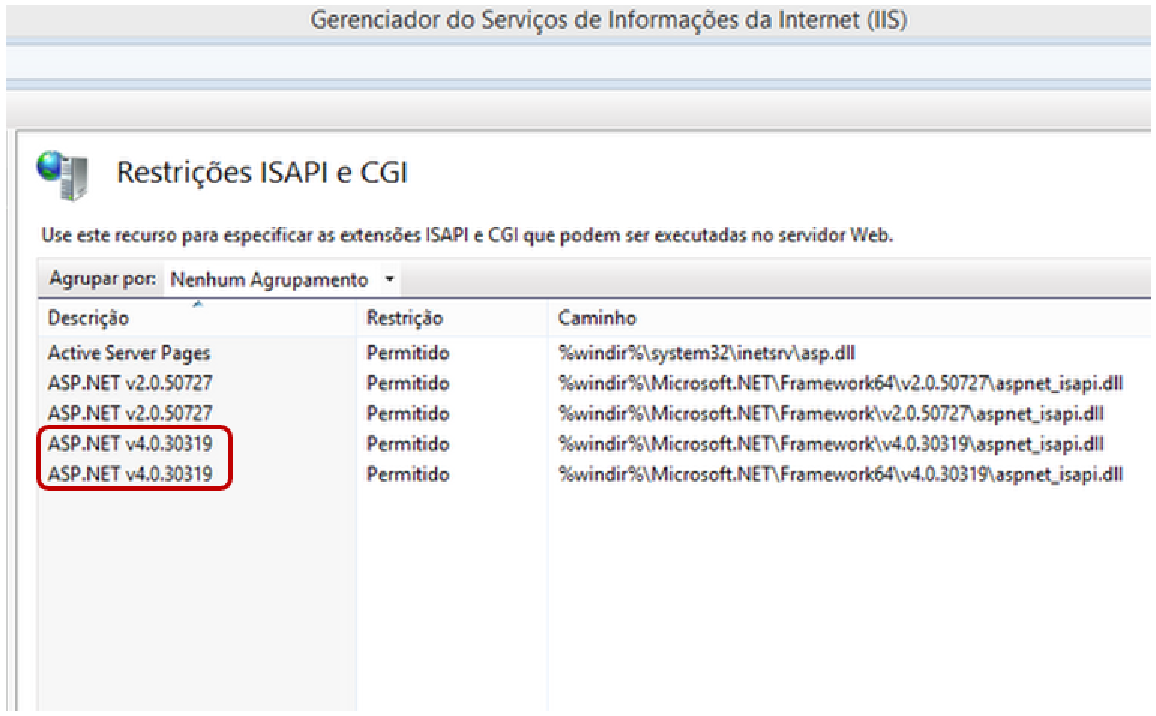
¶ 10.2.3 Portal Doesn't Load or Doesn't Appear
When trying to open the portal, a message is displayed as shown below:

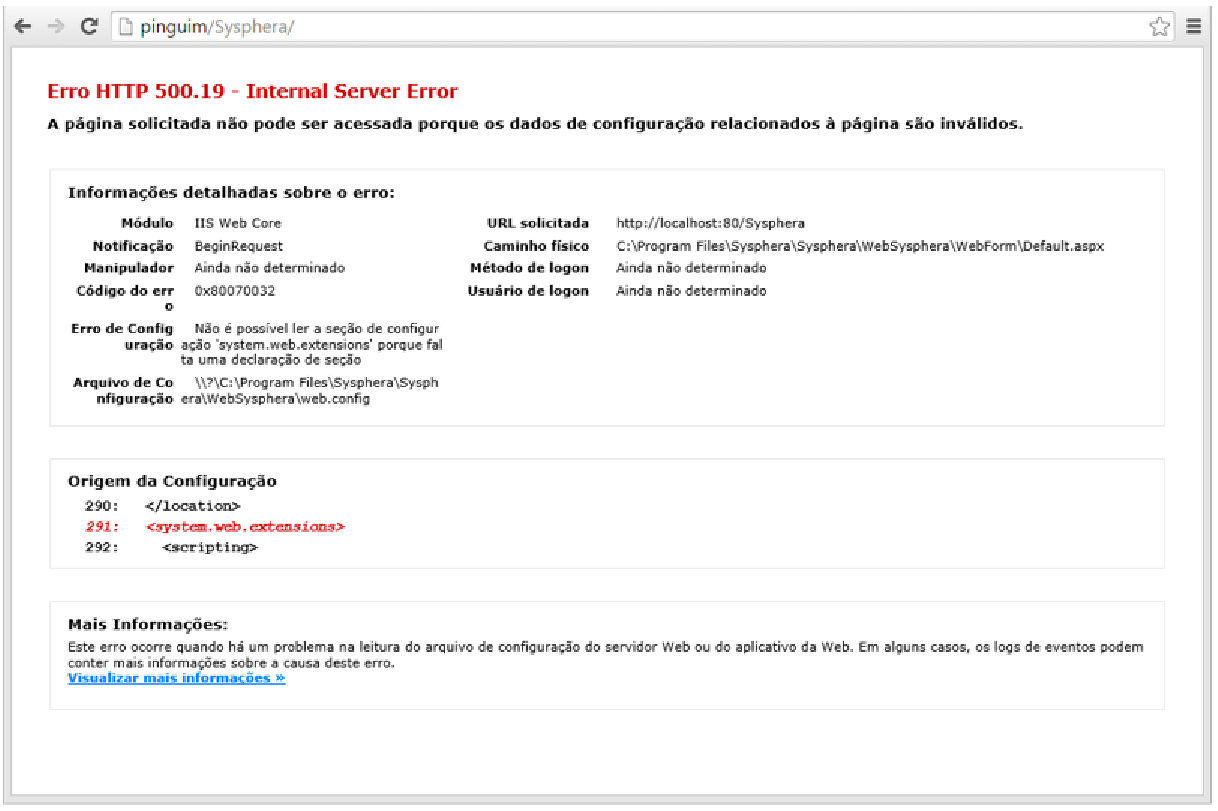
This error occurs when the ASP.NET access is not configured in IIS. To solve the issue, follow the steps below:
- Access the IIS Manager.
- Click on ISAPI and CGI Restrictions.
- Select the ASP.NET v4 options and set them to Allowed in the Restriction column.
¶ 10.2.4 Report Viewer Configuration Error
The HTTP Handler for the Web Control of the Report Viewer was not registered in the application's web.config file.
- Message: The HTTP Handler for the Web Control of the Report Viewer was not registered in the application's web.config file. Add to the system.web/httpHandlers section of the web.config file, or add <add name="ReportViewerWebControlHandler" preCondition="integratedMode" verb="*" path="Reserved.ReportViewerWebControl.axd"type="Microsoft.Reporting.WebForms.HttpHandler, Microsoft.ReportViewer.WebForms, Version=12.0.0.0, Culture=neutral, PublicKeyToken=89845dcd8080cc91" /> to the system.webServer/handlers section for IIS 7 or later.
To resolve this issue, change the T6 Enterprise pool to classic.
¶ 10.3 Update
During the update process, the installer may display error messages related to ongoing updates or adjustments that need to be made in the portal, which do not interfere with the update.
Below, we will show some examples of error messages, along with the indicated action to fix the problem.
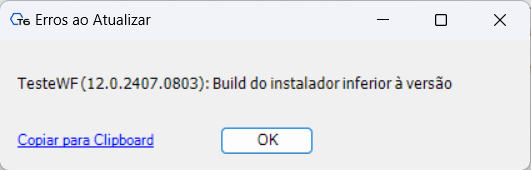
- The installer version is lower than the version being updated.
- In this case, verify if the downloaded installer version is correct and make the necessary adjustments.
- The version to be installed must always be higher than the current version.
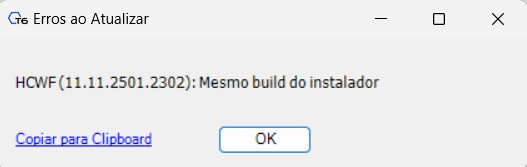
- The installer version is the same as the version being updated.
- In this case, verify if the downloaded installer version is correct and make the necessary adjustments.
- The version to be installed must always be higher than the current version.
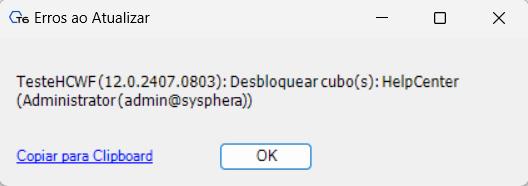
- Unlocking applications:
- The message informs which application is locked and the user responsible for the lock.
- In this case, access T6 Enterprise and unlock the application in question.
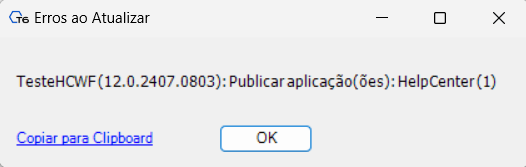
- Application publication:
- The message provides the name and code of the application that needs to be published.
- In this case, any user with publication permissions can access T6 Enterprise and perform the publication.
- Update failed:
- In this situation, review the summary and identify the problem that occurred, then apply the solution.
- Once the error is corrected, run the installation update again.
- The installer will always identify when an update fails and give the option to try again.
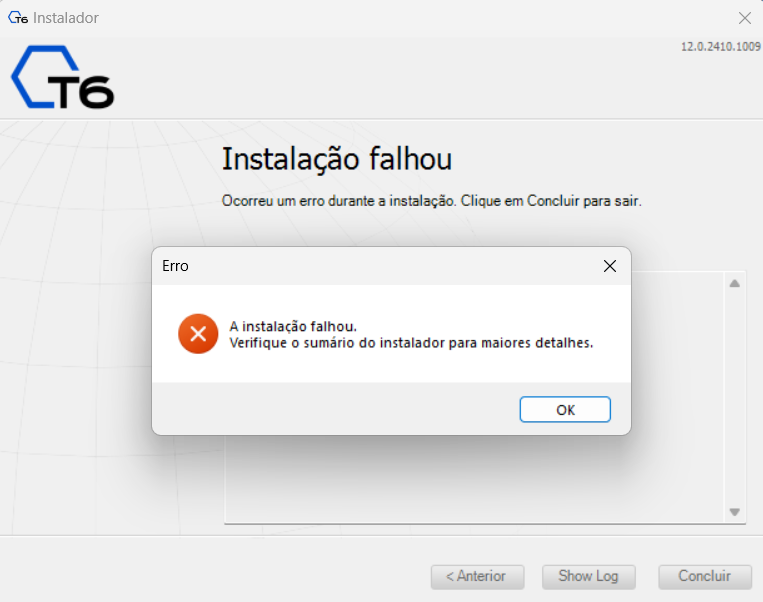
Other critical errors may occur during the Update Progress. In these cases, it is recommended to consult the detailed log, which is stored in the C:\Program Files\T6 Enterprise\T6 Enterprise Installer\Logs folder. There, you can see all the details of the update process and locate where the issue occurred, identify it, and fix it so the update can be completed successfully.