¶ 1. Overview
Our T6 notification system allows us to view executed actions with a wide level of detail, such as data loads, cube publications, and workflow processes. It enables you to check execution status, detailed start and end times, and total execution time. In case of errors during execution, a list of errors is displayed so you can select a specific error and review its details.
¶ 2. Features
Among the new features added to the notification system are:
- Full details of the triggered action;
- Ability to cancel a process that is running with failures and correct it before completion;
- Ability to download the data load file used;
- Display of a status bar showing the completion percentage;
- Lane with possible actions, which varies depending on the triggered action.
¶ 3. Usage
To use the notification system, you need to perform an action that generates a notification, such as a data load, a cube publication, or a workflow process.
By clicking on ![]() in the upper corner of the T6 screen, a panel will be displayed on the side with a list of notifications generated by the system and a status bar showing the execution percentage. Among them, we will have the following possibilities:
in the upper corner of the T6 screen, a panel will be displayed on the side with a list of notifications generated by the system and a status bar showing the execution percentage. Among them, we will have the following possibilities:
 : Displayed when the triggered action is being executed with no errors so far;
 : Displayed when the triggered action is executed and completed successfully;
 : Displayed when the triggered action is being executed with errors;
 : Displayed when the triggered action has been executed and completed, but with errors;
 : Displayed when the triggered action has one or more errors that prevent its execution and completion.
When you click a notification, a new tab opens in T6 showing full details of the triggered action.
In case of an error that prevents execution, the opened tab shows the title of the triggered action; a short explanation saying execution was not completed due to an error; which user triggered the action; the error status; the detailed start date and time of execution; and a panel with error details.
¶ 3.1. Cube Publication
When you publish the cube after creating one or more formulas, the system shows a notification. When you click the notification, a new tab opens where you can view details of the actions performed by the system during cube publication.
On this screen, you have:
- The name of the action performed;
- The user who triggered the action;
- The action status;
- Date and time when the action was triggered;
- Date and time when the action ended;
- Total duration to complete the action;
For formulas, you also have the following informational cards:

As shown above, each card includes:
- In the upper-left corner, a number showing the value before the publication that generated the notification;
- In the center of the card, the current value at publication time, and next to it one of 3 possible indicators:
- If the value did not change, the card is yellow with a dash, indicating no change in that value when publishing the cube;
- If the value increased, the card is red with an upward arrow, indicating an increase in that value when publishing the cube;
- If the value decreased, the card is green with a downward arrow, indicating a decrease in that value when publishing the cube;
For more information about formulas in T6, see: Formulas and Functions
Right below, there is a list of all steps performed by the system during cube publication, and next to each step, the duration of each action in milliseconds;
¶ 3.2. Data Load
When you run a data load, the system shows a notification. When you click the notification, a new tab opens where you can view details of the actions performed by the system during data load execution.
In case of success, the screen displays only:
- The name of the action performed;
- The user who triggered the action;
- The action status;
- Date and time when the action was triggered;
- Date and time when the action ended;
- Total duration to complete the action;
- Button to download the file used for the data load

In case of execution completed with failure due to a mapping error, in addition to the items above, you also have:
A card that shows the mapping name, the generated error code, and a Correct mapping button:
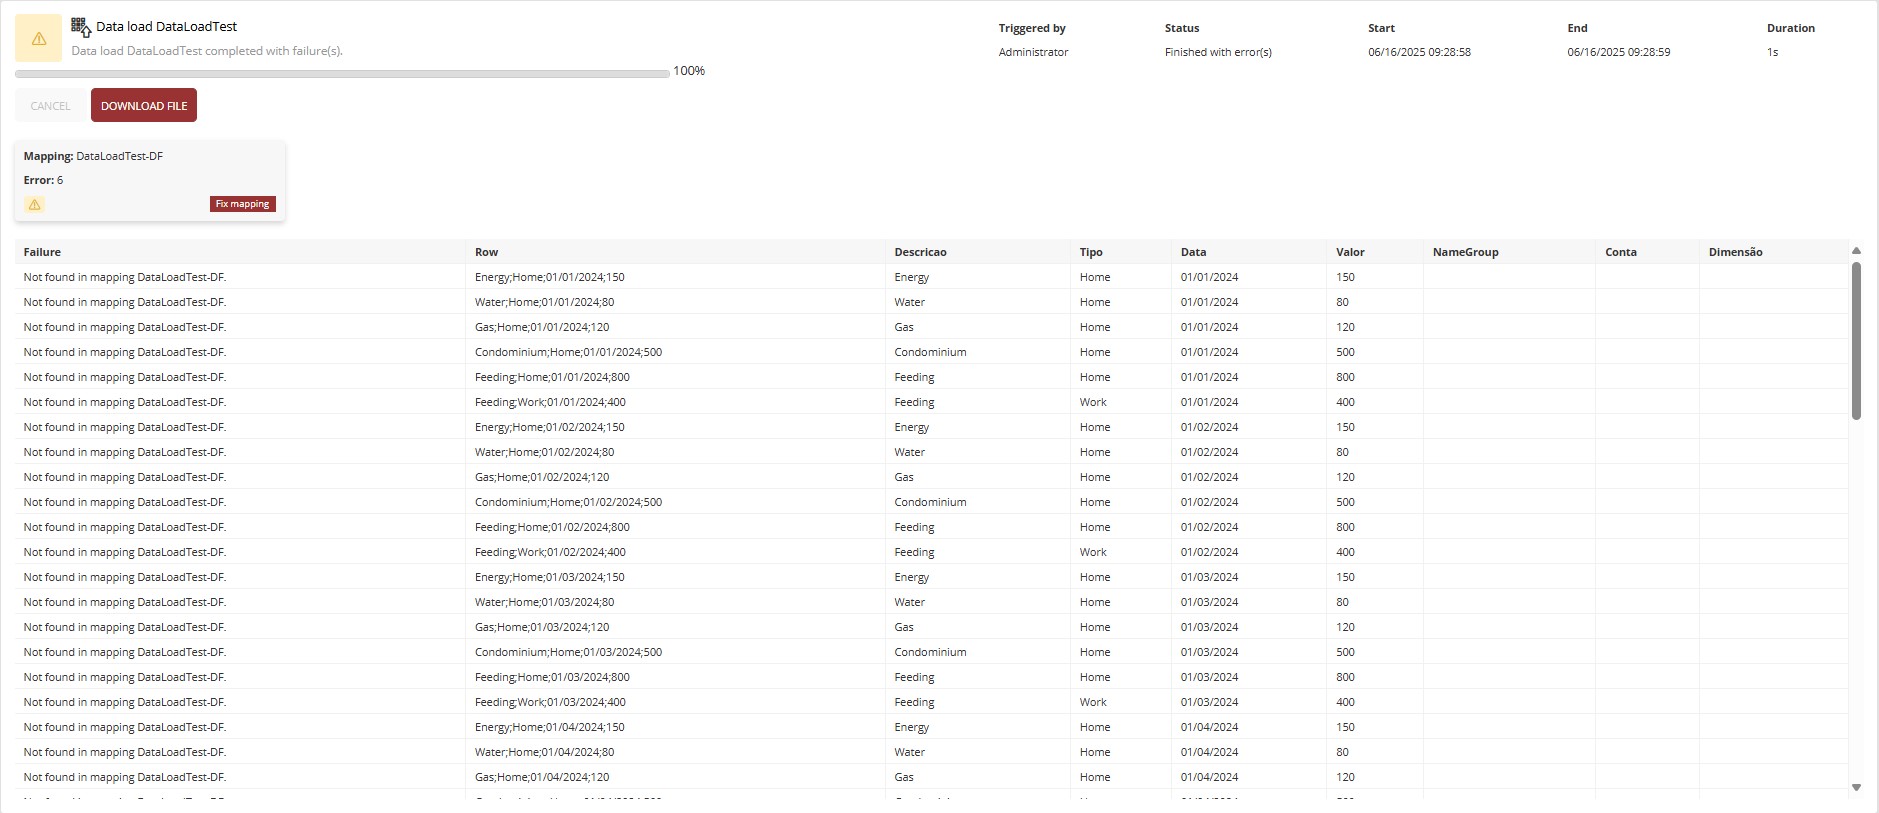
When you click Correct mapping, you are redirected to a new tab in T6 containing the data form used for the data load, so you can make the required corrections.
You can also edit the CSV file used in the load, fix the rows that generated errors, and run the load again.
Right below the card, there is a list of failures found during data load execution and their details;
¶ 4. Custom Notifications
It allows a user to send a message to a group of users, or to a specific user, while performing an activity. This makes it possible to create notifications with any information, not only application-generated details.
Our notifications are stored in database tables that start with REP_NOTIFICATION. The information stored in REP_NOTIFICATION contains general notification data.
In the REP_NOTIFICATION table, we have the following columns:
codNotification: Incremental identifier, generated automatically when a notification is created;codNotificationType: Notification type identifier fromREP_NOTIFICATION_TYPE. Available notification types include:- cubepublish = 1; (cube publication)
- error = 2; (error)
- scenariocopy = 3; (scenario copy)
- workflowstarter = 4; (workflow trigger)
- system = 5; (system notification)
- workflowaction = 6; (workflow action)
- powerbi = 7; (Power BI)
- custom = 8; (custom notification)
flgState: Notification state. Possible values are:- Unknown = 0; (Unknown)
- Running = 1; (Running)
- Finished = 2; (Finished)
- Canceled = 3; (Canceled)
- Error = 4; (Error)
- Stopped = 5; (Stopped)
codUser: Identifier of the user who created the notification;dscObjectID: Identifier of the object associated with the notification;dscObjectName: Name of the object associated with the notification;dscTitle: Title of the message shown in the notification;dscMessage: Message body shown in the notification;dscDetails: Message details shown in the notification;datStart: Notification start date;datEnd: Notification end date;
We also have the REP_NOTIFICATION_USER table, where we can define which users should be notified for the created notification.
In a custom notification, we fill one record in REP_NOTIFICATION and one or more records in REP_NOTIFICATION_USER.
¶ 4.1. Inserting Custom Notifications
To insert a custom notification, access your database and insert a record into REP_NOTIFICATION, for example:
INSERT INTO REP_NOTIFICATION (codNotificationType, flgState, codUser, dscObjectID, dscObjectName, dscTitle, dscMessage, dscDetails, datStart, datEnd)
VALUES
(8, 2, 1, NULL, NULL, 'Example Title', 'Example notification message body', 'Example details', GETUTCDATE(), GETUTCDATE())
You also need to insert a record into REP_NOTIFICATION_USER, for example:
INSERT INTO REP_NOTIFICATION_USER (codNotification, codUser)
SELECT TOP 1 codNotification AS codNotification, 1 AS codUser FROM REP_NOTIFICATION ORDER BY codNotification DESC
Whenever we create a custom notification, we must first run the INSERT on
REP_NOTIFICATIONto get the notification code used in the INSERT onREP_NOTIFICATION_USER.
¶ 4.2. Triggering the Custom Notification
The user is notified only once. As soon as the notification is read, the same notification will no longer be delivered to that user.
To trigger the notification, use the following API: .../API/Notification/Notify?notificationCode=****, where **** must be replaced with the notification code created previously.
The notification is generated only for users defined in the REP_NOTIFICATION_USER INSERT who are logged in at the moment the API is called. If no target user is logged in at call time, the notification is not delivered until one of the defined users logs in to T6.
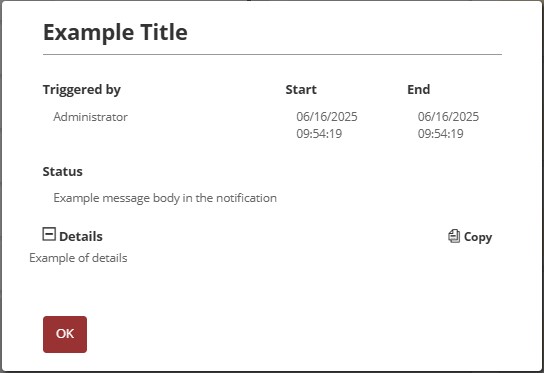
The custom notification is displayed as follows:

When you click the notification, a more detailed view is shown, including the user who triggered it, the start date, and the end date:
¶ 5. Q&A
Frequently Asked Questions
1. What is the T6 notification system?
The T6 notification system lets you view executed actions in detail, including data loads, cube publications, and workflow processes, showing status, start/end times, total duration, and error details.
2. How do I access notifications?
To access notifications in T6, click the bell icon in the upper corner of the T6 screen to open a side panel with the list of notifications.
3. What are the different notification statuses?
Notifications in T6 can have the following statuses:
Running;
Success (executed and completed successfully);
Running with failure;
Executed with failure;
Error (prevents execution).
4. What does each color in the informational cards mean after cube publication?
The informational card colors after cube publication indicate:
Yellow with dash: no value change;
Red with upward arrow: value increase;
Green with downward arrow: value decrease;
5. What can I do when a data load shows a failure notification?
After opening the notification, you can click Correct mapping to go to the data form and apply corrections, or fix the CSV file used and run the load again.
6. Can I download the file used in the data load from the notification?
Yes. After opening the notification, you can click the available download button for the file used in the data load.
7. What are custom notifications?
Custom notifications allow a user to send personalized messages to a group of users or to specific users, not limited to application-only information.
8. How do I create a custom notification?
To create custom notifications, you must insert records directly into the database tables, following the structure described in the documentation (Custom Notifications).
9. How do I trigger a custom notification?
To trigger a custom notification, use the API: .../api/Notification/Notify?notificationCode=**** where **** is the notification code created earlier.
10. When does the user receive the custom notification?
After the API call, if target user(s) are logged in at that moment, they receive the notification.
If no users are logged in, the notification is not delivered until one of them logs in.
11. Is it possible to cancel a running process from a notification?
Yes, after opening the notification, you can cancel a process that is running with failure and correct it before completion.
12. What does the status bar in a notification show?
When a notification displays the status bar, it shows the completion percentage until the process finishes (data load, cube publication, etc.).