¶ 1. Overview
There is a high demand for data integration between the various platforms and systems available in the market. T6 Enterprise enables this integration through the use of WebServices or REST API, transferring data in JSON format in three ways:
-
Retrieve data from an API/REST: consuming data from a service provided by the client/supplier.
-
Send data to an API/REST: encapsulating the data stored in T6 Enterprise and sending it to a service provided by the client/supplier.
-
Provide data for consultation: offering a data structure through our forms API so that a service can consume the data as needed by the source.
To view the complete list of T6 APIs, we can use Swagger, for information on configuration and use, visit our help center: Swagger.
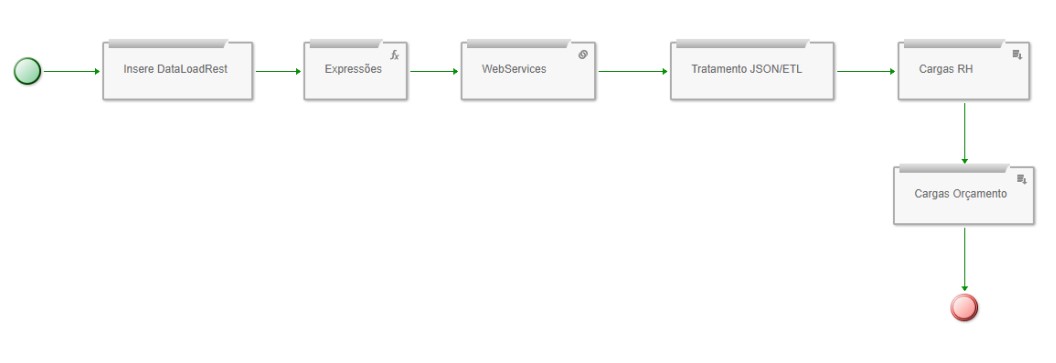
Internally in T6 Enterprise, data loads (ETL) are created through our workflow process, allowing various controls, email notifications, and user interaction. Below is an example of a data loading flow:
¶ 2. DataloadREST
The tool we provide to interact with any external API/REST to T6 is DataloadREST. Through it, we can trigger calls using various protocols, methods, and authentications, allowing us to consume data or send data to WebServices available on the network.
¶ 2.1. GET Request
By default, the service uses the POST method, but it is also possible to use the GET method by passing the parameters concatenated in the URL as shown in the example below. As in the previous case, the insert is within a Stored Procedure, which dynamically concatenates the year and month in the URL.
{
 "Url": "https://apiqas.cliente.com.br:6244/teste-e/sysphera/integracao?ano='+@ano+'&mes='+@mes
 "RequestMethod": "GET",
 "AuthenticateType": "None",
 "Body": ""
}
¶ 2.2. Basic Authentication
The simplest configuration, using the POST method, the service URL, the basic authentication method, username, password, and the parameters passed in the body (classic POST method passing):
{
 "Url": "http://sapqas.cliente.com:8001/sysphera/sysphera_dados?sap-client=300",
 "RequestMethod" : "POST" ,
 "AuthenticateType": "BASIC",
 "UserName": "SYSPHERA",
 "Password": "agrC4DkbyJuHSFwCU@",
 "Body": "{
 \"I_ANO\": \"2019\",
 \"I_MES\": \"02\"
 }"
}
¶ 2.3. Call WITHOUT Authentication or Included in the Service (URL)
When the service does not require authentication, set None in the parameters.
{
 "Url": "https://api.cliente.com.br:6244/sysphera/listar/volume",
 "AuthenticateType": "None",
 "UserName": "None",
 "Password": "None",
 "Body": "{
 \"ANO\": \"2019\",
 \"MES\": \"01\"
 }"
}')
¶ 2.4. Call with Parameter Passing in the HEADER "URL Encoded"
In this example, there is a need to include some information in the Header, such as the Content-Type and some parameters using URL Encoded.
{
 "Url" : "https://api-homologacao.cliente.com.br/credenciamento/auth/oauth/v2/token" ,
 "AuthenticateType" : "BASIC" ,
 "UserName" : "0fd71627-a1a1-b1b1-9cd4-69c6ef34fb74" ,
 "Password" : "e34af389-6054-9958-a8c4-c304244c9b81" ,
 "RequestMethod" : "POST" ,
 "Header": "Content-Type:application/x-www-form-urlencoded",
 "Body": "scope=onboarding-sap&grant_type=client_credentials"
}'
¶ 2.5. Call Passing a Cookie
There are cases where it is necessary to pass the TOKEN inside a Cookie, which is in the Header.
{
 "Url": "https://servicos.cliente.com.br/isw/api/v1/siteware/acompanhamentoFinanceiroProjeto",
 "RequestMethod": "POST",
 "Header": "Cookie: iPlanetDirectoryPro=\"My00YTk0LTljZDQtNjljNmVmMzRmYjc0OmUzN\";
 "Body": "[{\"ano\": 2020, \"codigo\": 900001, \"despesaOrcado\": 1.50, \"despesaRealizado\":
 ...
}
¶ 2.6. POST Call Sending Data
Sending data to an API uses the same message logic; the only difference is that the Body will contain the JSON with the data to be sent.
{
 "Url": "http://sapqas.cliente.com:8001/sysphera/sysphera_getdata",
 "RequestMethod" : "POST" ,
 "AuthenticateType": "BASIC",
 "UserName": "SYSPHERA",
 "Password": "agrC4DkbyJuHSFwCU@",
 "Body": "[
 {\"ano\": 2023, \"codigo\": 900001, \"despesaOrcado\": 1.50, \"despesaRealizado\": 1.60, \"mes
 {\"ano\": 2023, \"codigo\": 900002, \"despesaOrcado\": 2.40, \"despesaRealizado\": 2.30, \"mes
 {\"ano\": 2023, \"codigo\": 900003, \"despesaOrcado\": 3.20, \"despesaRealizado\": 3.50, \"mes
 {\"ano\": 2023, \"codigo\": 900004, \"despesaOrcado\": 1.80, \"despesaRealizado\": 1.60, \"mes
 ...
 ]"
}
¶ 2.7. oAuth Call
The service supports the oAuth protocol. This protocol works as if there were two calls, one for authentication and another for the service itself, but everything configured in a single execution as shown in the example below.
{
 "Url": "https://dev-api.cliente.com.br/sb/dados-contabeis/v1/contas?Periodo=01/01/2020",
 "AuthenticateType": "oAuth",
 "Header": "client_id:5ca627ad-a1a1-3680-87ac-0ededaffc59d; access_token:{{oAuthAccessToken}};
 "RequestMethod": "POST",
 "UserName": "",
 "Password": "",
 "Body":"",
 "oAuthAuthEndpoint": "https://api.cliente.com.br/oauth/grant-code",
 "oAuthAuthRequestMethod": "POST",
 "oAuthAuthRequestHeader": "Content-Type:application/json",
 "oAuthAuthRequestBody": "{\"client_id\": \"5ca627ad-608a-3680-87ac-0ededaffc59d\", \"redirect_
 "oAuthAuthRequestAuthenticateType": "",
 "oAuthAuthRequestUserName": "",
 "oAuthAuthRequestPassword": "",
 "oAuthTokenEndpoint": "https://api.cliente.com.br/oauth/access-token",
 "oAuthTokenRequestMethod": "POST",
 "oAuthTokenRequestHeader": "Content-Type:application/x-www-form-urlencoded",
 "oAuthTokenRequestBody": "grant_type=authorization_code&code={{oAuthGrantCode}}",
 "oAuthTokenRequestAuthenticateType": "Basic",
 "oAuthTokenRequestUserName": "5ca627ad-608a-3680-87ac-0ededaffc59d",
 "oAuthTokenRequestPassword": "87d147d1-a607-3d0f-9de2-78d9a11c0fe8"
}')
¶ 3. Data Forms REST API
T6 Enterprise has a second way of making data available for client consumption, through a REST API embedded in each WINDOW-type data form. There are two API calls authenticated via a token. The first API returns the query metadata, with the number of rows and the column descriptions, while the second API returns the dataset with the form data. The first call is not mandatory and the second API (offset) allows pagination when dealing with large data volumes.
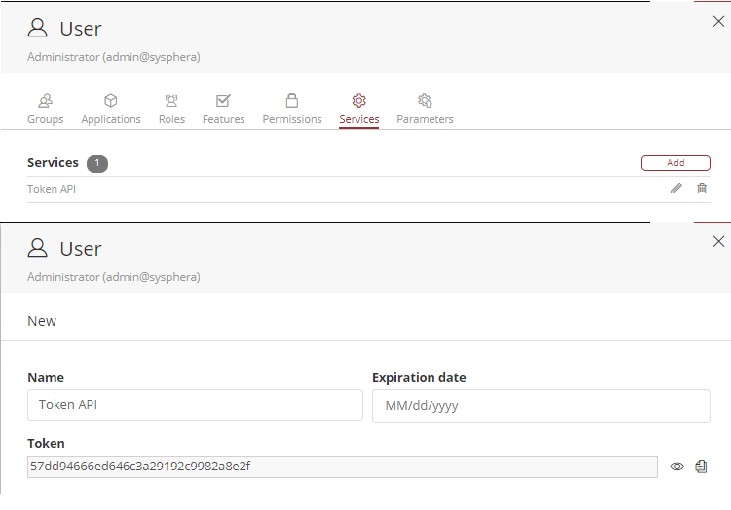
¶ 3.1. Access Token Configuration
In order to use the APIs, a multi-application administrator user needs to create an access token. This must be done when creating the user, in the Services tab as shown in the figure below.
The token is a set of characters that can have an expiration date and will allow access to the form APIs. It will authenticate instead of a username and password. This token can have an expiration date and can be revoked/deleted at any time.
¶ 3.2. The Data Form
Application managers will define which form (or forms) will be used to access data via API. Any window-type form can be created, regardless of whether it was created through a data table or through a query.
The important information to use in the API is the form code as shown below:

¶ 3.3. Why Service Principal?
Before the Service Principal, there was no practical way for an external service or background process to connect to T6 via API without a logged-in user.
The Service Principal solves this by providing a token-based mechanism that allows external services and applications to authenticate to T6 and consume its APIs without requiring user credentials or an active session.
Typical use cases include:
- Automated data loads from external systems via T6 REST API.
- Custom applications that consume data from T6 data forms or Explorer objects.
- Server-to-server integrations run on schedule or on demand, without user interaction.
¶ 3.3.1. API Request Structure
All requests to the Service API use the following structure:
Endpoint: POST http://your-domain/api/Services/Execute
Required Headers:
| Header | Value |
|---|---|
Content-Type |
application/json |
Request Body Fields:
| Field | Required | Description |
|---|---|---|
Url |
Yes | The internal T6 endpoint to be called |
Token |
Yes | The service token generated in the Services tab |
Data |
No | Payload for the internal request |
Determining GET vs POST internally:
The presence of the Data field determines how T6 handles the internal request:
- Without
Data→ the internal call is treated as GET:
{
  "Url": "Menu/GetItems",
  "Token": "your-service-token"
}
- With
Data→ the internal call is treated as POST:
{
  "Url": "Resource/GetWords",
  "Token": "your-service-token",
  "Data": ["Options", "Help", "Logout"]
}
The external call to
api/Services/Executeis always POST, regardless of the internal method used.
¶ 3.3.2. Token Validity and Lifecycle
The behavior of a service token depends on its configuration:
- Without a defined expiration date: the token remains valid indefinitely until the service is manually deleted.
- With a defined expiration date: the token is valid only until the specified date; after expiration, all requests will be blocked with an authorization error.
- Service deleted: any request using the token of a deleted service will immediately fail with an authorization error.
If you need to rotate or renew a token, delete the existing service and create a new one — a new token will be automatically generated upon creation.
¶ 3.4. CreateOrGet API
This is the first API we will call. It will provide the listing with the column names we will access and the number of rows in the Dataset.
For this call, we do not need the data parameter, we will use only the URL and the Token.
The URL will be Worksheet/CreateOrGet?type=dataform&typeCode=1996, where typeCode (in this example 1996) is the code of the data form to be consumed.
{
"Url":"Worksheet/CreateOrGet?type=dataform&typeCode=1996",
"Token":"1fae0b70e3d24d88b67208301b1c1eb1"
}
Below is the API call and the response, showing that the form has 51 rows and the column headers.
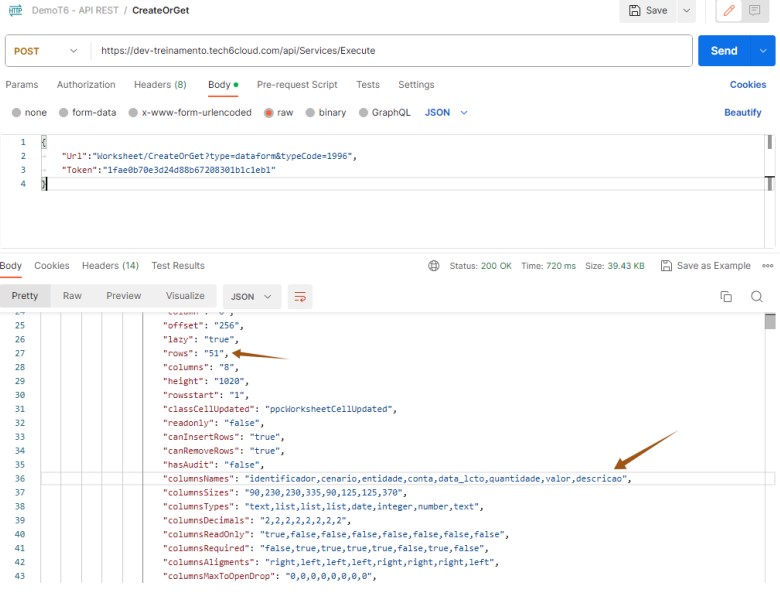
By default the Content-Type will come with the type Text/Plain, since in the Body we have a JSON, we need to change the Content-Type to Application/JSON, otherwise the following error will be generated: 415 - Unsupported Media Type.
¶ 3.5. Offset API
The Offset API is effectively used to consume the data. Depending on the data volume, it can be paginated, since in addition to the data form code (typeCode), we also have the starting row (start) and the number of rows (length) as attributes.
The length parameter has a maximum limit of 2000 rows per call; if the number of rows exceeds this value, multiple paginated calls will be required. If you try to enter a value greater than 2000, the API will return the error 400 - Bad Request.
The URL will be Worksheet/Offset?code=&type=dataform&typecode=1996&start=0&length=20&metadata=false. In this example I am starting from row "0" and will retrieve only 20 rows out of the total of 51.
In this call the Data parameter in the Body is required and will be fixed, always passed in the following way:
"Data":{"Comparator":0,"Operator":0,"Filters":[]}
{
"Url":"Worksheet/Offset?code=&type=dataform&typecode=1996&start=0&length=20&metadata=false
"Token":"1fae0b70e3d24d88b67208301b1c1eb1",
"Data":{"Comparator":0,"Operator":0,"Filters":[]}
}
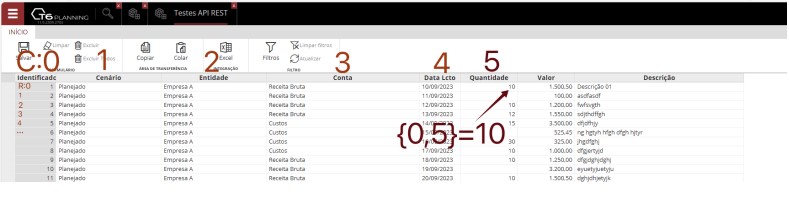
Below is the API call returning the data. The response will always be in the same linked list format with ROWS and COLUMNS.
Note that we start with the row RowIndex=0 and then all its columns ColumnIndex=0, 1, 2... The value is what is in the VALUE field. That is, cell {0,5} has the value "10".

In the example above, checking in the form what we have at ROW=0 and COLUMN=5, we have the value 10.
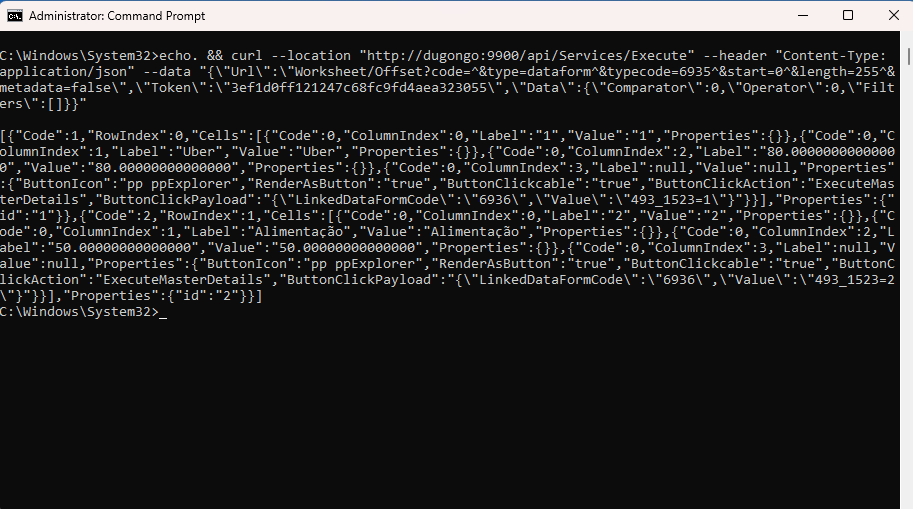
¶ 3.5.1. CURL - Offset
We can also make the API call via CURL, using CMD. To do this, we will run CMD as administrator and then execute the following CURL call:
echo. && curl --location "http://seu-domínio/api/Services/Execute" --header "Content-Type: application/json" --data "{\"Url\":\"Worksheet/Offset?code=^&type=dataform^&typecode=6935^&start=0^&length=255^&metadata=false\",\"Token\":\"3ef450hp121247c68fc9faaabbb123\",\"Data\":{\"Comparator\":0,\"Operator\":0,\"Filters\":[]}}"
When executing this CURL, we will see the data of the specified object displayed as shown in the example below:
¶ 3.6. Parameter Values in the APIs
To find the parameter values of an API, we will use a network traffic capture tool during the execution of T6Enterprise, so we can see the values being used during the execution of actions in the system. In this example we will use the Offset API and demonstrate how to locate the necessary parameters to apply filters through the Data field in the request body of the API itself.
To apply filters in the Offset API, we will need to use a tool that captures network traffic (in our example, we will use Fiddler Classic).
- Run Fiddler.
- Access T6Enterprise in your browser while Fiddler is running.
- Select a Data Form type object that will be used in the API call.
- We will need to use the object code in the API request body.

- Access the form and in the ribbon, click on Filters.
- A new panel will be displayed on the side, where we will filter the values we want.
- After changing the filters as desired, we will return to Fiddler, where we will locate the API used when applying the filters, as we will need the information generated there to complete our request body.
- When accessing Fiddler after having changed the filters in the data form, we will locate the triggered API in the list on the left, and follow the steps as shown in the image below.
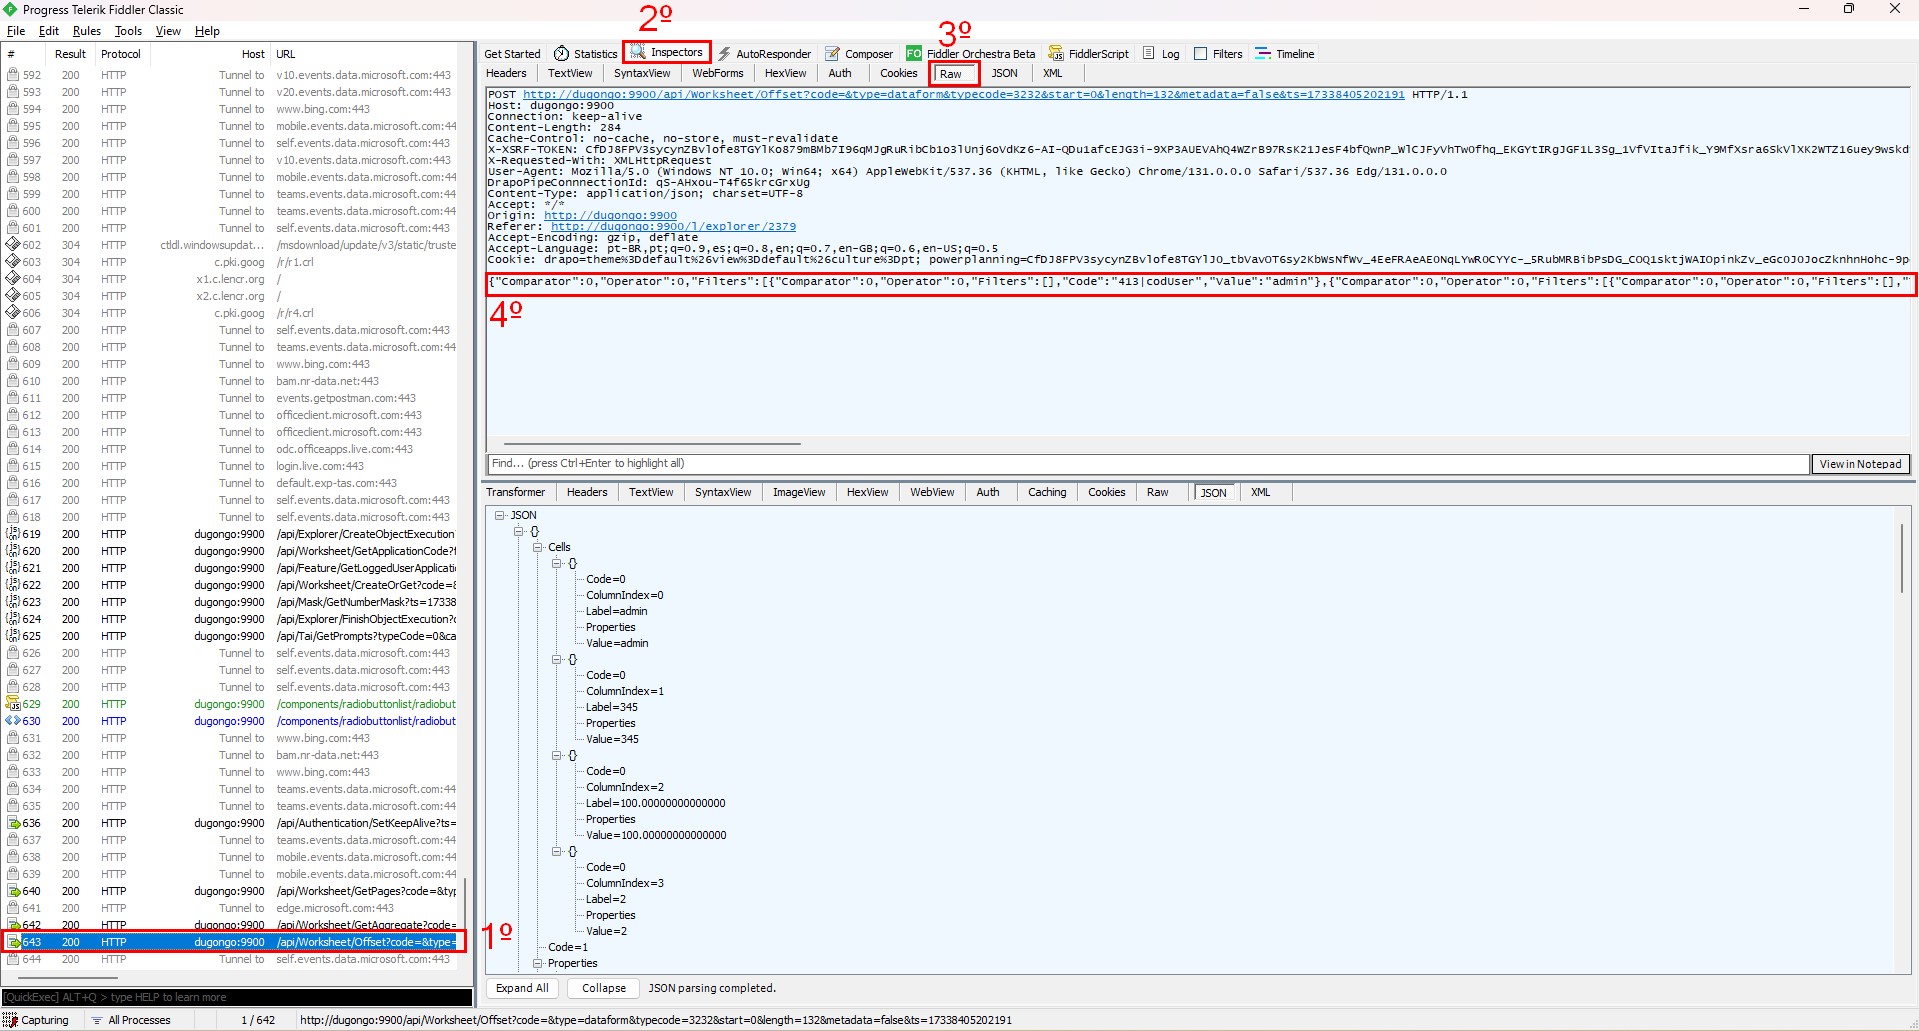
- 1st: We will select the API starting with
/api/Worksheet/Offset...with a double click. - 2nd: We will select the Inspectors tab.
- 3rd: In the Inspectors tab, we will select the Raw tab.
- 4th: In the last line, we will have the information we need to complete our request body, copy the entire line and then insert the copied information into the Data field of your API's request body.
{
"Url":"Worksheet/Offset?code=&type=dataform&typecode=3232&start=0&length=20&metadata=false
"Token":"1fae0b70e3d24d88b67268302b1d1eb1",
"Data":{"Comparator":0,"Operator":0,"Filters":[{"Comparator":0,"Operator":0,"Filters":[],"Code":"413|codUser","Value":"admin"},{"Comparator":0,"Operator":0,"Filters":[{"Comparator":0,"Operator":0,"Filters":[],"Type":"column","Code":"1026","Value":"Brindes"}],"Type":"column","Code":"1026"}]}
}
This way, when executing the API, we will receive only the data according to the applied filters.
¶ 4. Integration For Users
For a user to be able to access the system without using credentials, we will need an access Token for them, which we will use to generate a URL for access. To do this we will use the Integration API.
¶ 4.1 Token
To access a user's Token, we will need to query our database using the following SQL command:
select dbo.UrlEncode(dbo.VarBinaryToBase64(dbo.Encrypt('bmeredyk?~/l/cms/home'))) as token
When using this command, the database will return the Token that we will use to generate the URL that will grant access to the user. In the example above, we have the path 'bmeredyk?/l/cms/home', where bmeredyk is the user for whom we will generate the access token and /l/cms/home is the endpoint of the page that will be opened when the user clicks the URL, in this case the Home page of our application. We can change the endpoint so that the user accesses the system on a specific page.
¶ 4.2 Generating the URL via Powershell
To generate the access URL, we will use a Powershell script. For this, we will need to install the Invoke-SQLcmd module from SQLServer (Invoke-SQLcmd) in our Powershell. We will use the following script:
$tokenDS = Invoke-Sqlcmd -Query "select dbo.UrlEncode(dbo.VarBinaryToBase64(dbo.Encrypt('bmeredyk?~/l/explorer/2437'))) as token;" -As DataSet -ConnectionString "Server=TESTE;Database=EXEMPLO;TrustServerCertificate=true;user id=****;password=****"
$token = $tokenDS.Tables[0].token

$Url = $('http://TESTE:9900/api/Authentication/Integration?token=' + $token + '')

Write-Host "URL gerada: $Url"

Invoke-WebRequest -URI $Url -UseBasicParsing -Headers @{'content-type' = 'application/json'} -Method 'GET'
To use this script, the user must have access to the database and use their login credentials in the connectionstring.
When executing this script, an access URL will be generated as shown in the example below:

¶ 5. Q&A
Frequently Asked Questions
1. What are the data integration methods supported by T6 Enterprise?
T6 Enterprise supports three forms of data integration via REST API/WebServices:
- Retrieve data from an API/REST: consuming data from an external client/supplier service.
- Send data to an API/REST: encapsulating and sending data stored in T6 to an external service.
- Provide data for consultation: exposing data through the forms API so that external services can consume it.
2. What is DataloadREST and what authentication methods does it support?
DataloadREST is the T6 tool used to interact with external APIs/REST. Through it, it is possible to trigger calls using various protocols and methods. The supported authentication methods are:
- None: no authentication or with authentication included in the URL itself.
- BASIC: basic authentication with username and password.
- oAuth: oAuth protocol, which internally performs authentication and the service call in a single configuration.
- Cookie / Header: passing token or custom parameters in the request Header.
3. How does the oAuth protocol work in DataloadREST?
The oAuth protocol in DataloadREST works as two chained calls configured in a single execution:
- Authentication: T6 makes a call to the authentication endpoint (
oAuthAuthEndpoint) to obtain the authorization code. - Token retrieval: with the obtained code, a second call is made to the token endpoint (
oAuthTokenEndpoint). - Service call: with the generated
access_token(available via{{oAuthAccessToken}}), T6 executes the call to the final service specified inUrl.
4. What is Service Principal and why is it needed?
The Service Principal is a token-based mechanism that allows external services and applications to authenticate to T6 and consume its APIs without requiring user credentials or an active session.
Before Service Principal, there was no practical way for an external service or background process to connect to T6 via API without a logged-in user. Typical use cases include automated data loads, custom applications, and server-to-server integrations on schedule.
5. What is the maximum row limit per call in the Offset API?
The length parameter of the Offset API has a maximum limit of 2000 rows per call. If the data volume exceeds this value, multiple paginated calls will be required using the start and length parameters.
If a value greater than 2000 is provided, the API will return the error 400 - Bad Request.
6. What is the difference between the CreateOrGet API and the Offset API?
- CreateOrGet API (
Worksheet/CreateOrGet): returns the metadata of the data form, including the column names and the total number of rows in the dataset. Does not require theDataparameter in the body. - Offset API (
Worksheet/Offset): effectively returns the data from the form, with pagination support viastartandlength. Requires theDataparameter in the body with the format{"Comparator":0,"Operator":0,"Filters":[]}.
The call to the CreateOrGet API is not mandatory, but is useful for knowing the structure and volume of data before paginating it.
7. What causes the "415 - Unsupported Media Type" error when calling the API?
This error occurs when the Content-Type of the request is not correctly configured. By default, some tools send the Content-Type as Text/Plain, but since the request body contains a JSON, it is mandatory to set the Content-Type to Application/JSON.
8. How can I apply filters in the Offset API?
To apply filters in the Offset API, you need to capture the correct parameters using a network traffic capture tool such as Fiddler Classic. The process is:
- Run Fiddler and access T6 in the browser.
- Open the desired data form and apply the filters in the ribbon.
- In Fiddler, locate the
/api/Worksheet/Offset...call, go to the Inspectors > Raw tab and copy the content of the last line. - Insert the copied content into the Data field of your API call's request body.
9. How does the Service Principal token validity work?
The behavior of the token depends on the configuration made in the Services tab of the administrator user:
- Without expiration date: the token remains valid indefinitely until manually deleted.
- With expiration date: the token expires on the configured date; after that, all requests will be blocked with an authorization error.
- Service deleted: any request with the token of a deleted service will fail immediately.
To rotate a token, delete the existing service and create a new one — a token will be generated automatically.
10. How to generate an integrated access URL for a user without them having to type their credentials?
Use the T6 Integration API. The process involves two steps:
- Generate the token: execute the SQL function
dbo.UrlEncode(dbo.VarBinaryToBase64(dbo.Encrypt('user?~/endpoint')))replacinguserwith the user's login and/endpointwith the destination page path. - Generate the URL: build the URL in the format
http://your-domain/api/Authentication/Integration?token=<token>and share it with the user.
This URL can be generated via PowerShell with the Invoke-Sqlcmd module, as documented in section 4.2.