¶ 1. Overview
The audit involves saving details about changes and/or actions performed on any data considered critical within the T6 solution. Examples of critical data include any changes on the Security screen or modifications to values in form cells.
This information is audited so that, at any time, it is possible to identify who made a certain modification or determine the impact of the change on the model in terms of performance.
¶ 1.1. Types of Audit
List of information audited by T6 Planning:
- Security: Modifications to user, group, and role data are recorded. Changes to access permissions for T6 Planning features, applications users can access, and permissions for Reports and Forms are also logged;
- Audit Trail: Changes to cell values in forms are recorded;
- Cell Details Audit: Modifications to cell details in forms are recorded;
- Cell Value Details Audit: Changes to the details of cell values in forms are recorded;
- Data Table Audit: Information about changes to T6 data tables is logged;
- Object Logs: Information about the execution of objects in T6 is recorded;
- Formula Logs: Information about formula executions is logged;
- Error Logs: Any unhandled errors in the T6 interface are logged;
- Model History: Information about changes to the model is recorded.
¶ 2. Usage
With the implementation of audits within T6, we can ensure data integrity, track user actions, and generate detailed reports for analysis and decision-making.
¶ 2.1. Security
Modifications related to the creation/editing/deletion of users, groups, and roles are recorded. Changes to access permissions for T6 Planning features, applications users can access, and permissions for Reports and Forms are also logged.
T6 Planning audits any changes to information on the Security screen.
For security reasons, this information is not visible within the tool. To access it, database access to T6 Planning is required.
By default, security auditing is enabled during the installation of T6 Planning.
To enable or disable security auditing, follow these steps:
- In the main T6 menu, under Settings, access the Parameters option;
- A panel will open on the side with global and application parameters. Use the Global settings;
- Select the option
 and locate the parameter Enable Security Audit;
 - To enable the parameter, the switch button should be marked as
 ;
; - To disable the parameter, the switch button should be marked as
 .
.
¶ 2.2. Security Audit Table
The table that stores all security audit data is REP_LOG_SECURITY_TRAIL. This table is structured as follows:
- codLogSecurityAudit: Unique identifier for the record. The value of this column is automatically generated by SQL Server;
- datActionDate: Date the audit event occurred;
- codUser: User who performed the operation;
- dscActionType: Type of operation performed;
- dscInformationType: Area where the operation occurred;
- dscDescription: Detailed description of the login operation;
- codApplication: Application code where the operation took place;
- dcsIpAdress: Description of the IP address;
- codGroup: Code of the group that performed the operation;
- userCode: User code who performed the operation;
- codRole: Role code;
- codFeature: Feature code;
- codObject: T6 object code;
- dscResource: Description of the operation performed in T6;
- codActionType: Action type code;
- codInformationType: Information type code;
- dscContext: Full description of the operation performed, including added, removed, or modified data.
For additional information, access Log Retention.
¶ 2.3. Audit Trail
The Audit Trail works as a history of modifications made to any cell in T6 forms. The audited values refer to the difference between the new and old values.
Example:
In a T6 form, there is a cell with the value 220, the user changes the cell value to 200 and saves the form. The audited value will be -20.
To view the audit trail, follow these steps:
- Within T6, with a form open, select a cell with a saved value;
- Access the Tools tab in the ribbon and in the Cells section, select
 ;
; - A side panel Audit Trail will open;
- Date, User, Type, Value, and Subtotal will be displayed:
- Date: Shows the date and time of the operation;
- User: Displays the user who performed the operation;
- Type: Indicates the type of change (via formula, data load, data link, or manual change);
- Value: Shows the difference between the initial and current cell value;
- Subtotal: Displays the final cell value.
¶ 2.4. Cell Details Audit
To view cell details audit, follow these steps:
- Within T6, with a form open, select a cell with a saved value;
- Access the Tools tab in the ribbon and in the Cells section, select
 ;
; - A side panel Cell Details will open;
- Dimensions in which the cell is allocated and a box for detail input will be displayed;
- By clicking
 , the added detail will be saved and the panel will close;
 - When selecting the same cell and clicking again, the current detail of the cell will be visible;
- The history of details added to the cell can be viewed by clicking
 ;
; - Date and Time, User, and Details will be displayed.
¶ 2.5. Access Audit
The access audit feature allows you to track logins and accesses performed by each user in T6. It records information such as date, time, originating IP, and the operating system used during access.
To view the access audit, follow these steps:
- In the main menu of T6, go to Settings and select the Audit option;
- On the audit page, you will find a list with the following details:
- Date and Time: Indicates the exact time of access;
- User: Identifies the user who logged in;
- Originating IP: Displays the IP of the device used to access the system;
- Operating System: Shows the operating system used;
- Browser: Indicates the browser used during access.
¶ 2.6. Operations Audit
This feature enables the tracking of operations performed in T6, such as creating dimensions, modifying models, deleting data, among other actions. The operations audit is essential for maintaining transparency and recording important activities in the system.
To access the operations audit, follow these steps:
- In the main menu of T6, go to Settings and select the Audit option;
- Choose the Operations tab in the audit panel;
- The list will display the following details:
- Date and Time: Indicates when the operation was performed;
- User: Identifies the user responsible for the action;
- Operation Type: Specifies the nature of the operation (creation, modification, deletion, etc.);
- Object: Shows the object affected by the operation (e.g., name of a dimension or cube);
- Details: Provides additional information about the operation performed.
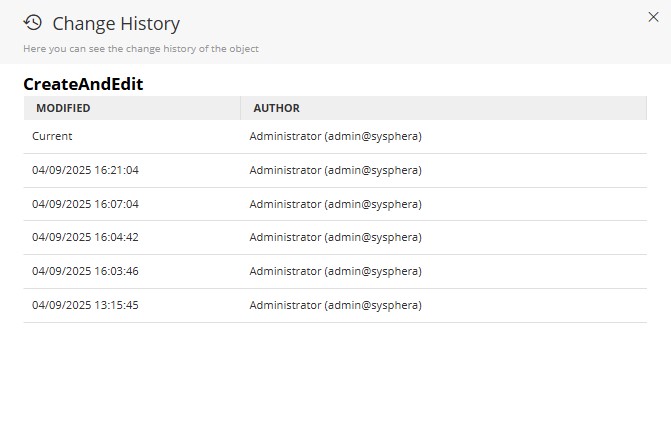
¶ 2.7. Object Logs
We also have within T6 the change history of an object's structure.
To view it, we will follow the steps below:
- In the main T6 menu, go to Settings and select the Explorer option;
- Select the object you want to view the history for;
- In the explorer ribbon, we will select the View tab;
- With the object selected, we will click on History in the explorer ribbon;
- A side panel will open, where we will view the Modification Date and the Author of the modification;
¶ 2.8. Error Logs
As with any large-scale system, unexpected errors can occasionally occur. T6 audits and saves the information that generated these errors, facilitating communication between the client and the support team.
To view the error log page, follow these steps:
- In the main menu of T6, go to Settings and select the Log option;
- A new page will open in T6 displaying the list of errors;
- The list will display Date, User, Layer, and Message;
- To view details, double-click a specific line in the list;
- A Log Administration panel will open on the side;
- It will display the following information:
- Date: Displays the date and time of the occurrence;
- User: Displays the user who attempted to perform an action that resulted in an error (a user may not always be associated);
- Layer: Displays the layer where the error occurred (LOG, DAO, COLAP, Control, or Data Provider);
- Version: Displays the version and build of T6 at the time of the occurrence;
- Details: Displays the full error message.
¶ 2.9. Model History
This feature allows all changes related to the structure of the T6 model to be recorded. For example, when creating a new dimension or adding a new member to a dimension, these changes are stored. The entire model structure is saved in XML format.
To access the model history, follow these steps:
- In the main menu of T6, go to Modeling and select the Model History option;
- A Model History panel will open on the side;
- By default, a list of all dimension entries saved in T6 will be displayed, regardless of application or type;
- If you want to display only specific types of records from a specific application, you can filter using the Application and Type dropdown boxes;
- The list displays:
- Code: Code generated when an entry is created;
- Type: Displays the name of the dimension or cube;
- User: Displays the user who performed the entry;
- Application: The T6 application;
- Creation: Displays the date and time when the entry occurred;
- Status: Displays the entry status, with three possible statuses:
- Synchronized: A cube that has been saved and published;
- Historic: A history of previously published cubes. Specific historical records can be deleted by clicking
 next to their name in the list. You can also delete all historical records at once by clicking
  located above the list;
 - Valid: A cube that has been saved but not published. If you do not want to publish the cube with the saved changes, you can click
 , which will undo the saved changes.
You can download a specific record by clicking
next to its name in the list. When you click export, a file in .XML format will be downloaded.