¶ 1. Overview
This manual addresses the importance of security in system configuration, highlighting the need to protect valuable information. It allows administrators to create, edit, and remove users, as well as assign permissions, roles, and specific profiles, such as administrators, managers, and analysts. Various functionalities are covered, such as:
- User impersonation;
- Application access configuration;
- System feature configuration;
- Object permissions;
¶ 1.1. Prerequisites
To be able to create and edit users in T6, some Features need to be enabled:
- Administrator: Manage application security (full) (multi-app); and Manage System Users.
- Manager: Manage Application Security;
A user will only have access to objects they own or have permissions for.
¶ 1.1.1. Migration from Previous Versions to 11.5 or Higher Versions
All users must retain the same access when migrating from previous versions to a more recent one.
When migrating the system to a current version, the system creates several global groups, one for each existing global functionality, and automatically includes users in them, maintaining existing access.
¶ 2. Features
Security is one of the most important aspects of any organization. All information controlled by CPM (Corporate Performance Management) systems, such as T6, is extremely valuable and should not be accessed by just anyone. Therefore, the T6 solution must be configured solidly and efficiently to ensure that information is protected, and only authorized personnel have access to it.
When implementing a security model, it is necessary to consider the business model requirements and the effects of this choice in terms of performance and scalability.
T6 has a security model that allows administrators and managers to create, configure, and maintain system access and critical information within the business model in a simple and intuitive way.
¶ 2.1. Access
Some security configurations in T6 can be accessed through the Users screen, as, like most security systems, T6 operates with the concept of users. To perform any task within T6, a valid login and password are required.
In the main menu of T6, under the Access Control section, you will find the following options:
- User
- Group
- Role
- Impersonate user;
We will select User and be directed to an Explorer tab with the list of T6 users.
¶ 3. Usage
When accessing the Users section, the T6 user list will be displayed. This screen is accessed by system administrators and managers who have the role of managing users.
In the user list, T6 users are displayed along with some information: Name (user’s name), Date (user creation date), Type (object type in T6), Description (shows the user’s email), Code (object code, automatically generated), Order, and Owner (displays the owner of the user).
Among the actions we can perform are the following tasks:
- Create, edit, and remove users;
- Manage permissions in applications, functionalities, and parameters;
- Impersonate users;
- Add and remove groups from users;
- Assign roles.
Also in the listing, next to the title of each column, there are buttons to facilitate viewing and filtering users:
-
 : Click to open a side panel with filtering options. It will display rows according to the selected filter. There are two "boxes", the first where we can click the button:
  to show filtering options (equals to; different from; starts with; ends with; contains; does not contain), and the second where we will insert what we want to filter. After entering, click
  , and the list will be updated, displaying only what fits the filter;
 -

 : Clicking will change the order of the items in the list, either ascending or descending.
¶ 3.1. User Profiles
The basic premise of a user is that they must be assigned a specific profile. Profiles allow users to be categorized based on their role within the business model and thus grant or restrict access or configuration rights to certain areas within T6.
When creating a user, we must define a licensed profile for planning and consolidation, among the following options:
- Analysts: Users whose role involves participating in the Workflow, using Data Entry, reading and writing comments at intermediate level cells, exporting XBRL, viewing management reports. Analysts have access to the Workflow, Forms, Reports, and Dashboard modules.
- Managers: Users whose role is to manage the T6 solution, model the data structure, formulas, business rules, manage the Workflow of the solution, create forms, manage Data Entry and its models, manage application security, handle XBRL, execute data loading, create/publish management reports, and other tasks related to daily use of the solution. Managers have access to all modules, but only administrators have access to all functionalities.
- Administrators: Users whose role is to administer the T6 application environment and infrastructure. Administrators have full access to all modules and data within an application. The administrator manages the data loading routines.
We can change the profile of an already created user by selecting it in the list and clicking  .
.
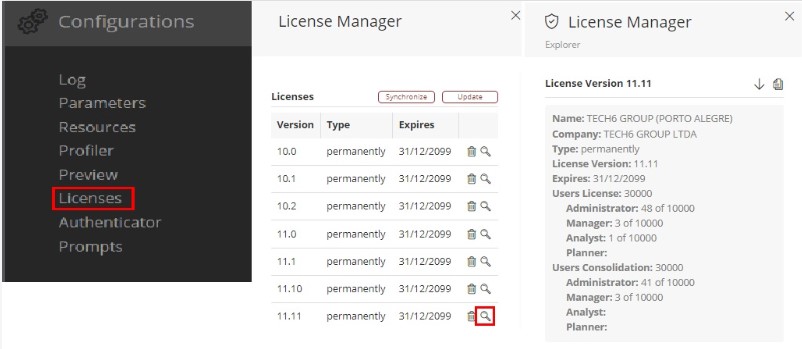
¶ 3.1.1 Licenses
In the case of on-premises applications (installed in the client environment), user profiles must be distributed according to the licenses purchased by the client.
It is possible to check the profiles available to the client in Settings >> Licenses, by clicking the magnifying glass icon next to the license.
¶ 3.2. User Creation and Editing
To create a new user in T6, follow these steps:
- In the T6 main menu, there are two possible paths to access:
- Selecting the Explorer option;
or - Selecting the Access Control → User option;
- Selecting the Explorer option;
- Click on
 in the New section of the ribbon, go to Access Control and select User;
 - A side panel will open where we will enter the information to create the new user. Fields marked with * are required;
- Login *: Enter the username that will be used to access T6;
- First Name *: Enter the user's first name;
- Middle Name: Enter the user's middle name (optional);
- Last Name *: Enter the user's last name;
- Licensed Planning Profile *: Select the user's licensed profile in the planning application;
- Licensed Consolidation Profile *: Select the user's licensed profile in the consolidation application;
- Email *: Enter the email address that can be used to log in and will be used for receiving T6 notifications and process flow alerts within the application;
- Applications: Select the applications the user will have access to;
- Password *: Enter the password to be set or modified for the user. This password must follow the security policies configured by the application administrator;
- Confirm Password *: Re-enter the exact same password provided in the Password field;
There are also some checkboxes: - Expire password every XX day(s): Check this checkbox if you want the user to be forced to change the password every predetermined period set by the application administrator. The default period is 30 days;
- Force password change on the next login of this user: Check this checkbox to force the user to change the password the next time they access the application;
- Active User: Uncheck this checkbox to deactivate the user;
- Multi-Application Administrator: Check this checkbox if you want the user to be able to migrate features;
- Blocked: Check this checkbox if you want to block the user's access to T6;
- To finish, click on
 .
.
After the user is created, we can edit them to change some information if necessary. To do so, select the user and click on .
¶ 3.3. Remove User
This functionality allows you to delete a user's record from the application. Removed users cannot be recovered.
To “Remove User”:
- In the T6 main menu, there are two possible paths to access:
- Selecting the Explorer option;
or - Selecting the Access Control → User option;
- Selecting the Explorer option;
- In the user list, select the user you want to delete by clicking on them in the list;
- In the ribbon in the Organize section, click the
 button;
 - A popup will open to confirm the action;
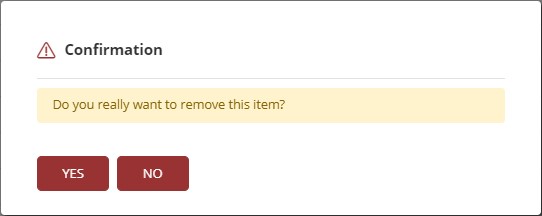
- If you agree and wish to delete the selected user, click Yes;
A user can only be removed if they are not associated with any task as a Planner/Data Reporting Responsible or Reviewer, and if they are not associated with any group.
¶ 3.4. Impersonate User
User impersonation in T6 can be used to "assume" the identity of a specific user within the system. This allows us to view data and objects shared between the impersonated user and the logged-in user.
To use user impersonation, follow these steps:
- In the T6 main menu, select the Access Control option;
- In access control, select the Impersonate User option;
- A pop-up will open where we will select the user to impersonate;
- By clicking on
 , a list of all available users for impersonation will appear;
 - Select the user and click on
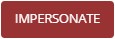 ;
; - Upon clicking impersonate, we will automatically be logged into the impersonated user, allowing us to view and interact with objects common to both users;
- To return to using the system with the original user, click on
 , we will be automatically re-logged in without the need to re-enter credentials.
The objects displayed in the explorer will be an intersection of the original user and the impersonated user, meaning only objects common to both users will be shown.
¶ 4. User Permissions
When selecting a user, we can modify their permissions. To do so, in the Security section of the ribbon, click on  . A side panel will open with the following options:

¶ 4.1. Groups
- After selecting a user from the list, click on in the security section of the ribbon.
In Groups, a list of groups will be displayed, showing:
- Application groups the user has access to (application access).
- Global groups that the logged-in user has permission for.
To add a user to a group, follow these steps:
- Click on
 to display the selected groups and available groups for selection;
- A list with group names and a checkbox next to each group for selection will be displayed;
- Check the checkbox of the groups you want to add the user to;
- Click on ;
- You will return to the main page, now showing the groups to which the user will be added;
- To finish, click on .
To remove a user from a group, follow these steps:
- Click on to display the selected groups;
- A list with group names will be shown. The groups the user is already added to will have the checkbox checked;
- Uncheck the checkbox of the groups you want to remove the user from;
- Click on ;
- To finish, click on .
A user can only add another user to a group if they have permission in the group;
For more information on group creation and configuration, visit: Security - Groups
¶ 4.2. Applications
-
After selecting a user from the list, click on
in the security section of the ribbon. -
In Applications, a list of applications the user has access to will be displayed.
To grant application access to a user, follow these steps:
- Click on to display the selected applications and available applications for selection;
- A list with application names, a checkbox for selection, and a profile selection box will be displayed;
- Check the checkbox of the applications you want to enable for the user;
- Next to the application name, there will be a profile selection box where you can choose the user's access profile
 (Administrator, Manager, or Analyst). Select the desired profile;
 - Click on ;
- You will return to the main page, now displaying the applications and access profiles assigned to the user;
- To finish, click on .
To remove user access to applications:
- Click on to display the selected applications;
- A list with application names, a checkbox for selection, and a profile selection box will be displayed. The applications the user already has access to will be checked and have a selected profile;
- Uncheck the checkbox of the applications you want to remove the user from;
- Click on ;
- To finish, click on .
The selected profile in the profile selection box must be equal to or lower than the licensed user profile!
¶ 4.3. Roles
-
After selecting a user from the list, click on
in the security section of the ribbon. -
In Roles, a list of roles the user has access to will be displayed.
To add roles to a user, follow these steps:
- Click on to display the selected roles and available roles for selection;
- A list of role names will appear with a checkbox next to each for selection;
- Check the checkbox of the roles you want to assign to the user;
- Click on ;
- You will return to the main page, now displaying the roles that will be assigned to the user;
- To finish, click on .
To remove roles from a user, follow these steps:
- Click on to display the selected roles and available roles for selection;
- A list of role names will be displayed, and the roles the user has access to will have the checkbox checked;
- Uncheck the checkboxes of the roles you want to remove from the user;
- Click on ;
- To finish, click on .
Roles function as permissions, enabling or restricting access to cube data. This depends on how they are configured.
For more information on creating and configuring roles, visit: Security - Roles
¶ 4.4. Functionalities
- After selecting a user from the list, click on in the security section of the ribbon.
In Functionalities, you can manage the features the user can execute within a specific application. To configure these, follow the steps below:
-
In Application, click on
to display the applications available to the user; -
In User Resources, you can manage the features of each profile. Click on
 to select functionalities through a checkbox:
Click to expand the options for the Administrator profile
| Functionality |
|---|
| Select all |
| Manage application security (full)(multi-app) |
| Manage system users |
| Manage system parameters and settings |
| Manage load routines |
Click to expand the options for the Manager profile
| Manager |
|---|
| Select all |
| Create and view dashboards/maps |
| Create and view data entry forms |
| Create and view profitability analysis |
| Create and view what-if scenarios |
| Unlock cubes locked by another user |
| Execute data loads |
| Manage lane structure |
| Manage data table structure |
| Manage trigger structure |
| Manage process structure |
| Manage application structure/model |
| Manage application security |
| Manage formulas |
| Manage Workflow |
| Manage XBRL |
| Enable formula editing |
| Enable formula execution |
| Pause instance |
| Personify action |
| Pin instance |
| Publish process |
| Synchronize management reports |
| Sysphera Excel Add-In with all functionalities |
| Transfer responsibility for instances |
| View process |
| New scenario wizard |
| Simulation wizard |
Click to expand the options for the Analyst profile
| Analyst |
|---|
| Select all |
| Act in the workflow with any task type |
| Execute formulas in forms |
| Export XBRL |
| Allow reading of comments in intermediate-level cells |
| Allow reading and writing of comments in intermediate-level cells |
| View dashboard |
| View details |
| View formula |
| View data entry forms |
| View management reports |
Only functionalities according to the profile defined in the Application tab will be enabled.
-
To remove functionalities, uncheck the checkbox to remove a specific functionality, or click on
 to remove all functionalities from a profile.
 -
Click on
; -
To finish, click on
.
We also have Group Resources, but they are only for viewing. For editing, you need to access through Groups.
¶ 4.5. Permissions
- After selecting a user from the list, click on in the security section of the ribbon;
In Permissions, we will define which objects the user can edit and view or only view, by following these steps:
- Click on to display the objects available in the system, the path, and a selection box for permission assignment;
- When clicking on manage, the list of objects will be displayed. It is possible to view the list in a hierarchical tree format, making it easier to visualize the objects and their paths.
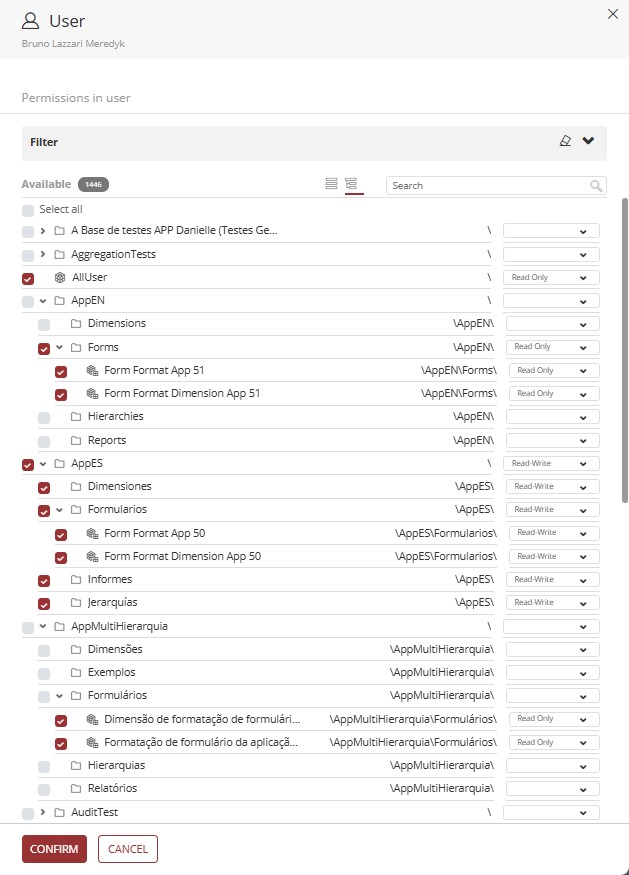
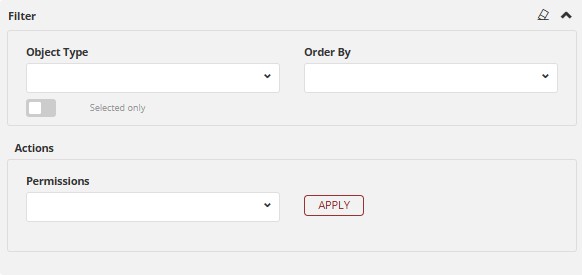
- It is also possible to apply filters by clicking on ∨ to display filtering actions.
- In the Object Type dropdown, you can select the type of object that will be displayed in the list.
- In the Sort By dropdown, the following options are displayed: Ascending Order and Descending Order.
- We have a Selected Only toggle button; when enabled, only the objects that are selected for the user will be displayed in the list.
- In Permissions, we have a selection box; when clicked, the options are displayed: Read-Only and Read-Write. When you click Apply, all selected objects will have the chosen permission applied.
- Check the checkbox of the objects you want to enable permissions for the user, or uncheck the ones you want to disable;
- Next to the object name, we will see its path, and there will be a box to select the user's access permission (Read-Only or Read-Write);
- Click on
 to finalize the selection.
 - Click on ;
- To finish, click on .
A user can only grant permissions to objects for which they have permission.
¶ 4.6. Services
Services were created to allow an external service to connect to T6 via API in a practical way.
They are linked to the user and use the user's permissions and functionalities;
Services will be used in server-to-server situations;
When a service wants to consume data from T6 without the need to access the interface and without the need for a logged-in user;
To create a service, follow these steps:
- Click on
 to register a new service;
 - Fill in the Name of the service;
- Optionally, you can fill in an Expiration Date for the service (if no date is defined, the token will be valid until the service is deleted);
- In Token, the token will be generated when you click add;
 : Click to show or hide the generated token;
 : Click to copy the token to the clipboard;
- The generated token will be used to call the API
qablue.tech6cloud.com/api/Service/Execute(in this example, qablue is the name of your domain.);- This API does not require authentication, as it will use the token to authenticate;
- After clicking , the created service will be displayed in the previous panel as a list;
- To edit a created service, click on
 ;
; - To delete a created service, click on
 .
.
The generated token is used to make a request to the application via the API: qablue.tech6cloud.com/api/Service/Execute;
-
In the headers, we will only include Content-Type since we are sending content to T6. The method used will always be POST.
-
In the Request Body, we will define what will be done through the service. The first required information is a URL (the URL will be the internal T6 service you want to use), then you must provide the generated Token, which will authenticate the service (if the token has expired or is invalid, execution will be blocked with an error). With these two pieces of information, you can execute the API and receive a response with the requested information.
-
If we add Data to the Request Body, the system will internally recognize it as a POST.
Example of Request Body:
{
  "Url":"Resource/GetWords",
  "Token":"2b2a8d095b838740bc91016cd929ab0d771",
  "Data":["Options","Help","Logout"]
}
The services tab is only displayed for multi-admin users.
If logged in as a multi-admin user, you can enable the services tab for other users, otherwise, you cannot.
¶ 4.7. Parameters
In Parameters, we can define security standards for the user regarding passwords and login.
- When accessing the Parameters section, we will have:
- Inactivity period after the last login for which the password must be reset (days);
- Password expiration time; *
- Password history verification; *
- Session expiration interval; **
- Multi-factor authentication (none or email); ***
For more information on the mentioned parameters, access the links:
* - Password Reset
** - Session Timeout
*** - Two-Factor Authentication
- After filling out the parameters, click on and finally on .
We have a level of granularity that applies parameter configuration hierarchically, with the configuration prioritized as USER → GROUP → SYSTEM.
¶ 5. Q&A
Frequently Asked Questions
1. What user profile types are available in T6?
There are 4 main profile types:
Analysts: Participate in Workflow, use Data Entry, and view reports;
Managers: Manage the T6 solution, modeling, form creation, and security management. Managers have access to all modules, but not all functionalities inside them. Full functionality access is restricted to administrators;
Administrators: Manage environment, infrastructure, and data load routines, and have full access to modules and application data;
Planners: Focus on data entry and analysis, with access to forms, reports, and dashboards.
2. What are the prerequisites for creating users?
To create users in T6, the following functionalities must be enabled:
Administrator: Manage application security (full) (multi-app) and Manage system users;
Manager: Manage Application Security.
3. Which fields are required when creating a user?
The required fields for user creation, marked with *, are:
Login
First Name
Last Name
Licensed Planning Profile
Licensed Consolidation Profile
Email
Password
Confirm Password
4. How do I force a user to change their password on the next login?
To force a user to change their password on the next login attempt, select the checkbox Force password change on the next login of this user while creating or editing the user.
5. How do I add a user to a group?
To add a user to a group, follow these steps:
- Access Explorer and locate the desired user;
- Select the user and click Permissions in the security section of the ribbon;
- Go to the Groups tab;
- Click Manage;
- Select the checkboxes for the desired groups;
- Click Apply and then Save.
6. What user permission types can be assigned to objects?
In user permissions, the following options are available:
Read-Only: The user can only view data, without editing permission;
Read-Write: The user can view and edit data.
7. What is user impersonation and how do I use it?
User impersonation allows you to "assume" another user's identity to view shared data and objects.
To use user impersonation, follow these steps:
- Access the T6 main menu and select Access Control;
- Click Impersonate User;
- Select the desired user from the list and click Impersonate;
- To return to the original user, click Logout and you will be logged in again automatically.
8. What are Services in user permissions and how do I add them?
Services allow external API connections without using the interface or a logged-in user. They are useful for server-to-server integrations using authentication tokens.
To add services in user permissions, follow these steps:
- Access Explorer and locate the desired user;
- In the ribbon, click Permissions in the security section;
- Go to the Services tab;
- Click Add;
- Fill in the Service Name and, optionally, the Expiration Date (the Token is generated automatically, and you can view or copy it using the icons beside it);
- Click Confirm;
- Click Save to finish.
9. When is it not possible to remove a user?
A user can only be removed if they are not associated with any task as Planner, Data Reporting Responsible, or Reviewer, and are also not associated with any group.
10. Who can see the Services tab in user permissions?
To view and manage the Services tab, the user must have the multi-admin role.