¶ 1. Overview
Forms are one of the possible ways to update data within T6. They allow data entry (quantities, percentages, values, etc.) for more detailed and specific planning by the responsible party.
The form is the tool used by Planners and Data Reporting Managers to carry out the company's planning in detail or adjust consolidation data, respectively.
¶ 1.1. Prerequisites
To be able to create and edit forms within T6, the following requirements must be met:
-
The user must have the Manager functionality: Create and View Data Entry Forms enabled;
-
The user must be added to a Global Group, with the Manager functionality: Manage Explorer enabled;
¶ 2. Features
A form configuration consists of five steps: defining properties and options, defining the dimension members to be displayed, adding related reports, selecting the desired relationships between dimensions, and creating calculated members.
The options Related Reports, Relationships Between Dimensions, and Calculated Members are optional.
Forms within T6 Enterprise serve as data windows, allowing users to easily register and manage information. Each form is designed to be intuitive and adaptable, enabling clients to input data to feed our analysis model. By configuring row, column, and page fields, you shape the data structure that makes up each form, allowing flexible customization to meet your specific needs.
¶ 3. Creating and Editing Forms
To create a form within T6, follow these steps:
- In the T6 main menu, access the Explorer option;
- Inside Explorer, navigate to the folder where you will create your form;
- After accessing the folder, in the ribbon, click on New Item, and under Data-Entry, select Form;
- Once the object is created, select it and click Open in the ribbon;
- The form editing page will open, where you will configure your form according to your needs;
¶ 3.1. Properties/Options
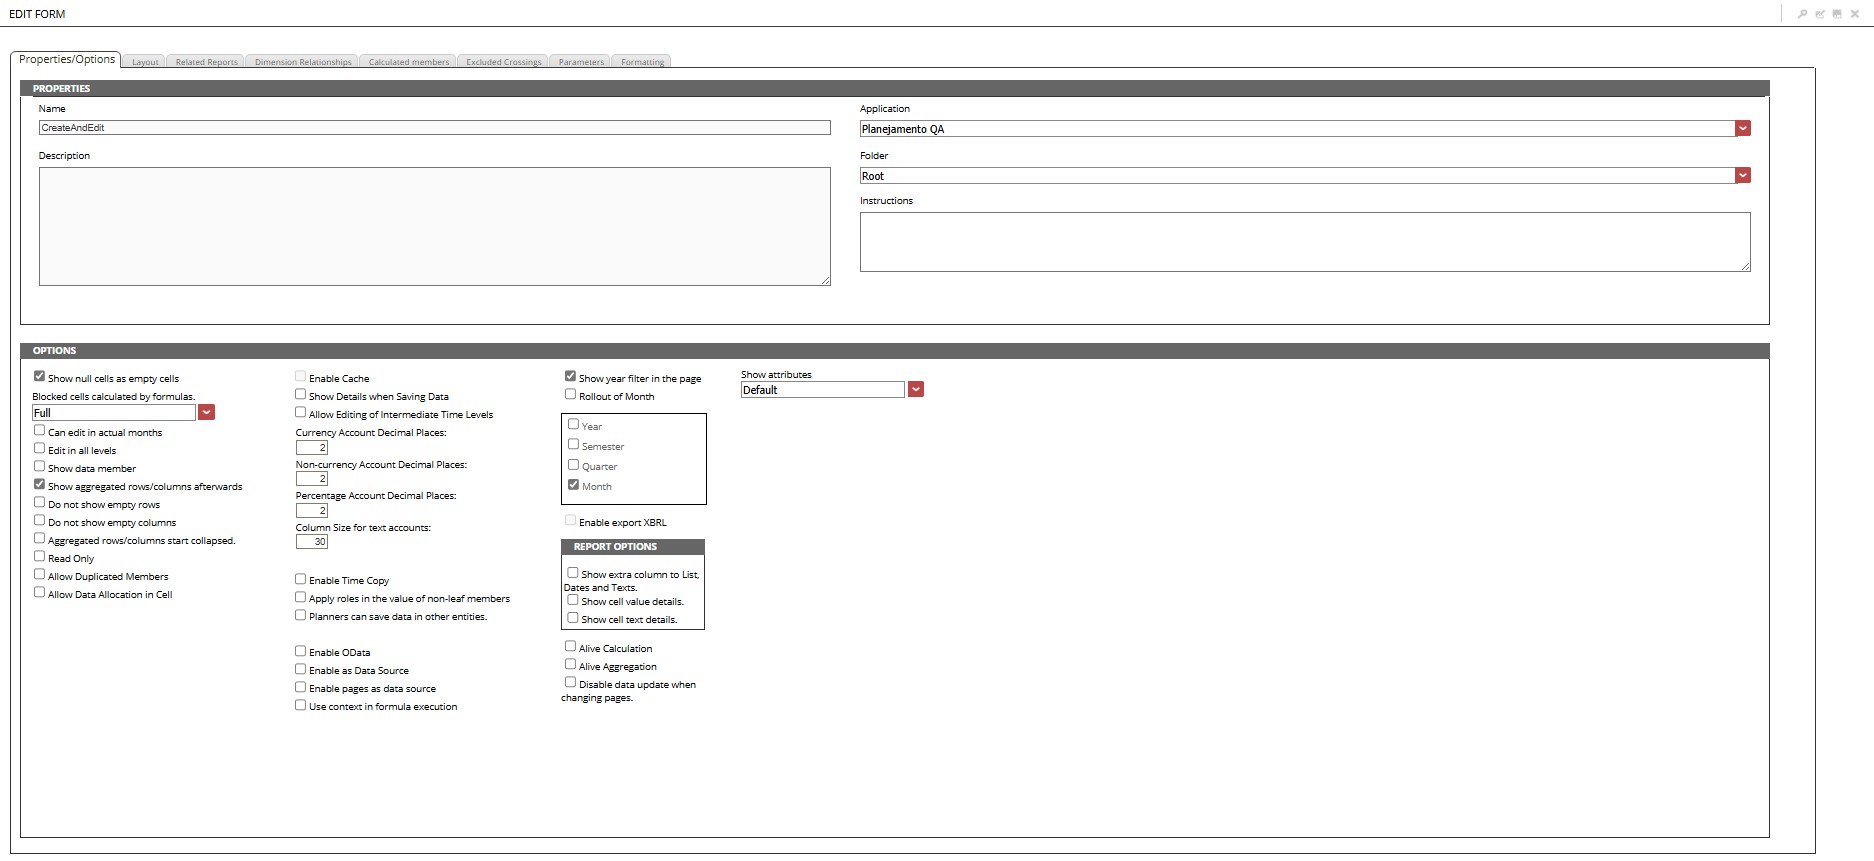
¶ 3.1.1 Properties
The Properties/Options tab allows you to define the basic details and visualization and interaction options of the form.
- In the Properties step, we will define the following fields:
- Name: Field where we will define the display name of our form;
- Application: Dropdown field where we will select the application to which this form will be linked;
- Description: Field where we can provide a brief description of the form (displayed in the Explorer listing);
- Folder: Dropdown field where we can change the location where the form will be saved and displayed;
- Instructions: Field where we can provide instructions about the form in question (displayed only when opening the form);
¶ 3.1.2. Options
- In the Options step, we will define the following fields:
| Name | Description | Default Value |
|---|---|---|
| Show null cells as empty | When enabled, null cells are displayed without any data | Enabled |
| Blocked cells calculated by formulas | We have three options: None, Account, and Full | Full |
| Can edit in actual months | When enabled, allows editing in actual months | Disabled |
| Edit in all levels | Check this option to allow value editing at all levels and not just leaf members (when enabled, the Show member data checkbox is automatically enabled) | Disabled |
| Show data member | Check this option to display member data for all members that have children (If the above option is enabled, the member data will be mandatorily visible) | Disabled |
| Show aggregated rows/columns afterwards | Check this option to display total rows below the hierarchy of members that compose their value | Enabled |
| Do not show empty rows | Check this option to hide rows that do not contain any value | Disabled |
| Do not show empty columns | Check this option to hide columns that do not contain any value | Disabled |
| Aggregated rows/columns start collapsed | Check this option to display total rows/columns initially collapsed (improves loading performance in forms with a large number of cells) | Enabled |
| Read-only | When enabled, data editing is not allowed | Disabled |
| Allow duplicate members | When enabled, does not allow the addition of duplicate members | Disabled |
| Allow data allocation in cells | When enabled, a box with the options Proportional Allocation, Fill Leaf Members, and Custom appears, allowing the selection of the available allocation type for the form | Disabled |
| Enable cache | Check this option to enable caching on the first execution of the form, so subsequent executions of the same form will take less time | Disabled |
| Show details when saving data | Check this option to view details when saving a form. These details may include Formula Execution, Data Updating, etc. | Disabled |
| Allow editing of intermediate time levels | Check this option to allow editing of intermediate members in the time dimension. Examples of intermediate members include semesters and quarters. | Disabled |
| Currency Account Decimal Places | Defines the number of decimal places for monetary accounts | 2 |
| Non-currency Account Decimal Places | Defines the number of decimal places for non-monetary accounts | 2 |
| Percentage Account Decimal Places | Defines the number of decimal places for percentage accounts | 2 |
| Column Size for text accounts | Specifies the column width for text accounts displayed in the form | 30 |
| Enable Time Copy | Check this option to replicate the account value in all valid leaf members in the Time dimension | Disabled |
| Apply roles in the value of non-leaf members | Allows entering values at intermediate levels, allocating the value to leaf members | Disabled |
| Planners can save data in other entities | Check this option to allow other Planners/Data Reporting Managers, besides the one defined in the entity, to enter data in the form | Disabled |
| Enable OData | When enabled, allows exposing the form data as an OData service, facilitating querying and integration with other applications, such as BI tools and custom scripts. | Disabled |
| Enable as data source | Allows saving the form as a Data Set in the Reporting Server for use in SDP | Disabled |
| Enable pages as data source | Allows saving pages as a Data Set in the Reporting Server for use in SDP | Disabled |
| Use context in formula execution | When enabled, formula execution in the form will consider the cube context | Disabled |
| Show year filter on the page | If enabled, displays a new panel with the options Year, Semester, Quarter, and Month | Enabled (month enabled) |
| Rollout of month | Check this option to display the time starting from the selected month defined by the time dimension on the page (Filter). Only months from the selected month onward up to the selected scroll number will be displayed (The chosen number must be a multiple of twelve) | Disabled |
| Enable export XBRL | Check this option to enable the form export button in the XBRL standard (The checkbox will only be enabled when one or more XBRL models are registered in the application.) | Disabled |
| Show extra column to List, Dates, and Texts | When enabled, reports will display an additional column for list, date, and text data | Disabled |
| Show cell value details | When enabled, reports will also display the cell value | Disabled |
| Show cell text details | When enabled, reports will also display cell details | Disabled |
| Alive Calculation | When enabled, executes formula calculations in real time when altering any data (used only for basic operations +, -, *, / and the function IFF) | Disabled |
| Alive Aggregation | Allows real-time updating of aggregated values without needing to refresh the page or reload the form (can only be used for basic operations +, -, *, and /) | Disabled |
| Disable data update when changing pages | When enabled, switching pages in the form will retain unsaved inserted/altered data until the form is closed or saved | Disabled |
| Display attributes | We have three options: Default, Right after members, and Right before members | Default |
¶ 3.2. Dimension Layout
The layout tab allows you to define the main structure of the form, establishing how the data is displayed in the form.
To work with forms, we need to have at least one dimension arranged in rows and one dimension arranged in columns.
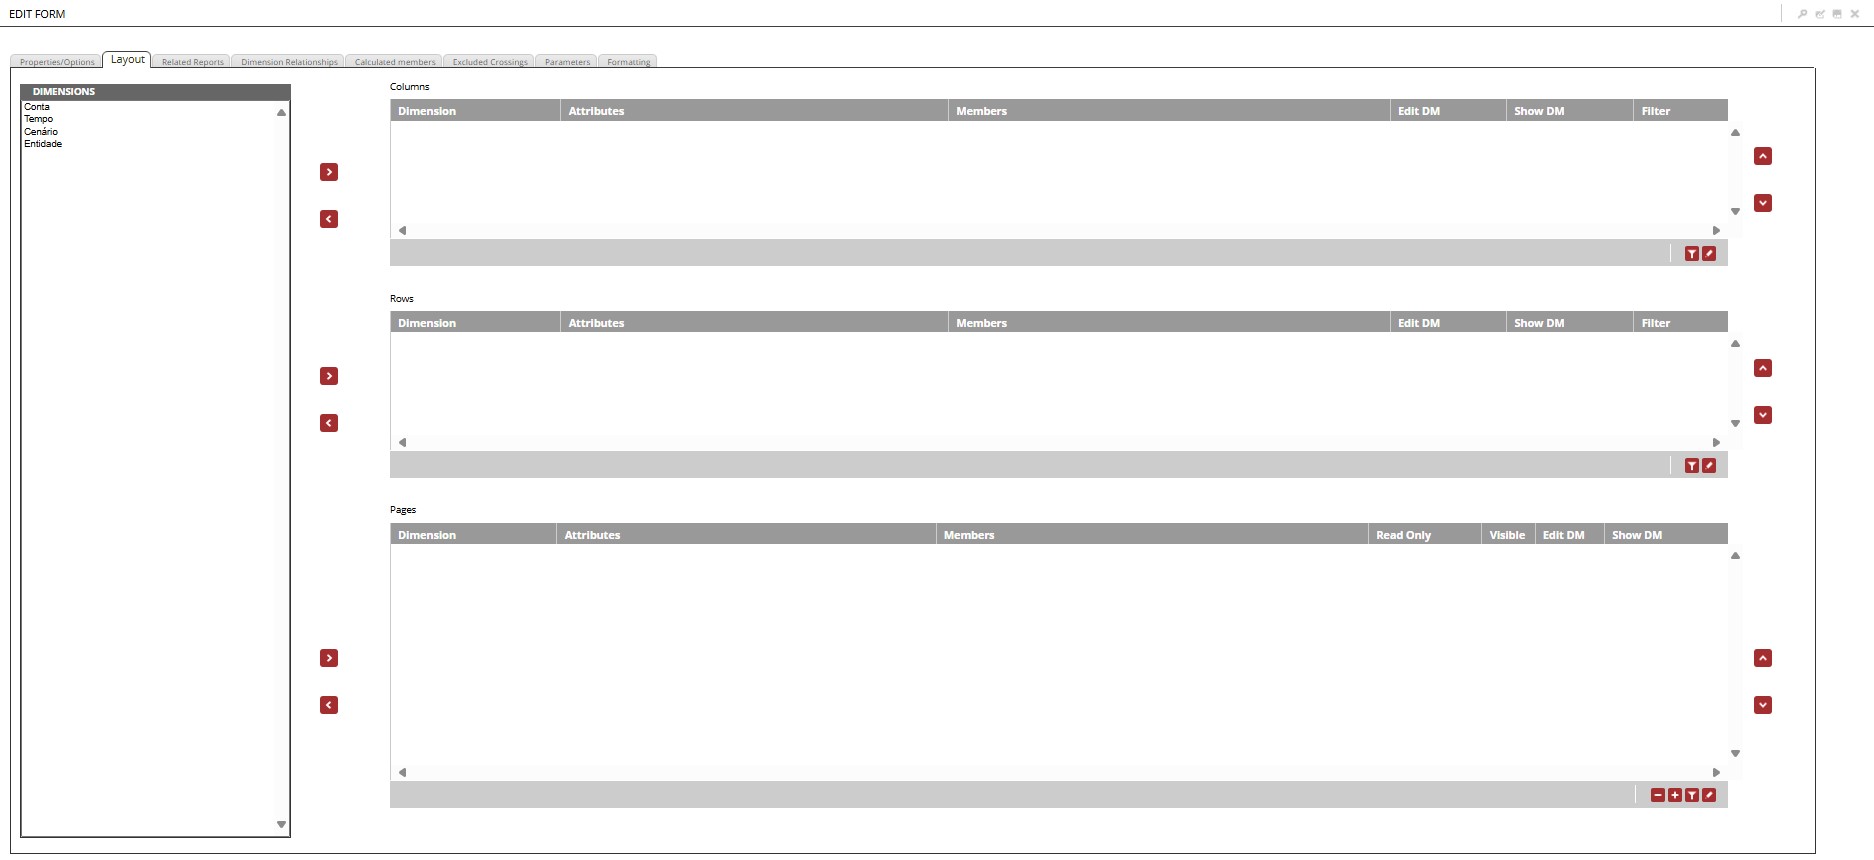
The creation of a form is only possible if all dimensions contain registered members.
If our form has more than one dimension in its row or column arrangement, the first displayed dimension will take into account the number of members to be displayed in the second dimension and will aggregate the cells in the header of the member from the first added dimension.
¶ 3.2.1 Dimensions
The dimension listing displays all available dimensions for insertion into columns, rows, pages, or constraints.
All dimensions must be added to one of the form’s structural filters (Columns, Rows, and Pages).
- Columns: Displays the list of dimensions added to the form’s columns. The members defined for each column dimension appear in the top header of the form.
- Rows: Displays the list of dimensions added to the form’s rows. The members defined for each row dimension appear in the headers on the left side of the form.
- Pages: Displays the list of dimensions added to the form’s pages. The members defined for each page dimension appear in the selection boxes in the panel located on the right side of the screen.
In the dimension layout listing, the following columns are displayed:
| Column | Description |
|---|---|
| Dimension | Name of the dimension added to the list |
| Attributes | List of selected attributes for the added dimension |
| Members | List of selected members for the added dimension |
| Read-Only | Check this option to define dimension constraints for the form |
| Visible | Check this option to make the constraint definition visible in the form display |
| Edit DM | Check this option to allow editing of Member Data |
| Show DM | Check this option to display Member Data for the selected members |
| Filter | Checked option indicating whether a filter has been created for the dimension |
The Read-Only and Visible columns are available only for pages.
After distributing the dimensions, we will select the members to be displayed in the form. To do this, we will double-click on the Member field of the selected dimension. A new window will open where we will make the member selection.
¶ 3.2.2. Member Selection
Allows the selection of members from the selected dimension using the specified aggregation.
- Hierarchy: Displays the list of available hierarchies for the selected dimension.
This option will not be available for dimensions that do not have created hierarchies.
- Available Members: Displays the list of available members for selection;
- Aggregation: Select the type of aggregation to be applied to the selected members;
Click to display the available aggregation options
| Aggregation Type | Description |
|---|---|
| Member | Returns only the selected member |
| Descendants | Returns all descendants of the selected member, excluding the member itself |
| Descendants (inc) | Returns all descendants of the selected member, including the member itself |
| Ancestors | Returns all members at a hierarchical level above the selected member, excluding the member itself |
| Ancestors (inc) | Returns all members at a hierarchical level above the selected member, including the member itself |
| Same Level Members | Returns all members at the same hierarchical level as the selected member, excluding the member itself |
| Same Level Members (inc) | Returns all members at the same hierarchical level as the selected member, including the member itself |
| Parent Member | Returns only the parent member of the selected member (if applied at the root, no data will be displayed) |
| Parent Member (inc) | Returns the parent member of the selected member, including the member itself |
| Children Member | Returns only the direct children of the specified member |
| Children Member (inc) | Returns the direct children of the specified member, including the member itself |
| Descendants Without Children | Returns only the descendants of the selected member that have no children |
| Member Data | Returns the data associated with the selected member |
| Children Data Member | Returns the data associated with the direct children of the selected member |
| Descendants Data Member (inc) | Returns the data associated with the descendants of the selected member, including the member itself |
| Exclude Member | Returns all members of the hierarchy, excluding the specified member |
| Exclude Data Member | Returns all data from the hierarchy, excluding the data of the selected member |
| Previous | Returns the member immediately before the selected member |
| Next | Returns the next member in the same hierarchy |
| Previous (Relative to Parent) | Returns the previous member in relation to the parent in the selected member’s hierarchy |
| Next (Relative to Parent) | Returns the next member in relation to the parent in the selected member’s hierarchy |
| Previous (Relative to Root) | Returns the previous member in relation to the root of the selected member’s hierarchy |
| Next (Relative to Root) | Returns the next member in relation to the root of the selected member’s hierarchy |
| Previous (inc) | Returns all previous members of the selected member, including the member itself |
| Next (inc) | Returns all subsequent members of the selected member, including the member itself |
| Previous Member Same Ammount Children Root (inc) | Returns all previous members of the selected member that have the same number of children at the root, including the member itself |
| Next Member Same Ammount Children Root (inc) | Returns all subsequent members of the selected member that have the same number of children at the root, including the member itself |
In the list of available members, we will select the member we want to add to our form along with its aggregation type, then click ![]() to add it to the Selected Members list.
to add it to the Selected Members list.
We can choose not to select specific members in the layout stage. If no members are selected, the form will display all registered members in the selected dimension.
- Selected Members: Displays the list of selected members and the applied aggregation type;
To remove a member from the selected members list, simply select the member and click
.
Still on the member selection screen, we have the Attributes tab, which allows us to select attributes for the selected dimension.
- The attribute selection is divided into two areas: Filter and View;
¶ 3.3. Related Reports
Allows the association of reports with the form.
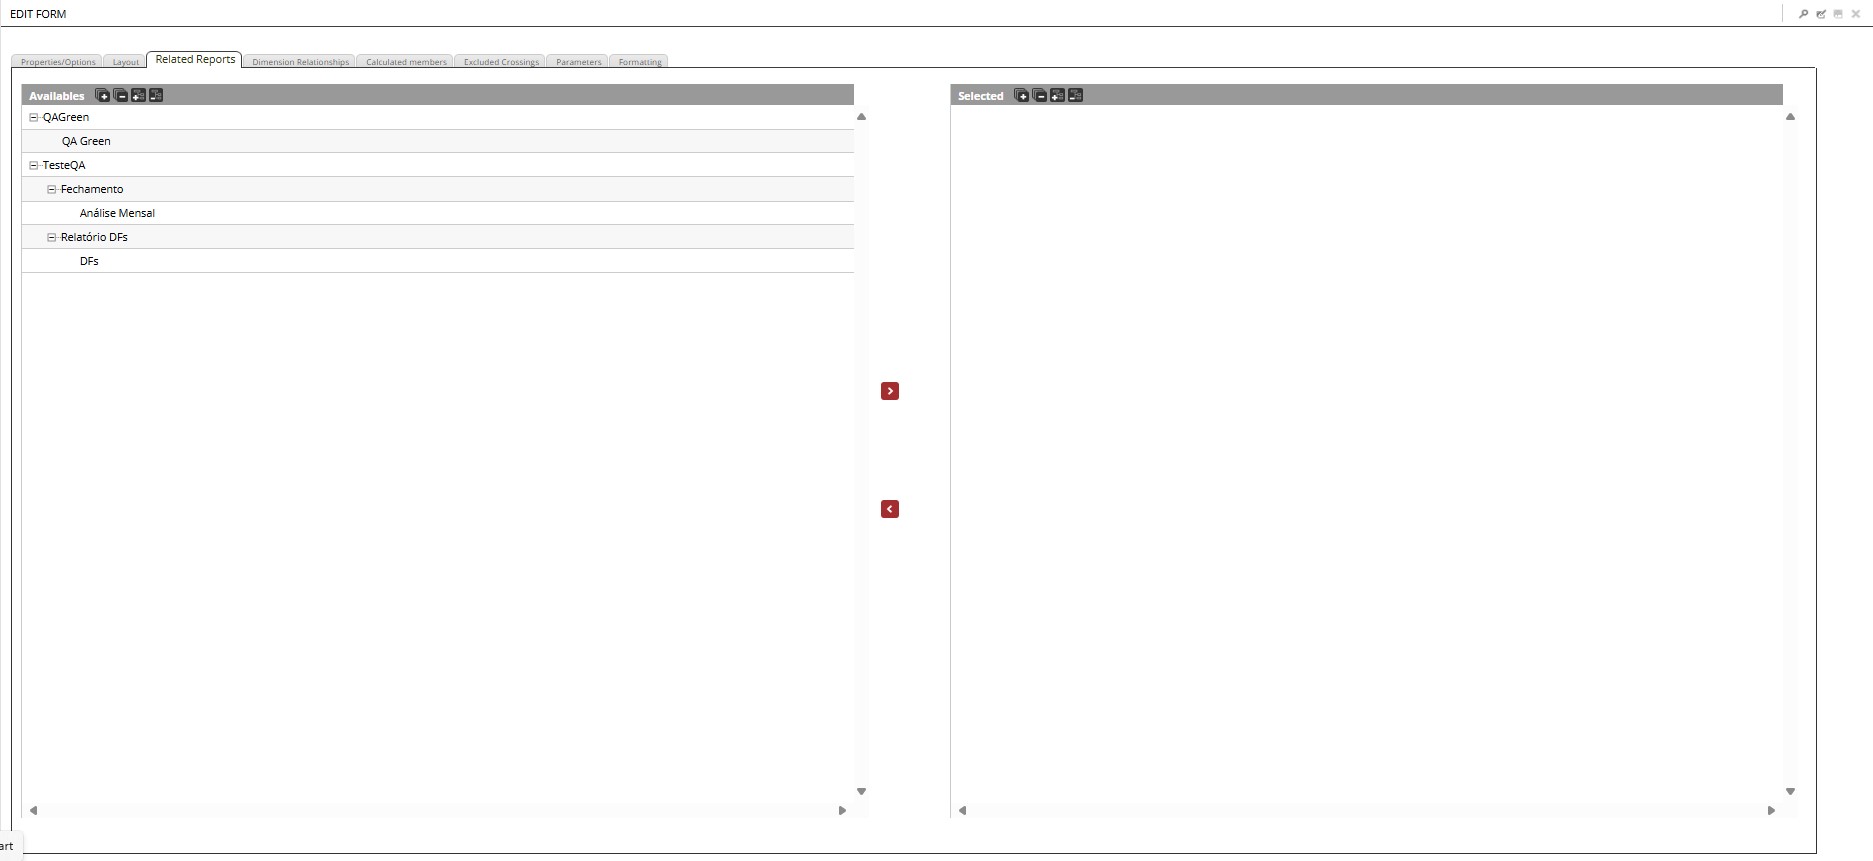
When reports are registered, they are displayed in the list of available reports for association with the form. To add a report, click ![]() . If you want to remove an added report, click
. If you want to remove an added report, click ![]() .
.
¶ 3.4. Dimension Relationships
This tab allows the selection of relationships between dimensions created in the application's model administration.
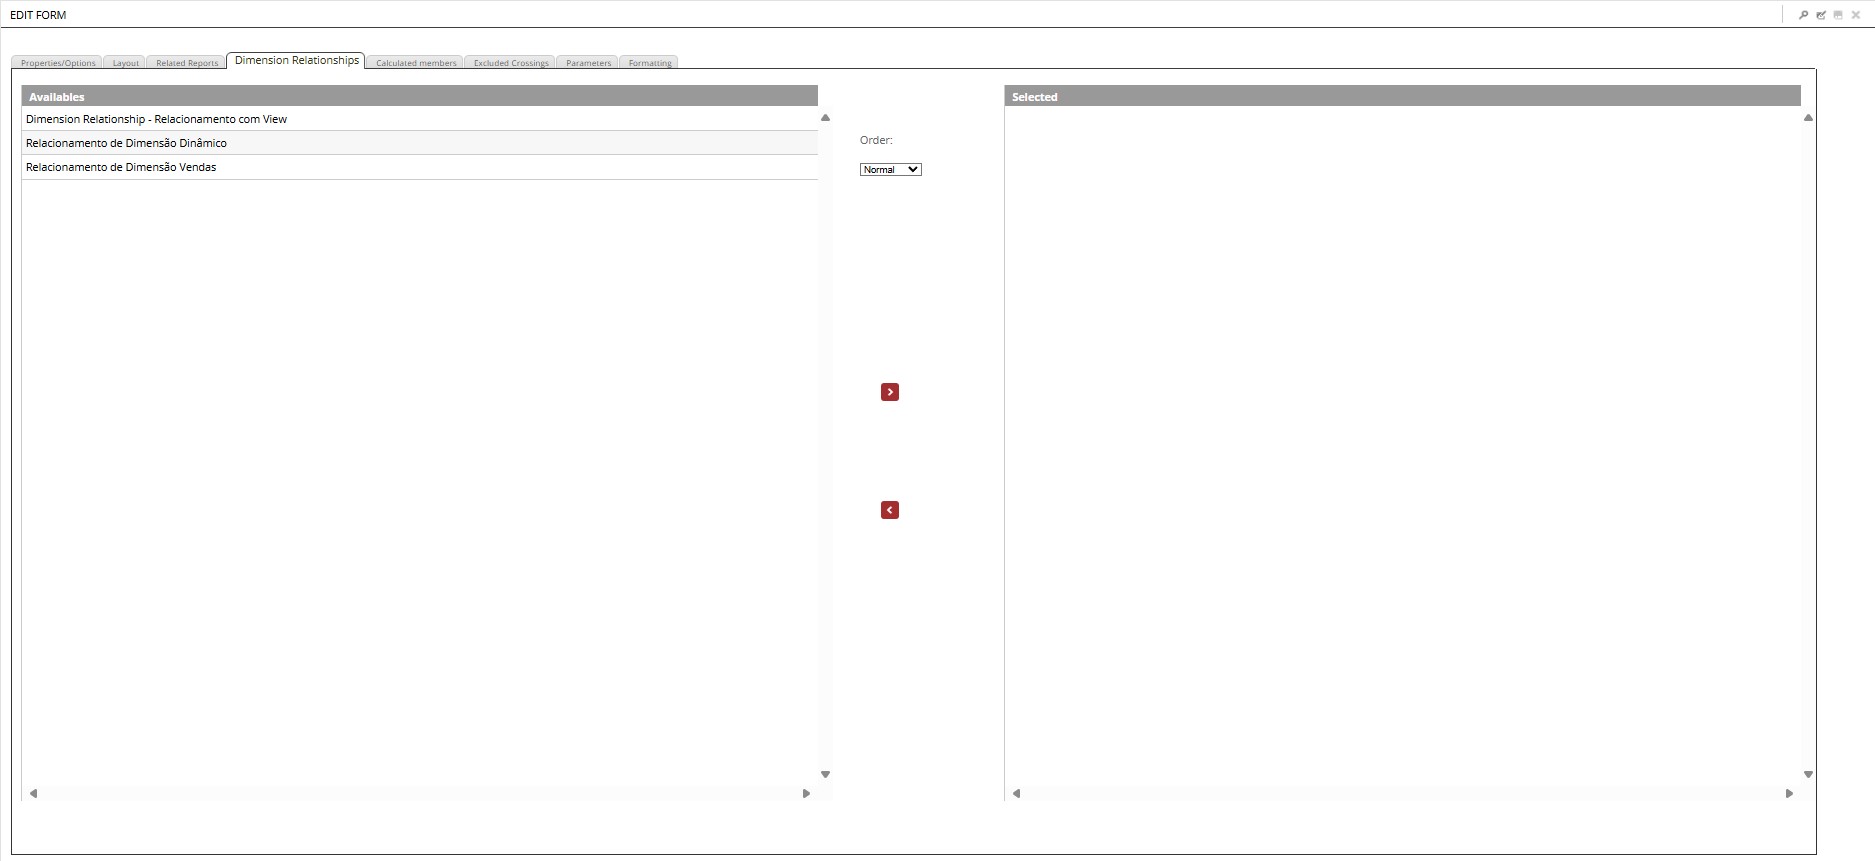
A list displays the available dimension relationships for selection. To add a relationship to the form, click ![]() . To remove a relationship added to the form, click
. To remove a relationship added to the form, click ![]() .
.
For additional information, visit: Dimension Relationships.
¶ 3.5. Calculated Members
Allows the creation of simple calculations between dimension members without the need to create formulas.
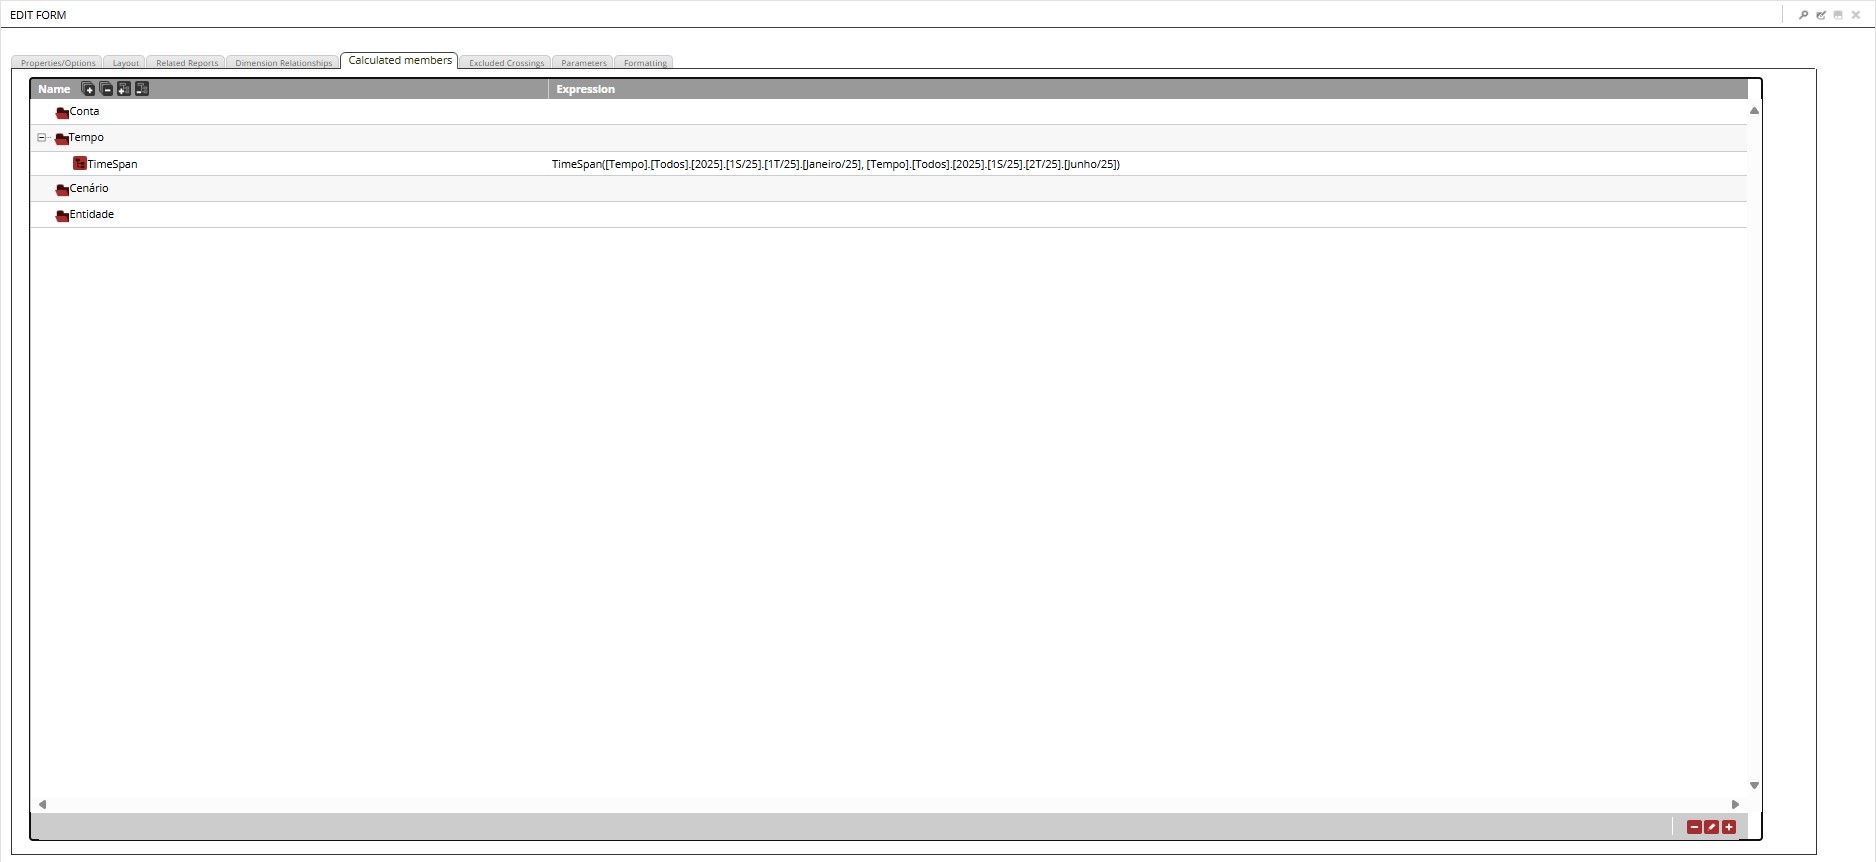
For additional information, visit: Calculated Members.
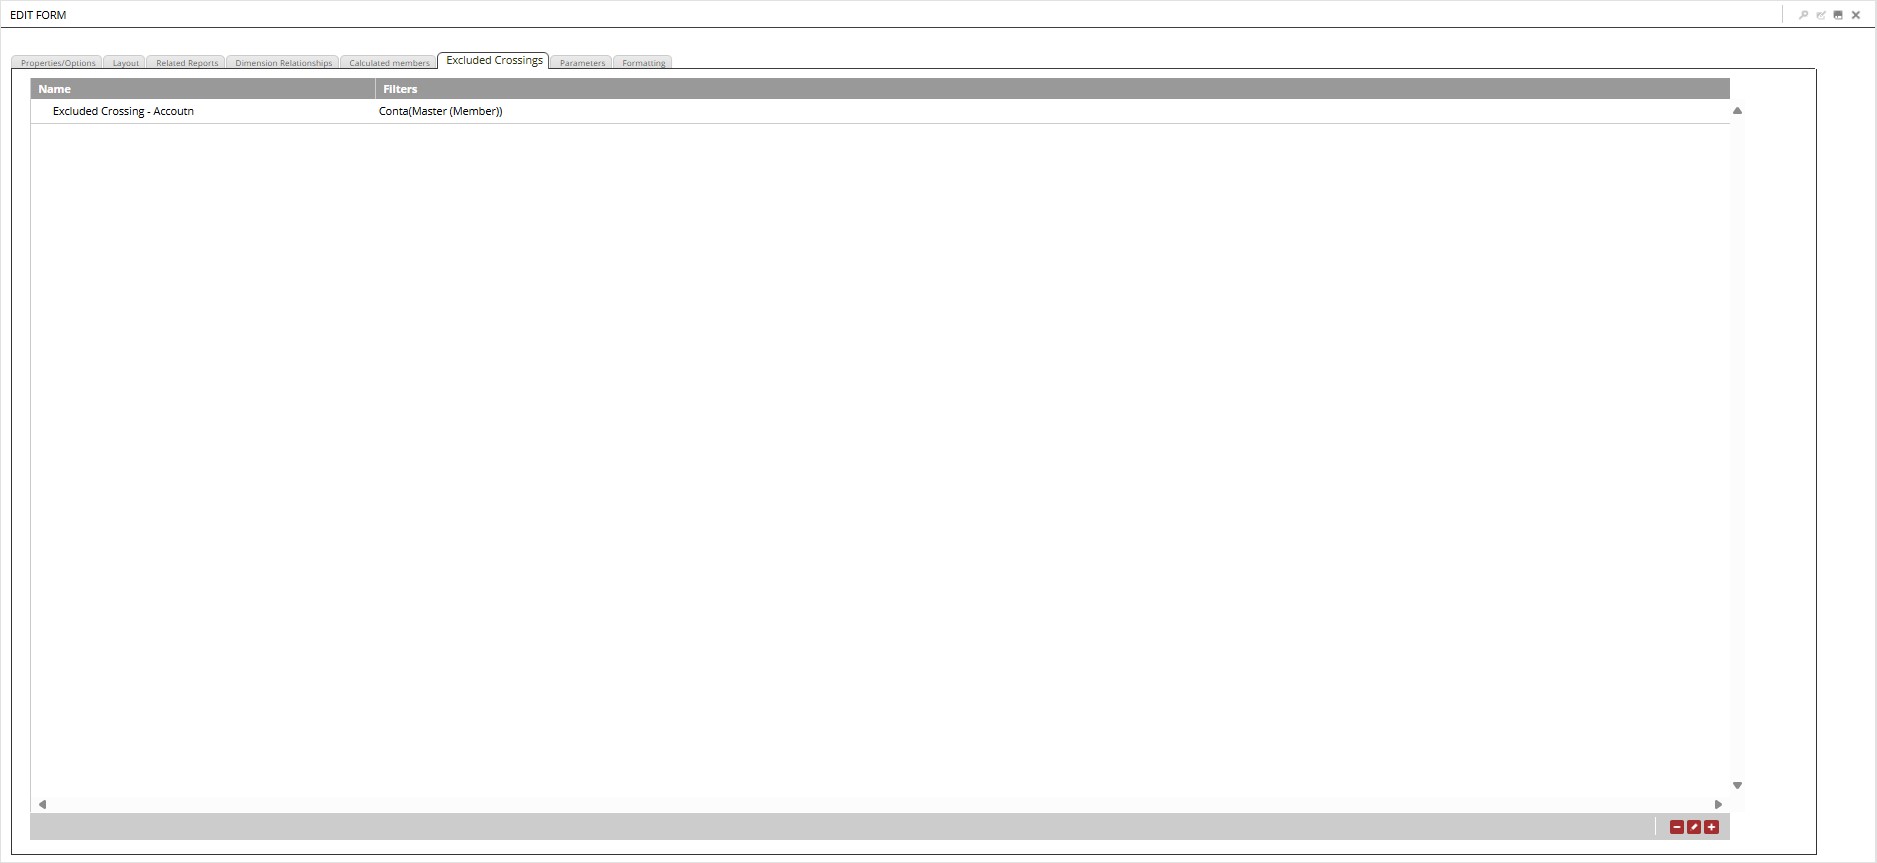
¶ 3.6. Excluded Crossings
Allows the creation, editing, and removal of crossings/combinations between members and dimensions for simple calculations between dimension members.
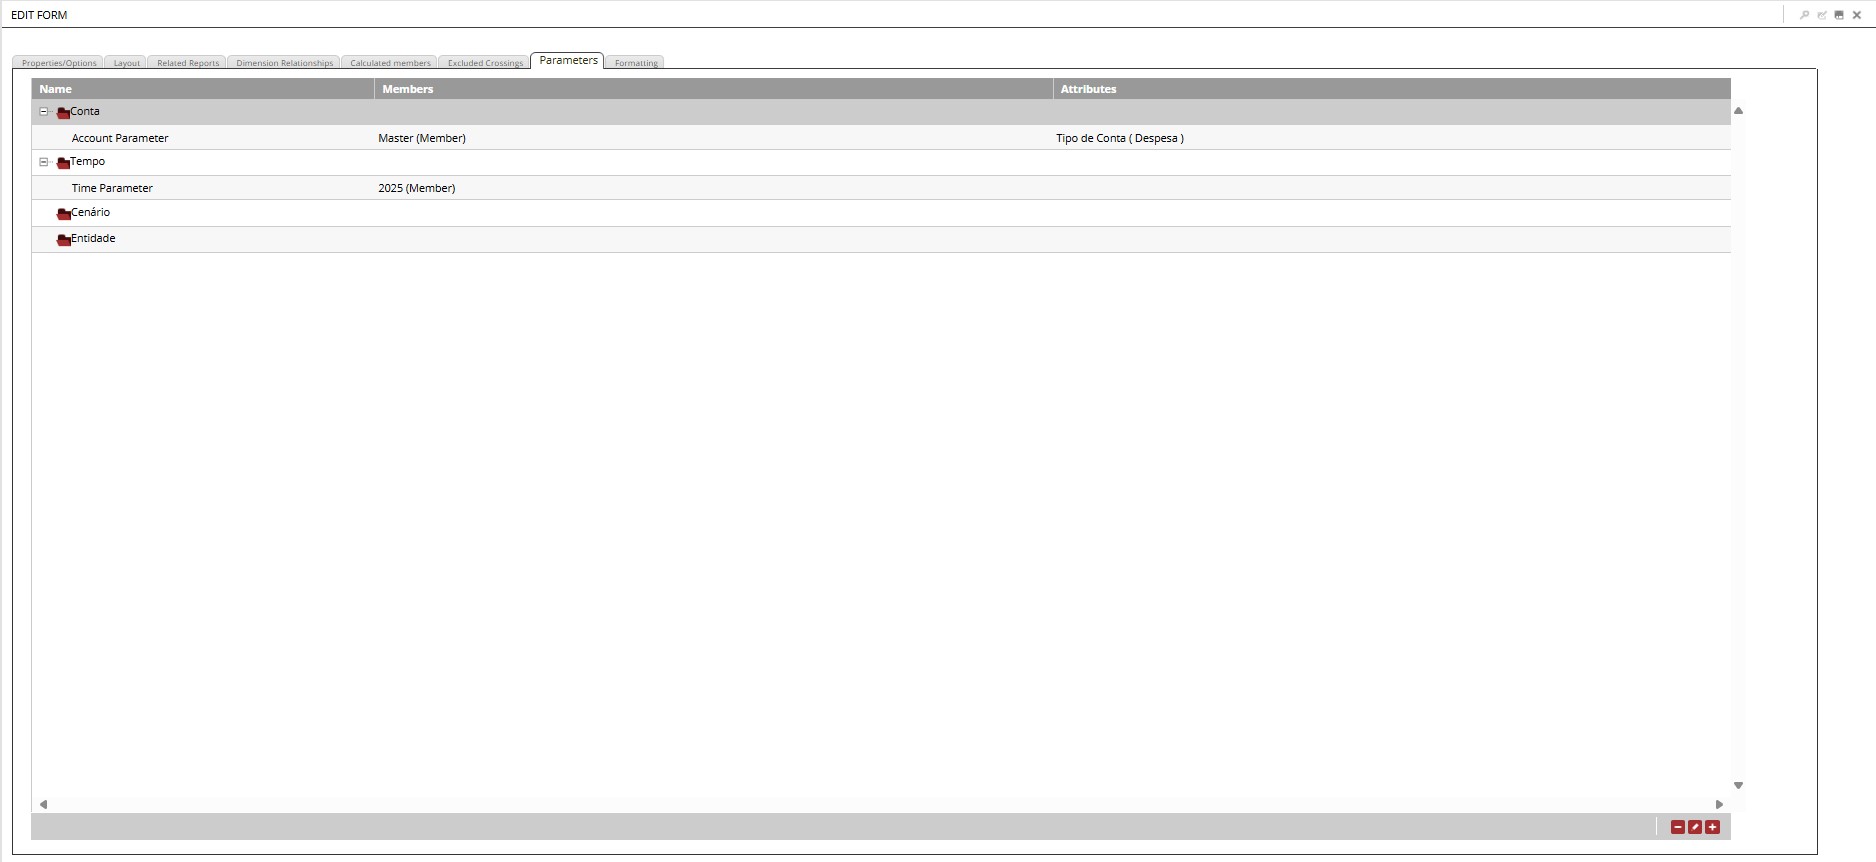
¶ 3.7. Parameters
Allows more specific filtering of dimension members within the form, helping to narrow its scope or provide alternative views in a practical and intuitive way. This enables the user to switch, for example, the base year or the planned scenario without needing to edit the form, as these parameters can also be used in calculated members.
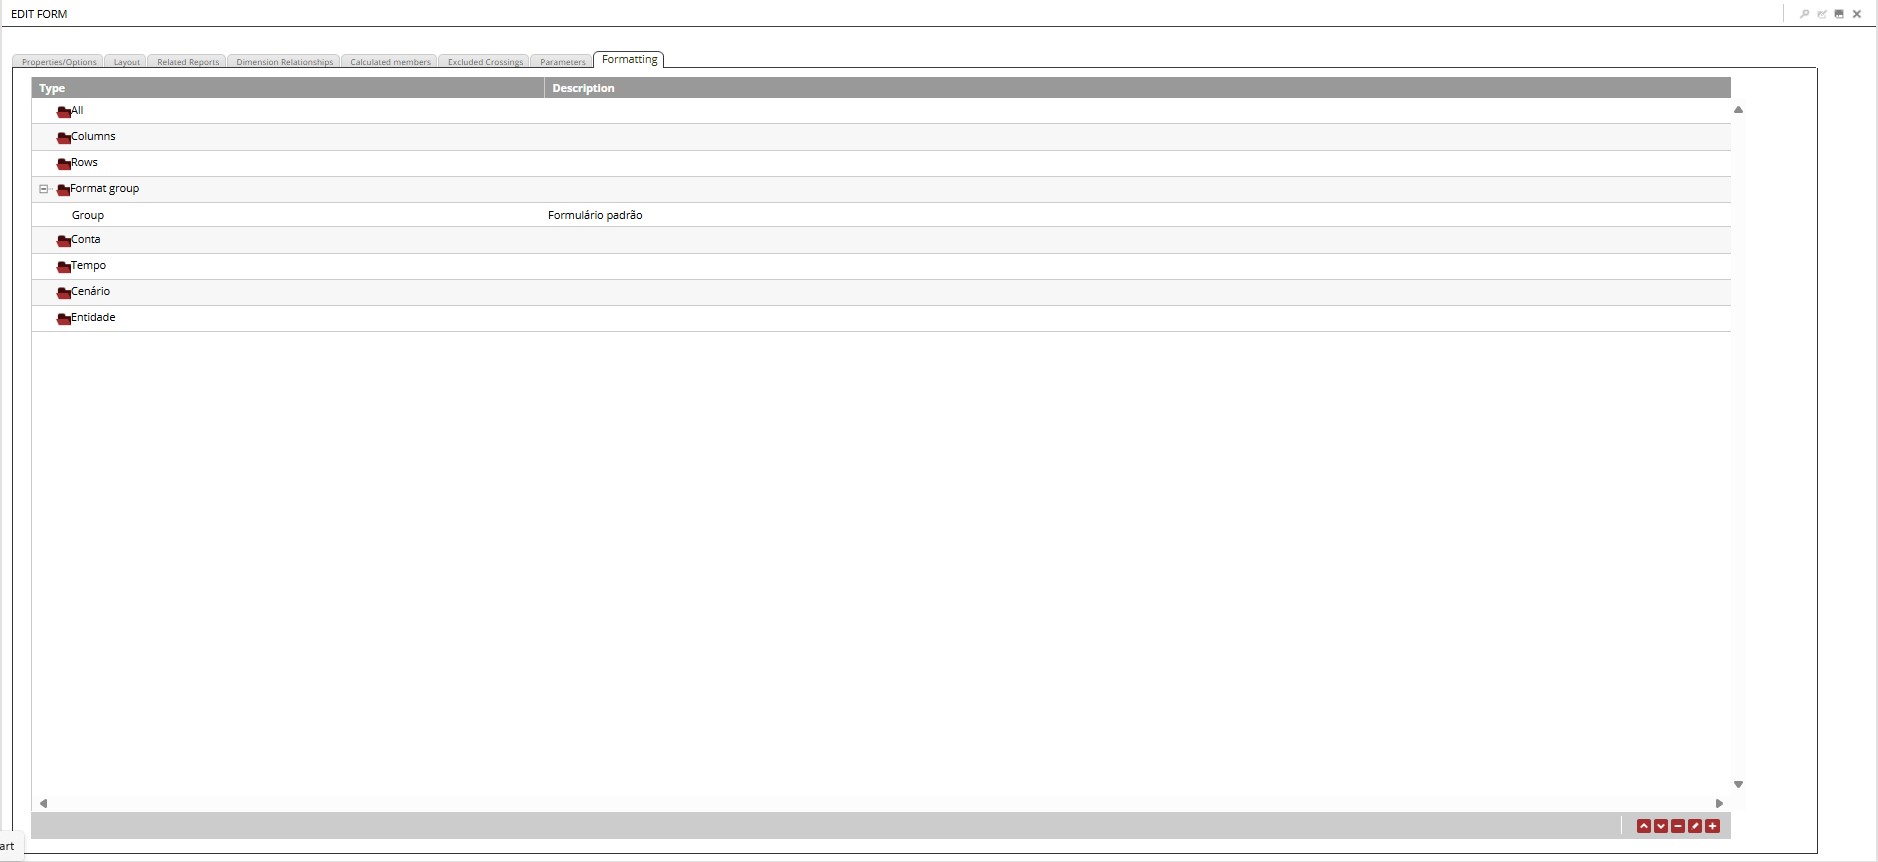
¶ 3.8. Formatting
Allows formatting of forms with changes to fill colors, font, background, and borders of Headers or values. It is also possible to apply these formats to all or specific items such as rows, columns, Dimensions, or Members.
From version 12.0 onwards, all newly created forms will have a default formatting group. If this group is deleted, the form will be displayed without any formatting.
For additional information, visit: Formatting.
After completing the form configuration, we need to save it. To do this, click the floppy disk icon in the upper corner of the page:
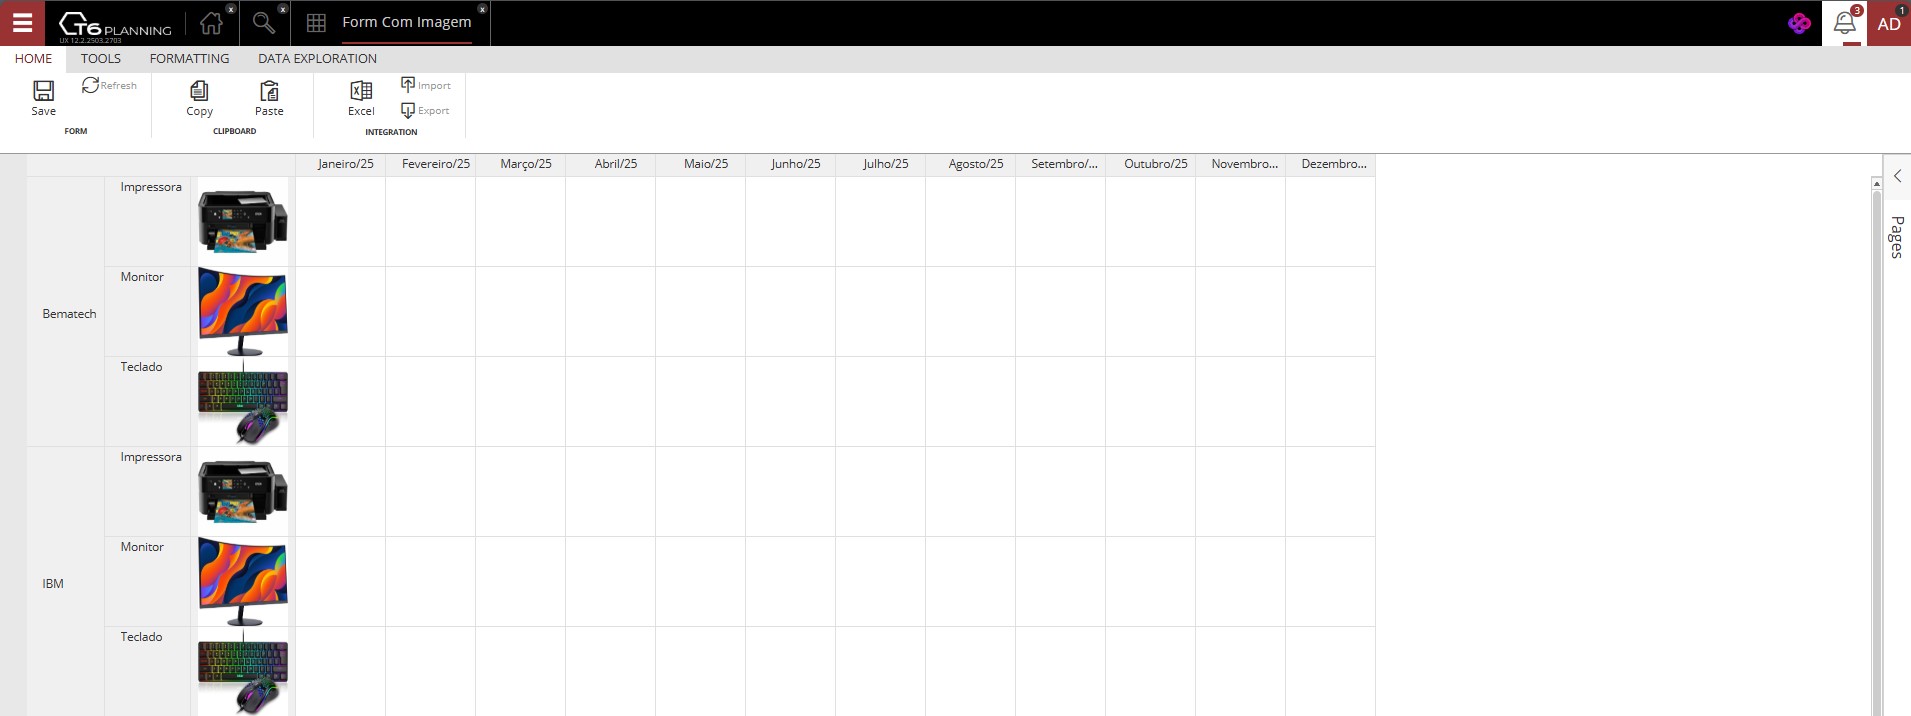
¶ 4. Adding Images to Forms
¶ Setting Up the Environment for Image Addition
We need to add a new attribute to a dimension in our application.
Adding an Attribute:
- In the explorer, access the Dimensions folder of your application;
- Select the desired dimension and click Edit in the ribbon;
- Click the plus sign (+) in the lower corner of the page;
- A new window will open, where we will name and define the attribute type;
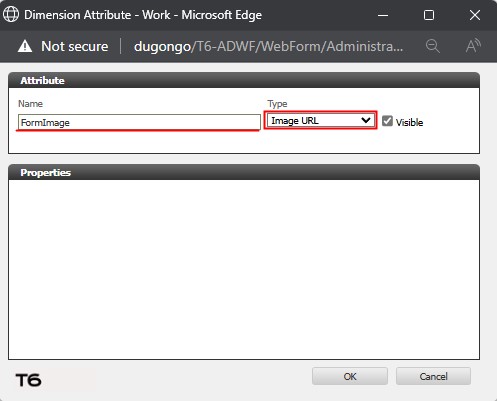
- In the Name field, add a name for the new attribute to be created;
- In the Type field, click the dropdown and select the Image URL option;
- Click OK to close the creation window;
- Click Save to finalize the creation of the Image URL attribute.
The addition of images to the form is done through the properties of a dimension member. Therefore, access the main menu of T6, go to the Modeling field, and select Designer.
- In Application, click the dropdown and select the desired application;
- In Hierarchy, click the dropdown and select the dimension where the Image URL attribute was created;
- Select a dimension member, click Tools → Show Properties;
- A side panel will open displaying the properties of the selected member, where there will be a field with the name of the attribute created earlier;
- In the Image URL attribute field, add the full URL (protocol/domain/path) of the image you want to add:
https://exampleurl.com.br/home/images/2518154
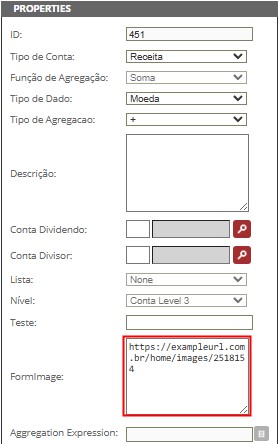
The added image will only be displayed if the URL provided in the property field is compatible with the communication protocol and the domain previously added in the Image Host Addresses parameter (for additional information, visit: Parameter Configuration).
- After adding the URL, click Save;
- To complete the process, we must publish the cube.
To view the images added to our form, select the form and click Edit in the ribbon;
- In the first tab, Properties/Options, there is the Display Attributes option, where we define where the added image will be displayed: Before the member or After the member (the default display is after the member);
- In the next tab, Disposition, we will distribute the dimensions in our form;
To be able to view the added images, the dimension containing the UrlImage attribute must be added to Row or Column.
- Select the dimension containing the UrlImage attribute, double-click it, or click
 ;
;
- A new window for member selection will open, with two tabs: Members and Attributes;
- In Members, select the member that contains the image URL added in the properties, choose the aggregation type, and click
 ;
; - In Attributes, in the View field, locate the attribute created earlier for adding images, and click to add it, then click OK;
- In Members, select the member that contains the image URL added in the properties, choose the aggregation type, and click
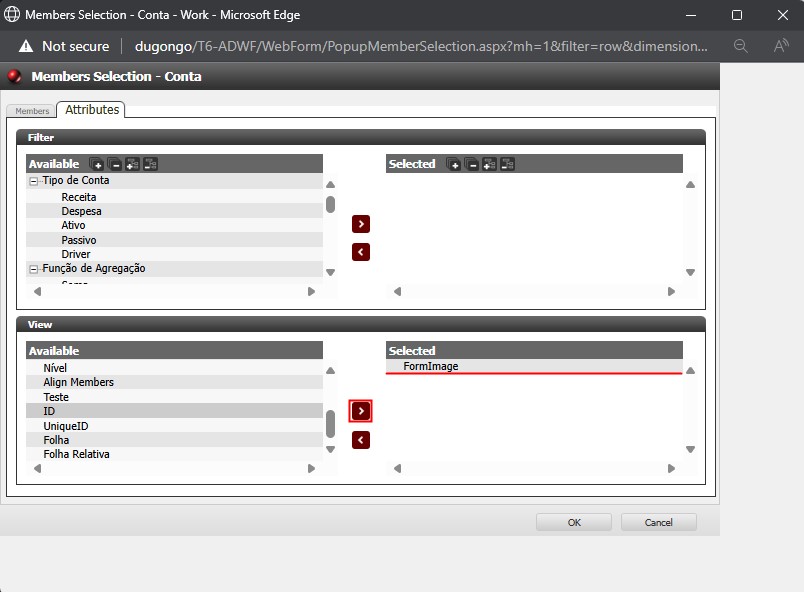
- After completing the dimension distribution and adding the necessary members and attributes, save by clicking
 ;
;
- When opening the form, the added images will be displayed according to the previous configurations.
Example: